既存のTomcatユーザーが1アプリ1組み込みサーバーなマイクロサービスアーキテクチャ時代に簡単に追いつく方法
(2015-05-08追記) こんな記事書いていたけど、いま思うと実行可能なjar/war作るだけで"マイクロサービス"だとか言っちゃうなんで笑っちゃいますね。
Javaのアプリケーションサーバーに(複数)アプリをデプロイしていく時代はもう終わったと言われ始めています。
ぼくも1月のJJUGナイトセミナーで「"war" is over」と宣言しましたね。
マイクロサービスアーキテクチャとは
1アプリ1組み込みサーバー構成は、Martin Fowlerらが書いたマイクロサービスアーキテクチャに向いています。
microservices.ioにまとまっていますが、図を見ると分かりやすいです。
これまでの伝統的な、1つのAPサーバーに複数のアプリをデプロイする方法はモノシリックアーキテクチャと説明されています。
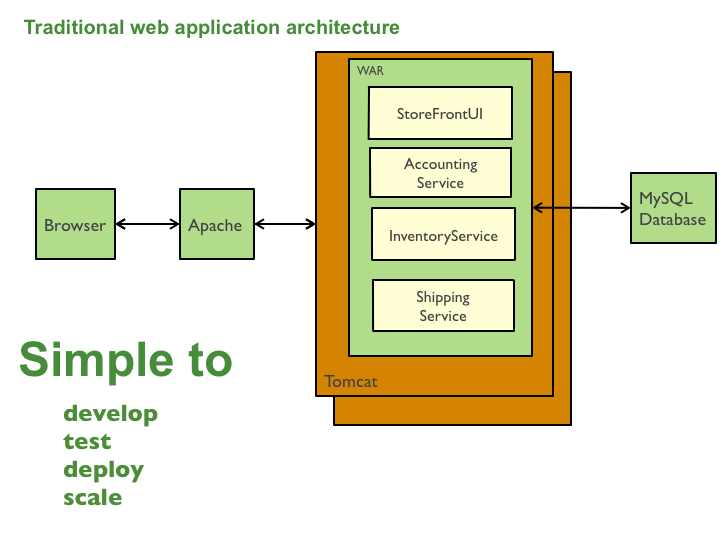
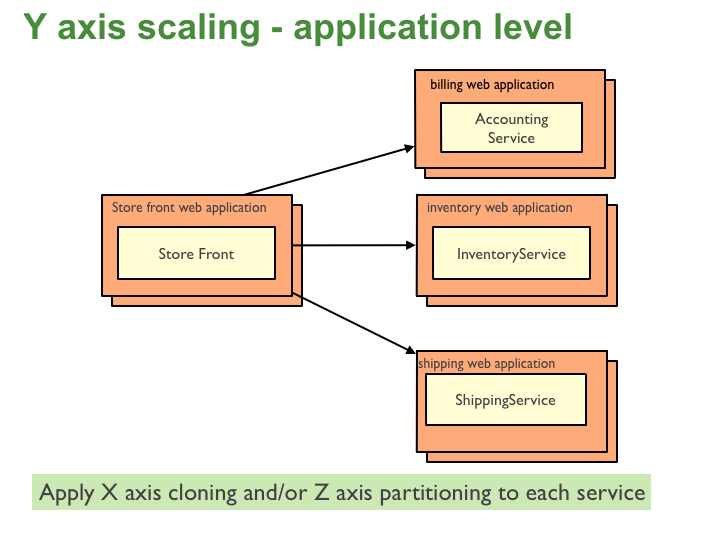
そして、小さい粒度でサービスを分割し、それぞれのサービスが1つのサーバーをもつ(複製すると複数だけど)のがマイクロサービスアーキテクチャです。
モノシリックアーキテクチャに対して、マイクロサービスアーキテクチャは
- 個々のサービスが小さいので開発しやすい
- 特定のサービスだけバージョンアップしやすい
- スケーラビリティが高い
- 1サービスで障害が起きた場合に、そこだけ切り離しやすい
などのメリットがあります。(反面、結合テストが大変などのデメリットもありますが・・)
上記の記事ではNetflix, Amazon,eBayなどがモノシリックアーキテクチャからマイクロサービスアーキテクチャに変わったと書かれています。
このようなアプリ開発に向いているJavaフレームワークとしては
などが挙げられています。
既存のTomcatユーザーだって追いつきたい
話を本題に。
DropwizardやSpring Bootがこのような作りに向いているとは言え、これらのフレームワークに移行するのが難しいケースはあると思います。既にTomcatにwarをデプロイしてる人は多いですよね。
そんな人でも大丈夫!伝統的Tomcatユーザーでも簡単に組み込みサーバー化できます。 Tomcat Maven Pluginを使えば、簡単に実行可能jarファイルを作成できます。
試してみましょう。
雛形プロジェクト生成
$ mvn -B archetype:generate -DgroupId=com.mycompany.app -DartifactId=my-webapp -Dversion=1.0.0 -DarchetypeArtifactId=maven-archetype-webapp
$ cd my-webapp
でシンプルなWebプロジェクトを生成します。
tomcat7-maven-pluginの設定
pom.xmlを以下のように修正します。
<project xmlns="http://maven.apache.org/POM/4.0.0" xmlns:xsi="http://www.w3.org/2001/XMLSchema-instance"
  xsi:schemaLocation="http://maven.apache.org/POM/4.0.0 http://maven.apache.org/maven-v4_0_0.xsd">
  <modelVersion>4.0.0</modelVersion>
  <groupId>com.mycompany.app</groupId>
  <artifactId>my-webapp</artifactId>
  <packaging>war</packaging>
  <version>1.0.0</version>
  <name>my-webapp Maven Webapp</name>
  <url>http://maven.apache.org</url>
  <dependencies>
    <dependency>
      <groupId>junit</groupId>
      <artifactId>junit</artifactId>
      <version>3.8.1</version>
      <scope>test</scope>
    </dependency>
  </dependencies>
  <build>
    <finalName>my-webapp</finalName>
    <!-- ここから -->
    <plugins>
      <plugin>
        <groupId>org.apache.tomcat.maven</groupId>
        <artifactId>tomcat7-maven-plugin</artifactId>
        <version>2.3-SNAPSHOT</version>
        <executions>
          <execution>
            <id>tomcat-run</id>
            <goals>
              <goal>exec-war-only</goal>
            </goals>
            <phase>package</phase>
            <configuration>
              <path>/</path>
	      <connectorHttpProtocol>org.apache.coyote.http11.Http11NioProtocol</connectorHttpProtocol>
	      <finalName>${project.artifactId}.jar</finalName>
            </configuration>
          </execution>
        </executions>
      </plugin>
    </plugins>
    <!-- ここまで -->
  </build>
</project>
細かいオプションはこちらを参照。
ビルドする
mvn pacakgeするだけ。簡単。
$ mvn package
$ cd target
$ ls -lh
total 17760
drwxr-xr-x  2 maki  staff    68B  5 14 22:49 classes
drwxr-xr-x  3 maki  staff   102B  5 14 22:49 maven-archiver
drwxr-xr-x  5 maki  staff   170B  5 14 22:49 my-webapp
-rw-r--r--  1 maki  staff   8.7M  5 14 22:49 my-webapp.jar
-rw-r--r--  1 maki  staff   2.3K  5 14 22:49 my-webapp.war
-rw-r--r--  1 maki  staff    86B  5 14 22:49 war-exec.manifest
-rw-r--r--  1 maki  staff   266B  5 14 22:49 war-exec.properties
my-webapp.jarが出来ています。
実行する
$ java -jar my-webapp.jar
Picked up _JAVA_OPTIONS: -Dfile.encoding=UTF-8
5 14, 2014 10:52:01 午後 org.apache.coyote.http11.Http11Protocol init
情報: Initializing ProtocolHandler ["http-bio-8080"]
5 14, 2014 10:52:01 午後 org.apache.catalina.core.StandardService startInternal
情報: Starting service Tomcat
5 14, 2014 10:52:01 午後 org.apache.catalina.core.StandardEngine startInternal
情報: Starting Servlet Engine: Apache Tomcat/7.0.53
5 14, 2014 10:52:03 午後 org.apache.catalina.util.SessionIdGenerator createSecureRandom
情報: Creation of SecureRandom instance for session ID generation using [SHA1PRNG] took [308] milliseconds.
5 14, 2014 10:52:03 午後 org.apache.coyote.http11.Http11Protocol start
情報: Starting ProtocolHandler ["http-bio-8080"]
5 14, 2014 10:52:24 午後 org.apache.coyote.http11.Http11Protocol pause
情報: Pausing ProtocolHandler ["http-bio-8080"]
http://localhost:8080 にアクセス。

画面がでましたね。実行可能jarのオプションは以下のような感じ。
$ java -jar my-webapp.jar -h
Picked up _JAVA_OPTIONS: -Dfile.encoding=UTF-8
usage: java -jar [path to your exec war jar]
 -ajpPort <ajpPort>                     ajp port to use
 -clientAuth                            enable client authentication for
                                        https
 -D <arg>                               key=value
 -extractDirectory <extractDirectory>   path to extract war content,
                                        default value: .extract
 -h,--help                              help
 -httpPort <httpPort>                   http port to use
 -httpProtocol <httpProtocol>           http protocol to use: HTTP/1.1 or
                                        org.apache.coyote.http11.Http11Nio
                                        Protocol
 -httpsPort <httpsPort>                 https port to use
 -keyAlias <keyAlias>                   alias from keystore for ssl
 -loggerName <loggerName>               logger to use: slf4j to use slf4j
                                        bridge on top of jul
 -maxPostSize <maxPostSize>             max post size to use
 -obfuscate <password>                  obfuscate the password and exit
 -resetExtract                          clean previous extract directory
 -serverXmlPath <serverXmlPath>         server.xml to use, optional
 -uriEncoding <uriEncoding>             connector uriEncoding default
                                        ISO-8859-1
 -X,--debug                             debug
ポートを変えるときは
$ java -jar my-webapp.jar -httpPort 8888
Picked up _JAVA_OPTIONS: -Dfile.encoding=UTF-8
5 14, 2014 10:56:38 午後 org.apache.coyote.http11.Http11NioProtocol init
情報: Initializing ProtocolHandler ["http-nio-8888"]
5 14, 2014 10:56:38 午後 org.apache.tomcat.util.net.NioSelectorPool getSharedSelector
情報: Using a shared selector for servlet write/read
5 14, 2014 10:56:38 午後 org.apache.catalina.core.StandardService startInternal
情報: Starting service Tomcat
5 14, 2014 10:56:38 午後 org.apache.catalina.core.StandardEngine startInternal
情報: Starting Servlet Engine: Apache Tomcat/7.0.53
5 14, 2014 10:56:40 午後 org.apache.catalina.util.SessionIdGenerator createSecureRandom
情報: Creation of SecureRandom instance for session ID generation using [SHA1PRNG] took [330] milliseconds.
5 14, 2014 10:56:40 午後 org.apache.coyote.http11.Http11NioProtocol start
情報: Starting ProtocolHandler ["http-nio-8888"]
です。-httpPortを指定しないとpom.xmlで指定したConnector(Http11NioProtocol)が有効にならない・・・
あとはSpring MVCなどRESTfullなフレームワークで開発すると立派なマイクロサービスの一員ですね! 実行可能jarなのでsystem property等で外から設定を変えられるように設計する必要があります。
ちなみにこのblogも実行可能jarで動いています。興味があればダウンロードしてみてください。
Java EEで開発したい!って方はこちらを参照してください。