JavaCVで画像処理
JavaでOpenCVが使いたくなったので調べてみた。
次の2通りあるっぽい
セットアップの手軽さ(Mavenだけで使える)を重視し、JavaCVを使う。 OpenCVはセットアップが面倒なイメージがあったが、JavaCV使うとさくっと使える。
JavaCVはJavaCPPというC++のソースから自動生成してできるブリッジのようなもので作られているみたい。
pom.xmlの設定
ネイティブライブラリを選ぶために、classifierを指定する必要があるが、Mavenのprofile機能で切り替えられる。
<project xmlns="http://maven.apache.org/POM/4.0.0" xmlns:xsi="http://www.w3.org/2001/XMLSchema-instance"
         xsi:schemaLocation="http://maven.apache.org/POM/4.0.0 http://maven.apache.org/maven-v4_0_0.xsd">
    <modelVersion>4.0.0</modelVersion>
    <groupId>com.example</groupId>
    <artifactId>hello-javacv</artifactId>
    <packaging>jar</packaging>
    <version>1.0.0-SNAPSHOT</version>
    <name>hello-javacv</name>
    <properties>
        <javacv.version>0.10</javacv.version>
        <opencv.version>2.4.10-${javacv.version}</opencv.version>
    </properties>
    <dependencies>
        <dependency>
            <groupId>org.bytedeco</groupId>
            <artifactId>javacv</artifactId>
            <version>${javacv.version}</version>
        </dependency>
        <dependency>
            <groupId>org.bytedeco.javacpp-presets</groupId>
            <artifactId>opencv</artifactId>
            <version>${opencv.version}</version>
        </dependency>
        <dependency>
            <groupId>org.bytedeco.javacpp-presets</groupId>
            <artifactId>opencv</artifactId>
            <version>${opencv.version}</version>
            <classifier>${classifier}</classifier>
        </dependency>
    </dependencies>
    <build>
        <plugins>
            <plugin>
                <artifactId>maven-compiler-plugin</artifactId>
                <configuration>
                    <source>1.8</source>
                    <target>1.8</target>
                </configuration>
            </plugin>
        </plugins>
    </build>
    <profiles>
        <profile>
            <id>macosx-x86_64</id>
            <activation>
                <os>
                    <family>mac</family>
                    <arch>x86_64</arch>
                </os>
            </activation>
            <properties>
                <classifier>macosx-x86_64</classifier>
            </properties>
        </profile>
        <profile>
            <id>linux-x86_64</id>
            <activation>
                <os>
                    <family>unix</family>
                    <arch>amd64</arch>
                </os>
            </activation>
            <properties>
                <classifier>linux-x86_64</classifier>
            </properties>
        </profile>
        <profile>
            <id>windows-x86_64</id>
            <activation>
                <os>
                    <family>windows</family>
                    <arch>amd64</arch>
                </os>
            </activation>
            <properties>
                <classifier>windows-x86_64</classifier>
            </properties>
        </profile>
        <profile>
            <id>windows-x86</id>
            <activation>
                <os>
                    <family>windows</family>
                    <arch>x86</arch>
                </os>
            </activation>
            <properties>
                <classifier>windows-x86</classifier>
            </properties>
        </profile>
    </profiles>
</project>
簡単な画像処理プログラミング
とりあえず画像をリサイズ(1/2)する例
package com.example;

import java.net.URISyntaxException;
import java.nio.file.Paths;

import static org.bytedeco.javacpp.opencv_core.*;
import static org.bytedeco.javacpp.opencv_highgui.*;
import static org.bytedeco.javacpp.opencv_imgproc.*;

public class App {
    public static void main(String[] args) throws URISyntaxException {
        String filepath = args.length > 0 ? args[0] : Paths.get(
                App.class.getResource("/lena.png").toURI()).toString();
        resize(filepath);
    }

    public static void resize(String filepath) {
        IplImage source = cvLoadImage(filepath, CV_LOAD_IMAGE_ANYDEPTH | CV_LOAD_IMAGE_ANYCOLOR);
        System.out.println("path = " + filepath);
        System.out.println("image = " + source);
        if (source != null) {
            IplImage dest = cvCreateImage(cvSize(source.width() / 2, source.height() / 2), source.depth(), source.nChannels());
            cvResize(source, dest, CV_INTER_NN);
            cvSaveImage("half-" + Paths.get(filepath).getFileName().toString(), dest);
            cvReleaseImage(source);
            cvReleaseImage(dest);
        }
    }
}
定番のlenaで実行
$ mvn compile exec:java -Dexec.mainClass=com.example.App -Dexec.args=lena.png

できた。
顔検出
OpenCV定番の顔検出をやってみる。今度はOpenCV2系のC++用APIを使ってみる。
package com.example;

import static org.bytedeco.javacpp.opencv_core.*;
import static org.bytedeco.javacpp.opencv_highgui.*;
import static org.bytedeco.javacpp.opencv_objdetect.*;

import java.net.URISyntaxException;
import java.nio.file.Paths;

public class App {
    public static void main(String[] args) throws URISyntaxException {
        String filepath = args.length > 0 ? args[0] : Paths.get(
                App.class.getResource("/lena.png").toURI()).toString();
        faceDetect(filepath);
    }

    public static void faceDetect(String filepath) throws URISyntaxException {
        String classifierName = Paths.get(
                App.class.getResource("/haarcascade_frontalface_default.xml")
                        .toURI()).toString();
        CascadeClassifier faceDetector = new CascadeClassifier(classifierName);
        System.out.println("load " + filepath);
        Mat source = imread(filepath);
        Rect faceDetections = new Rect();
        faceDetector.detectMultiScale(source, faceDetections);
        int numOfFaces = faceDetections.limit();
        System.out.println(numOfFaces + " faces are detected!");
        for (int i = 0; i < numOfFaces; i++) {
            Rect r = faceDetections.position(i);
            rectangle(source, new Point(r.x(), r.y()), new Point(r.x()
                    + r.width(), r.y() + r.height()), new Scalar(0, 0, 255, 0));
        }
        imwrite("faces.png", source);
    }
}
実行
$ mvn compile exec:java -Dexec.mainClass=com.example.App -Dexec.args=lena.png

できた。
Duke化
ちょっと遊んでみましょう。 赤枠で囲む代わりにDukeっぽくしてみます。
あと、org.bytedeco.javacpp.opencv_core.Matクラスを使って直接読み書きするのはJavaプログラミングとしては応用し辛くなるので、
java.awt.image.BufferedImageを介するようにする。
package com.example;

import javax.imageio.ImageIO;
import java.awt.image.BufferedImage;
import java.io.File;
import java.io.IOException;
import java.io.OutputStream;
import java.net.URISyntaxException;
import java.nio.file.Files;
import java.nio.file.Paths;

import static org.bytedeco.javacpp.opencv_core.*;
import static org.bytedeco.javacpp.opencv_objdetect.*;

public class App {
    public static void main(String[] args) throws URISyntaxException, IOException {
        String filepath = args.length > 0 ? args[0] : Paths.get(
                App.class.getResource("/lena.png").toURI()).toString();
        faceDetect(filepath);
    }

    public static void faceDetect(String filepath) throws URISyntaxException, IOException {
        String classifierName = Paths.get(
                App.class.getResource("/haarcascade_frontalface_default.xml")
                        .toURI()).toString();
        CascadeClassifier faceDetector = new CascadeClassifier(classifierName);
        System.out.println("load " + filepath);
        Mat source = Mat.createFrom(ImageIO.read(new File(filepath))); // BufferedImage -> Mat

        Rect faceDetections = new Rect();
        faceDetector.detectMultiScale(source, faceDetections);
        int numOfFaces = faceDetections.limit();
        System.out.println(numOfFaces + " faces are detected!");
        for (int i = 0; i < numOfFaces; i++) {
            Rect r = faceDetections.position(i);
            ducker(source, r);
        }

        BufferedImage image = source.getBufferedImage(); // Mat -> BufferedImage

        try (OutputStream out = Files.newOutputStream(Paths
                .get("duked-faces.png"))) {
            ImageIO.write(image, "png", out);
        }
    }

    public static void ducker(Mat source, Rect r) {
        int x = r.x(), y = r.y(), h = r.height(), w = r.width();
        // make the face Duke
        rectangle(source, new Point(x, y), new Point(x + w, y + h / 2),
                new Scalar(0, 0, 0, 0), -1, CV_AA, 0);
        rectangle(source, new Point(x, y + h / 2), new Point(x + w, y + h),
                new Scalar(255, 255, 255, 0), -1, CV_AA, 0);
        circle(source, new Point(x + h / 2, y + h / 2), (w + h) / 12,
                new Scalar(0, 0, 255, 0), -1, CV_AA, 0);
    }
}
実行
$ mvn compile exec:java -Dexec.mainClass=com.example.App -Dexec.args=lena.png
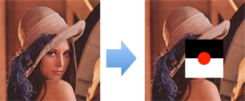
できた。
これで色々遊べますね。
ここのリファレンスがほぼそのまま使えます。ありがたい。