---
title: Cloud Foundry on AzureにMeta Azure Service Brokerをインストール
tags: ["Azure", "BOSH", "Cloud Foundry", "Azure Storage", "Azure Redis Cache", "Azure DocumentDB", "Azure Service Bus", "Azure SQL Database"]
categories: ["Dev", "PaaS", "CloudFoundry"]
date: 2016-09-15T14:18:10Z
updated: 2016-09-15T14:20:39Z
---
[前の記事](https://blog.ik.am/entries/390)に続いて、Cloud Foundry on Azureにバックエンドサービスを追加する。
今度は[Meta Azure Service Broker](https://github.com/Azure/meta-azure-service-broker)。
これは次のAzureサービス群に対するCloud FoundryのService Brokerである。
* Azure Storage
* Azure Redis Cache
* Azure DocumentDB
* Azure Service Bus
* Azure SQL Database
これも[ドキュメント](https://github.com/Azure/meta-azure-service-broker/blob/master/docs/how-admin-deploy-the-broker.md)通りなのだが、少し気合が必要。まずはソースコード取得。この記事執筆段階では[`3916aac`](https://github.com/Azure/meta-azure-service-broker/tree/3916aacec4e6186d2e59730cf8f808feeda576b4)。
```
git clone https://github.com/Azure/meta-azure-service-broker
cd meta-azure-service-broker
```
### SQL Server準備
Service Brokerのメタ情報保存先としてSQL Serverが必要である。
https://azure.microsoft.com/ja-jp/documentation/articles/sql-database-get-started/
にしたがって作成。次の情報を入力してメモっておく。
* サーバー名
* ユーザー名
* パスワード
 `mssql`コマンドインストール。
```
sudo apt-get install npm nodejs-legacy
sudo npm install -g sql-cli
```
接続して、ソースコードに含まれる`scripts/schema.sql`実行。
``` console
$ mssql --server "xxxx.database.windows.net" --database azure-cf-service-broker --user making@azure-cf-service-broker --pass xxxx --encrypt
sql-cli version 0.4.6
Enter ".help" for usage hints.
mssql> .run scripts/schema.sql
```
### Azure Serviceの有効化
`azure provider list`で`Registered`になっていないサービスを有効化。
```
azure provider register Microsoft.DocumentDB
azure provider register Microsoft.Cache
azure provider register Microsoft.ServiceBus
azure provider register Microsoft.Sql
azure provider register Microsoft.Storage
```
### DocumentDBの準備
DocumentDBだけはService BrokerによってDynamic Provisionできないので、事前に作成しておく必要がある(DocumentDBのService Brokerを使いたい時だけ)。
https://azure.microsoft.com/en-us/documentation/articles/documentdb-automation-resource-manager-cli/
にしたがって、CLIで作成。
```
azure resource create -g azure-cf -n azure-cf-documentdb -r "Microsoft.DocumentDB/databaseAccounts" -o 2015-04-08 -l japaneast -p "{\"databaseAccountOfferType\":\"Standard\"}"
```
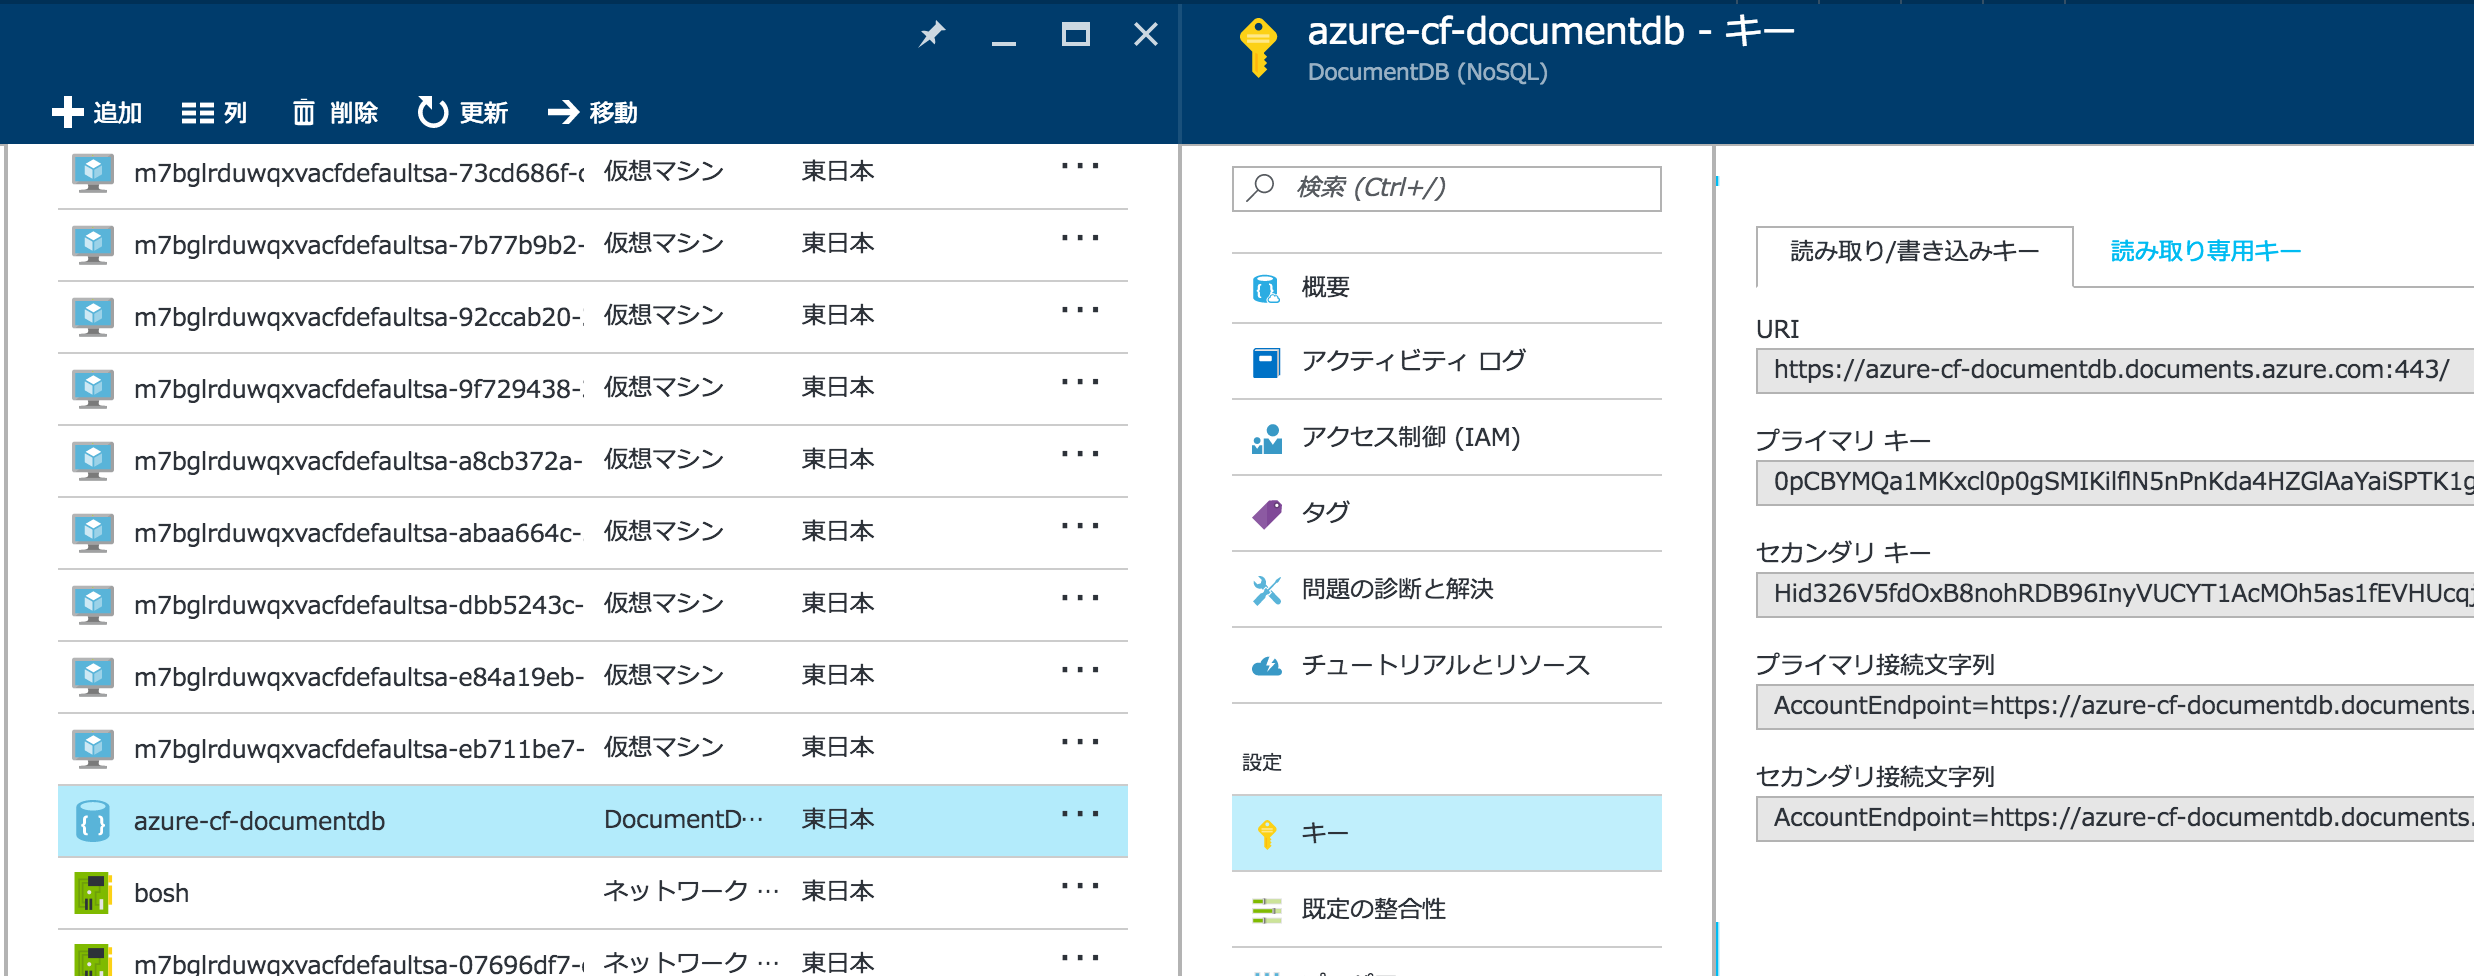
接続情報をメモる。
`mssql`コマンドインストール。
```
sudo apt-get install npm nodejs-legacy
sudo npm install -g sql-cli
```
接続して、ソースコードに含まれる`scripts/schema.sql`実行。
``` console
$ mssql --server "xxxx.database.windows.net" --database azure-cf-service-broker --user making@azure-cf-service-broker --pass xxxx --encrypt
sql-cli version 0.4.6
Enter ".help" for usage hints.
mssql> .run scripts/schema.sql
```
### Azure Serviceの有効化
`azure provider list`で`Registered`になっていないサービスを有効化。
```
azure provider register Microsoft.DocumentDB
azure provider register Microsoft.Cache
azure provider register Microsoft.ServiceBus
azure provider register Microsoft.Sql
azure provider register Microsoft.Storage
```
### DocumentDBの準備
DocumentDBだけはService BrokerによってDynamic Provisionできないので、事前に作成しておく必要がある(DocumentDBのService Brokerを使いたい時だけ)。
https://azure.microsoft.com/en-us/documentation/articles/documentdb-automation-resource-manager-cli/
にしたがって、CLIで作成。
```
azure resource create -g azure-cf -n azure-cf-documentdb -r "Microsoft.DocumentDB/databaseAccounts" -o 2015-04-08 -l japaneast -p "{\"databaseAccountOfferType\":\"Standard\"}"
```
接続情報をメモる。
 ### Service Brokerのデプロイ
次の2ファイルを用意。
`manifest.yml `
``` yaml
---
applications:
- name: meta-azure-service-broker
buildpack: https://github.com/cloudfoundry/nodejs-buildpack
instances: 1
env:
ENVIRONMENT: AzureCloud
SUBSCRIPTION_ID: aaaaaaaa-aaaa-aaaa-aaaa-aaaaaaaaaaaa
TENANT_ID: bbbbbbbb-bbbb-bbbb-bbbb-bbbbbbbbbbbb
CLIENT_ID: cccccccc-cccc-cccc-cccc-cccccccccccc
CLIENT_SECRET: changeme
DOCDB_HOSTENDPOINT: https://azure-cf-documentdb.documents.azure.com:443/
DOCDB_MASTERKEY: xxxxxx
```
`config/default.json`
``` json
{
"apiVersion": "2.8.0",
"authUser": "admin",
"authPassword": "password",
"name": "Meta Azure Service Broker",
"port": 5001,
"database": {
"server": "azure-cf-service-broker.database.windows.net",
"user": "making@azure-cf-service-broker",
"password": "xxxx",
"database": "azure-cf-service-broker"
}
}
```
AzureのService Broker用に`services` Organization、`azure` Spaceを作成し、`cf push`。
``` console
cf create-org services
cf target -o services -s azure
cf push
```
Service Brokerを登録。
```
cf create-service-broker azure-service-broker admin password https://meta-azure-service-broker.azurecf.ik.am
```
5つのサービスが登録され、様々なプランがあることがわかる。
``` console
$ cf service-access
Getting service access as admin...
broker: p-mysql
service plan access orgs
p-mysql 100mb all
p-mysql 1gb all
broker: azure-service-broker
service plan access orgs
azure-documentdb standard none
azure-rediscache basic none
azure-rediscache standard none
azure-rediscache premium none
azure-servicebus standard none
azure-sqldb basic none
azure-sqldb StandardS0 none
azure-sqldb StandardS1 none
azure-sqldb StandardS2 none
azure-sqldb StandardS3 none
azure-sqldb PremiumP1 none
azure-sqldb PremiumP2 none
azure-sqldb PremiumP4 none
azure-sqldb PremiumP6 none
azure-sqldb PremiumP11 none
azure-storageblob standard none
```
全部有効にする。
```
cf enable-service-access azure-documentdb
cf enable-service-access azure-rediscache
cf enable-service-access azure-servicebus
cf enable-service-access azure-sqldb
cf enable-service-access azure-storageblob
```
マーケットプレースに登録された🙌
``` console
$ cf marketplace
Getting services from marketplace in org services / space azure as admin...
OK
service plans description
azure-documentdb standard* Azure DocumentDb Service
azure-rediscache basic*, standard*, premium* Azure Redis Cache Service
azure-servicebus standard* Azure Service Bus Service
azure-sqldb basic*, StandardS0*, StandardS1*, StandardS2*, StandardS3*, PremiumP1*, PremiumP2*, PremiumP4*, PremiumP6*, PremiumP11* Azure SQL Database Service
azure-storageblob standard* Azure Storage Blob Service
p-mysql 100mb, 1gb MySQL databases on demand
* These service plans have an associated cost. Creating a service instance will incur this cost.
TIP: Use 'cf marketplace -s SERVICE' to view descriptions of individual plans of a given service.
```
### サービスインスタンス作成
#### Azure DocumentDB
https://github.com/Azure/meta-azure-service-broker/blob/3916aacec4e6186d2e59730cf8f808feeda576b4/docs/azure-document-db.md
`cf create-service`を実行時に、様々なパラメータJSONで渡す必要がある。次の`azure-documentdb-config.json`を作成。
``` json
{
"resourceGroup": "my-resource-group-name",
"docDbName": "mrs",
"parameters": {
"location": "japaneast"
}
}
```
サービスインタンス作成。
```
cf create-service azure-documentdb standard demo-doc -c azure-documentdb-config.json
```
すでに作成済みのDocumentDBインスタンスを使用するのでサービスインタンスの作成は早い。
``` console
$ cf services
admin として組織 default_organization / スペース demo 内のサービスを取得しています...
OK
名前 サービス プラン バインド済みアプリ 最後の操作
demo-doc azure-documentdb standard create は成功しました
demo-db p-mysql 100mb demo-app create は成功しました
```
アプリにバインド
```
cf bind-service demo-app demo-db
```
環境変数を見ると次のような`credentials`が設定されていることがわかる。
``` console
$ cf env demo-app
admin として組織 default_organization / スペース demo 内のアプリ demo-app の環境変数を取得しています...
OK
システム提供:
{
"VCAP_SERVICES": {
"azure-documentdb": [
{
"credentials": {
"documentdb_database": "demo-app",
"documentdb_host": "https://azure-cf-documentdb.documents.azure.com:443/",
"documentdb_key": "xxxx",
"documentdb_resource_id": "xxxx"
},
"label": "azure-documentdb",
"name": "demo-doc",
"plan": "standard",
"provider": null,
"syslog_drain_url": null,
"tags": [],
"volume_mounts": []
}
],
"p-mysql": [
{
"credentials": {
"hostname": "10.0.50.5",
"jdbcUrl": "jdbc:mysql://10.0.50.5:3306/xxxx,
"name": "xxxx",
"password": "xxxx",
"port": 3306,
"uri": "mysql://xxxx:xxxx@10.0.50.5:3306/xxxx",
"username": "xxxx"
},
"label": "p-mysql",
"name": "demo-db",
"plan": "100mb",
"provider": null,
"syslog_drain_url": null,
"tags": [
"mysql"
],
"volume_mounts": []
}
]
}
}
{
"VCAP_APPLICATION": {
"application_id": "cdbdc286-9173-49cb-8ce4-b7baef81b17b",
"application_name": "demo-app",
"application_uris": [
"demo-app.azurecf.ik.am"
],
"application_version": "b0d2da70-be02-4c94-aac5-c334961fa7a7",
"limits": {
"disk": 1024,
"fds": 16384,
"mem": 512
},
"name": "demo-app",
"space_id": "f7798e39-7ac0-4295-98ee-a66c96e63baf",
"space_name": "demo",
"uris": [
"demo-app.azurecf.ik.am"
],
"users": null,
"version": "b0d2da70-be02-4c94-aac5-c334961fa7a7"
}
}
ユーザー提供:
SPRING_DATASOURCE_INITIALIZE: false
実行環境変数が設定されていません
ステージング中環境変数が設定されていません
```
#### Azure Redis Cache
https://github.com/Azure/meta-azure-service-broker/blob/master/docs/azure-redis-cache.md
`cf create-service`を実行時に、様々なパラメータJSONで渡す必要がある。次の`azure-redis-config.json`を作成。
``` json
{
"resourceGroup": "redisResourceGroup",
"cacheName": "mrs",
"parameters": {
"location": "japaneast",
"enableNonSslPort": true,
"sku": {
"name": "Basic",
"family": "C",
"capacity": 0
}
}
}
```
`enableNonSslPort`にしないとJedisを使ってアクセスできない。
```
cf create-service azure-rediscache basic demo-redis -c azure-redis-config.json
```
このサービスインタンス作成は非同期で行われ、動的にRedisインスタンスが作成される。`cf services`を見ても状態は`create は進行中です`となっている。
```
$ cf services
admin として組織 default_organization / スペース demo 内のサービスを取得しています...
OK
名前 サービス プラン バインド済みアプリ 最後の操作
demo-db p-mysql 100mb demo-app create は成功しました
demo-redis azure-rediscache basic demo-app create は進行中です
```
次の図でも、状態が"作成中..."になっている。
### Service Brokerのデプロイ
次の2ファイルを用意。
`manifest.yml `
``` yaml
---
applications:
- name: meta-azure-service-broker
buildpack: https://github.com/cloudfoundry/nodejs-buildpack
instances: 1
env:
ENVIRONMENT: AzureCloud
SUBSCRIPTION_ID: aaaaaaaa-aaaa-aaaa-aaaa-aaaaaaaaaaaa
TENANT_ID: bbbbbbbb-bbbb-bbbb-bbbb-bbbbbbbbbbbb
CLIENT_ID: cccccccc-cccc-cccc-cccc-cccccccccccc
CLIENT_SECRET: changeme
DOCDB_HOSTENDPOINT: https://azure-cf-documentdb.documents.azure.com:443/
DOCDB_MASTERKEY: xxxxxx
```
`config/default.json`
``` json
{
"apiVersion": "2.8.0",
"authUser": "admin",
"authPassword": "password",
"name": "Meta Azure Service Broker",
"port": 5001,
"database": {
"server": "azure-cf-service-broker.database.windows.net",
"user": "making@azure-cf-service-broker",
"password": "xxxx",
"database": "azure-cf-service-broker"
}
}
```
AzureのService Broker用に`services` Organization、`azure` Spaceを作成し、`cf push`。
``` console
cf create-org services
cf target -o services -s azure
cf push
```
Service Brokerを登録。
```
cf create-service-broker azure-service-broker admin password https://meta-azure-service-broker.azurecf.ik.am
```
5つのサービスが登録され、様々なプランがあることがわかる。
``` console
$ cf service-access
Getting service access as admin...
broker: p-mysql
service plan access orgs
p-mysql 100mb all
p-mysql 1gb all
broker: azure-service-broker
service plan access orgs
azure-documentdb standard none
azure-rediscache basic none
azure-rediscache standard none
azure-rediscache premium none
azure-servicebus standard none
azure-sqldb basic none
azure-sqldb StandardS0 none
azure-sqldb StandardS1 none
azure-sqldb StandardS2 none
azure-sqldb StandardS3 none
azure-sqldb PremiumP1 none
azure-sqldb PremiumP2 none
azure-sqldb PremiumP4 none
azure-sqldb PremiumP6 none
azure-sqldb PremiumP11 none
azure-storageblob standard none
```
全部有効にする。
```
cf enable-service-access azure-documentdb
cf enable-service-access azure-rediscache
cf enable-service-access azure-servicebus
cf enable-service-access azure-sqldb
cf enable-service-access azure-storageblob
```
マーケットプレースに登録された🙌
``` console
$ cf marketplace
Getting services from marketplace in org services / space azure as admin...
OK
service plans description
azure-documentdb standard* Azure DocumentDb Service
azure-rediscache basic*, standard*, premium* Azure Redis Cache Service
azure-servicebus standard* Azure Service Bus Service
azure-sqldb basic*, StandardS0*, StandardS1*, StandardS2*, StandardS3*, PremiumP1*, PremiumP2*, PremiumP4*, PremiumP6*, PremiumP11* Azure SQL Database Service
azure-storageblob standard* Azure Storage Blob Service
p-mysql 100mb, 1gb MySQL databases on demand
* These service plans have an associated cost. Creating a service instance will incur this cost.
TIP: Use 'cf marketplace -s SERVICE' to view descriptions of individual plans of a given service.
```
### サービスインスタンス作成
#### Azure DocumentDB
https://github.com/Azure/meta-azure-service-broker/blob/3916aacec4e6186d2e59730cf8f808feeda576b4/docs/azure-document-db.md
`cf create-service`を実行時に、様々なパラメータJSONで渡す必要がある。次の`azure-documentdb-config.json`を作成。
``` json
{
"resourceGroup": "my-resource-group-name",
"docDbName": "mrs",
"parameters": {
"location": "japaneast"
}
}
```
サービスインタンス作成。
```
cf create-service azure-documentdb standard demo-doc -c azure-documentdb-config.json
```
すでに作成済みのDocumentDBインスタンスを使用するのでサービスインタンスの作成は早い。
``` console
$ cf services
admin として組織 default_organization / スペース demo 内のサービスを取得しています...
OK
名前 サービス プラン バインド済みアプリ 最後の操作
demo-doc azure-documentdb standard create は成功しました
demo-db p-mysql 100mb demo-app create は成功しました
```
アプリにバインド
```
cf bind-service demo-app demo-db
```
環境変数を見ると次のような`credentials`が設定されていることがわかる。
``` console
$ cf env demo-app
admin として組織 default_organization / スペース demo 内のアプリ demo-app の環境変数を取得しています...
OK
システム提供:
{
"VCAP_SERVICES": {
"azure-documentdb": [
{
"credentials": {
"documentdb_database": "demo-app",
"documentdb_host": "https://azure-cf-documentdb.documents.azure.com:443/",
"documentdb_key": "xxxx",
"documentdb_resource_id": "xxxx"
},
"label": "azure-documentdb",
"name": "demo-doc",
"plan": "standard",
"provider": null,
"syslog_drain_url": null,
"tags": [],
"volume_mounts": []
}
],
"p-mysql": [
{
"credentials": {
"hostname": "10.0.50.5",
"jdbcUrl": "jdbc:mysql://10.0.50.5:3306/xxxx,
"name": "xxxx",
"password": "xxxx",
"port": 3306,
"uri": "mysql://xxxx:xxxx@10.0.50.5:3306/xxxx",
"username": "xxxx"
},
"label": "p-mysql",
"name": "demo-db",
"plan": "100mb",
"provider": null,
"syslog_drain_url": null,
"tags": [
"mysql"
],
"volume_mounts": []
}
]
}
}
{
"VCAP_APPLICATION": {
"application_id": "cdbdc286-9173-49cb-8ce4-b7baef81b17b",
"application_name": "demo-app",
"application_uris": [
"demo-app.azurecf.ik.am"
],
"application_version": "b0d2da70-be02-4c94-aac5-c334961fa7a7",
"limits": {
"disk": 1024,
"fds": 16384,
"mem": 512
},
"name": "demo-app",
"space_id": "f7798e39-7ac0-4295-98ee-a66c96e63baf",
"space_name": "demo",
"uris": [
"demo-app.azurecf.ik.am"
],
"users": null,
"version": "b0d2da70-be02-4c94-aac5-c334961fa7a7"
}
}
ユーザー提供:
SPRING_DATASOURCE_INITIALIZE: false
実行環境変数が設定されていません
ステージング中環境変数が設定されていません
```
#### Azure Redis Cache
https://github.com/Azure/meta-azure-service-broker/blob/master/docs/azure-redis-cache.md
`cf create-service`を実行時に、様々なパラメータJSONで渡す必要がある。次の`azure-redis-config.json`を作成。
``` json
{
"resourceGroup": "redisResourceGroup",
"cacheName": "mrs",
"parameters": {
"location": "japaneast",
"enableNonSslPort": true,
"sku": {
"name": "Basic",
"family": "C",
"capacity": 0
}
}
}
```
`enableNonSslPort`にしないとJedisを使ってアクセスできない。
```
cf create-service azure-rediscache basic demo-redis -c azure-redis-config.json
```
このサービスインタンス作成は非同期で行われ、動的にRedisインスタンスが作成される。`cf services`を見ても状態は`create は進行中です`となっている。
```
$ cf services
admin として組織 default_organization / スペース demo 内のサービスを取得しています...
OK
名前 サービス プラン バインド済みアプリ 最後の操作
demo-db p-mysql 100mb demo-app create は成功しました
demo-redis azure-rediscache basic demo-app create は進行中です
```
次の図でも、状態が"作成中..."になっている。
 しばらくすると`create は成功しました`になる。
だけど、自分が試した時は20分くらいかかった・・・諦めずに待つと良い。
できたら、アプリにバインド。
```
cf bind-service demo-app demo-redis
```
環境変数を見ると次のような`credentials`が設定されていることがわかる。
``` console
$ cf env demo-app
admin として組織 default_organization / スペース demo 内のアプリ demo-app の環境変数を取得しています...
OK
システム提供:
{
"VCAP_SERVICES": {
"azure-rediscache": [
{
"credentials": {
"hostname": "mrs.redis.cache.windows.net",
"name": "mrs",
"port": 6379,
"primaryKey": "xxxx",
"secondaryKey": "xxxx",
"sslPort": 6380
},
"label": "azure-rediscache",
"name": "demo-redis",
"plan": "basic",
"provider": null,
"syslog_drain_url": null,
"tags": [],
"volume_mounts": []
}
],
"p-mysql": [
{
"credentials": {
"hostname": "10.0.50.5",
"jdbcUrl": "jdbc:mysql://10.0.50.5:3306/xxxx,
"name": "xxxx",
"password": "xxxx",
"port": 3306,
"uri": "mysql://xxxx:xxxx@10.0.50.5:3306/xxxx",
"username": "xxxx"
},
"label": "p-mysql",
"name": "demo-db",
"plan": "100mb",
"provider": null,
"syslog_drain_url": null,
"tags": [
"mysql"
],
"volume_mounts": []
}
]
}
}
{
"VCAP_APPLICATION": {
"application_id": "cdbdc286-9173-49cb-8ce4-b7baef81b17b",
"application_name": "demo-app",
"application_uris": [
"demo-app.azurecf.ik.am"
],
"application_version": "b0d2da70-be02-4c94-aac5-c334961fa7a7",
"limits": {
"disk": 1024,
"fds": 16384,
"mem": 512
},
"name": "demo-app",
"space_id": "f7798e39-7ac0-4295-98ee-a66c96e63baf",
"space_name": "demo",
"uris": [
"demo-app.azurecf.ik.am"
],
"users": null,
"version": "b0d2da70-be02-4c94-aac5-c334961fa7a7"
}
}
```
Spring Bootからアクセスする場合は次のような`RedisProperties`クラスを作っておけば良い。
``` java
@Profile("cloud")
@Bean
public RedisProperties redisProperties(ObjectMapper objectMapper) throws IOException {
JsonNode credentials = objectMapper.readTree(System.getenv("VCAP_SERVICES"))
.get("azure-rediscache").get(0).get("credentials");
RedisProperties prop = new RedisProperties();
prop.setHost(credentials.get("hostname").asText());
prop.setPort(credentials.get("port").asInt());
prop.setPassword(credentials.get("primaryKey").asText());
return prop;
}
```
#### その他
気が向いたら試す。
しばらくすると`create は成功しました`になる。
だけど、自分が試した時は20分くらいかかった・・・諦めずに待つと良い。
できたら、アプリにバインド。
```
cf bind-service demo-app demo-redis
```
環境変数を見ると次のような`credentials`が設定されていることがわかる。
``` console
$ cf env demo-app
admin として組織 default_organization / スペース demo 内のアプリ demo-app の環境変数を取得しています...
OK
システム提供:
{
"VCAP_SERVICES": {
"azure-rediscache": [
{
"credentials": {
"hostname": "mrs.redis.cache.windows.net",
"name": "mrs",
"port": 6379,
"primaryKey": "xxxx",
"secondaryKey": "xxxx",
"sslPort": 6380
},
"label": "azure-rediscache",
"name": "demo-redis",
"plan": "basic",
"provider": null,
"syslog_drain_url": null,
"tags": [],
"volume_mounts": []
}
],
"p-mysql": [
{
"credentials": {
"hostname": "10.0.50.5",
"jdbcUrl": "jdbc:mysql://10.0.50.5:3306/xxxx,
"name": "xxxx",
"password": "xxxx",
"port": 3306,
"uri": "mysql://xxxx:xxxx@10.0.50.5:3306/xxxx",
"username": "xxxx"
},
"label": "p-mysql",
"name": "demo-db",
"plan": "100mb",
"provider": null,
"syslog_drain_url": null,
"tags": [
"mysql"
],
"volume_mounts": []
}
]
}
}
{
"VCAP_APPLICATION": {
"application_id": "cdbdc286-9173-49cb-8ce4-b7baef81b17b",
"application_name": "demo-app",
"application_uris": [
"demo-app.azurecf.ik.am"
],
"application_version": "b0d2da70-be02-4c94-aac5-c334961fa7a7",
"limits": {
"disk": 1024,
"fds": 16384,
"mem": 512
},
"name": "demo-app",
"space_id": "f7798e39-7ac0-4295-98ee-a66c96e63baf",
"space_name": "demo",
"uris": [
"demo-app.azurecf.ik.am"
],
"users": null,
"version": "b0d2da70-be02-4c94-aac5-c334961fa7a7"
}
}
```
Spring Bootからアクセスする場合は次のような`RedisProperties`クラスを作っておけば良い。
``` java
@Profile("cloud")
@Bean
public RedisProperties redisProperties(ObjectMapper objectMapper) throws IOException {
JsonNode credentials = objectMapper.readTree(System.getenv("VCAP_SERVICES"))
.get("azure-rediscache").get(0).get("credentials");
RedisProperties prop = new RedisProperties();
prop.setHost(credentials.get("hostname").asText());
prop.setPort(credentials.get("port").asInt());
prop.setPassword(credentials.get("primaryKey").asText());
return prop;
}
```
#### その他
気が向いたら試す。