Certified OpenID Connect ProviderのUAAをCloud Foundryにデプロイする方法とSpring Bootとの連携方法
Certified OpenID Connect Providerの一つであるUAA(ドキュメント)をCloud Foundryにデプロイします。 UAAはCloud Foundryのユーザー認証・認可にも使われているコンポーネントでCFユーザーにはお馴染みですが、ただのJavaアプリなので普通にデプロイして、自システムで使用するスタンドアローンなOIDC Providerとして利用可能です。 古くから利用されておりBattle Testedなコンポーネントな一方、Spring Boot登場前より存在するため、普通のSpringアプリケーションでありwar形式でのデプロイとなります。
目次
UAAのデプロイ
UAAのGithubレポジトリではソースしかダウンロードできないのですが、Stark And Wayne社がwarにパッケージングしたものを配布しているので、こちらを使用します。
ファイル名をROOT.warにしてダウンロードしてください。
wget https://github.com/starkandwayne/uaa-war-releases/releases/download/v4.21.0/cloudfoundry-identity-uaa-4.21.0.war -O ROOT.war
次にUAAの設定をカスタマイズするためのベースのYAML(uaa.yml)を用意します。
cat <<EOF > uaa.yml
issuer:
  uri: https://((route))

uaa:
  url: https://((route))

encryption:
  encryption_keys:
  - label: uaa-encryption-key-1
    passphrase: ((uaa_encryption_key_1))
  active_key_label: uaa-encryption-key-1

scim:
  users:
  - admin|((admin_user_password))|admin||||uaa
  userids_enabled: true
  user:
    override: true

require_https: true

oauth:
  authorize:
    ssl: true
  clients:
    uaa_admin:
      override: true
      authorized-grant-types: client_credentials
      scope: ""
      authorities: clients.read,clients.write,clients.secret,uaa.admin,scim.read,scim.write,password.write
      secret: ((admin_client_secret))
  user:
    authorities:
    - openid
    - scim.me
    - password.write
    - uaa.user
    - uaa.offline_token

jwt:
  token:
    queryString:
      enabled: true
    revocable: true
    policy:
      accessTokenValiditySeconds: 43200
      refreshTokenValiditySeconds: 2592000
      global:
        accessTokenValiditySeconds: 43200
        refreshTokenValiditySeconds: 2592000
      activeKeyId: uaa-jwt-key-1
      keys:
        uaa-jwt-key-1:
          verification-key: ((uaa_jwt_signing_key.public_key))
          signingKey: ((uaa_jwt_signing_key.private_key))
    refresh:
      restrict_grant: false
      unique: false
      format: jwt

login:
  url: https://((route))
  selfServiceLinksEnabled: true
  serviceProviderKey: ((uaa_service_provider_ssl.private_key))
  serviceProviderKeyPassword: "" # TODO: Remove this when UAA defaults this value
  serviceProviderCertificate: ((uaa_service_provider_ssl.certificate))

zones:
  internal:
    hostnames:
      - ((route))

variables:
- name: admin_user_password
  type: password

- name: admin_client_secret
  type: password

- name: uaa_jwt_signing_key
  type: rsa

- name: uaa_encryption_key_1
  type: password

- name: default_ca
  type: certificate
  options:
    is_ca: true
    common_name: ca

- name: uaa_service_provider_ssl
  type: certificate
  options:
    ca: default_ca
    common_name: ((route))
    alternative_names: [((route))]
EOF
YAMLのカスタマイズ性を高めるのと、Credentialを自動生成するためにBOSH CLIを使用します。
BOSH CLIは実行可能バイナリとして配布されているのでダウンロードしてPATHに追加してください。
次にUAAのOAuth2クライアントを追加するための設定をBOSH CLIのops file形式で定義します。
ここではhttp://localhost:8080のアプリを想定してdemo_devというクライアントを作成するための設定を作ります。
mkdir -p ops-files

cat <<EOF > ops-files/add-demo.yml
- type: replace
  path: /oauth/clients/demo_dev?
  value:
    name: Demo Dev
    authorities: uaa.none
    authorized-grant-types: authorization_code,refresh_token,password
    override: true
    redirect-uri: http://localhost:8080/login/oauth2/code/uaa
    scope: openid,role
    secret: ((demo_dev_client_secret))

- type: replace
  path: /variables/name=demo_dev_client_secret?
  value:
    name: demo_dev_client_secret
    type: password
EOF
次のSMTP通知設定を行うためのops fileを作成します。
cat <<EOF > ops-files/smtp.yml
- type: replace
  path: /smtp?
  value:
    host: ((smtp_host))
    port: ((smtp_port))
    user: ((smtp_user))
    password: ((smtp_password))
    starttls: true
EOF
uaa.ymlにops fileを合成した上でROOT.warに埋め込むためのscriptを作成します。ここでは次に作成する.profileファイルも埋め込みます。
デプロイ後のホスト名はdemo-uaa.cfapps.ioとします。
cat <<'EOF' > embbed-manifest.sh
#!/bin/bash
set -e

bosh int uaa.yml \
  -o ops-files/smtp.yml \
  -o ops-files/add-demo.yml \
  -v route=demo-uaa.cfapps.io \
  -v smtp_host=smtp.gmail.com \
  -v smtp_port=587 \
  --vars-store=credentials.yml \
  > WEB-INF/classes/uaa.yml

jar -uvf ROOT.war .profile WEB-INF
EOF
chmod +x embbed-manifest.sh
UAAのデータベース接続情報(MySQL/PostgreSQL/SQL Server)を環境変数に設定するためにPre-Runtime Hooksを使用します。
ここではdemo-uaa-dbという名前のMySQLサービスインスタンスをバインドする前提とします。環境変数VCAP_SERVICESに含まれるdemo-uaa-dbサービスインスタンスに関する接続情報をjqコマンドで取得するためのスクリプトを.profieファイルに記述します。
cat <<'EOF' > .profile
CREDS=$(echo $VCAP_SERVICES | jq -r ".[] | map(select(.name == \"demo-uaa-db\"))[0].credentials")

export DATABASE_HOSTNAME=$(echo $CREDS | jq -r .hostname)
export DATABASE_PORT=$(echo $CREDS | jq -r .port)
export DATABASE_USERNAME=$(echo $CREDS | jq -r .username)
export DATABASE_PASSWORD=$(echo $CREDS | jq -r .password)
export DATABASE_NAME=$(echo $CREDS | jq -r .name)
export DATABASE_URL=jdbc:mysql://${DATABASE_HOSTNAME}:${DATABASE_PORT}/${DATABASE_NAME}
EOF
SMTPに接続情報をcredentials.ymlに定義します。
cat <<EOF > credentials.yml
smtp_user: your-account@gmail.com
smpt_password: your-password
EOF
embbed-manifest.shを実行してデプロイ可能なROOT.warを作成します。
mkdir -p WEB-INF/classes
./embbed-manifest.sh
Cloud Foundryのmaniefst.ymlを作成します。
cat <<EOF > manifest.yml
applications:
- name: demo-uaa
  memory: 1g
  instances: 1
  path: ROOT.war
  health-check-type: http
  health-check-http-endpoint: /healthz
  services:
  - demo-uaa-db
  env:
    SPRING_PROFILES: mysql
    DATABASE_DRIVERCLASSNAME: org.mariadb.jdbc.Driver
    DATABASE_MAXACTIVE: 4
    DATABASE_MAXIDLE: 3
    DATABASE_MINIDLE: 1
EOF
cf pushでアプリをデプロイします。ここではPivotal Web Servicesを使用し、MySQLサービスとしてClearDBサービスのsprkプランを利用します。
cf create-service cleardb spark demo-uaa-db
cf push

できました。
adminユーザーのパスワードはbosh int credentials.yml --path /admin_user_passwordで表示されます。
CLIコマンドを使ってUAAにアクセス
UAAのCLIはRuby版とExperimentalなGo版があります。
Ruby版
gem install cf-uaac
使い方はこちら
接続先UAAの設定
uaac target https://demo-uaa.cfapps.io
uaa_adminクライアントのClient Credentials Grant Typeでアクセストークンを取得してみます。
ADMIN_SECRET=$(bosh int --path /admin_client_secret credentials.yml)
uaac token client get uaa_admin -s ${ADMIN_SECRET}
クライアント一覧表示
uaac clients
出力結果
  demo_dev
    scope: openid role
    resource_ids: none
    authorized_grant_types: authorization_code refresh_token password
    redirect_uri: http://localhost:8080/login/oauth2/code/uaa
    autoapprove:
    authorities: uaa.none
    name: Demo Dev
    lastmodified: 1536702358000
  uaa_admin
    scope: uaa.none
    resource_ids: none
    authorized_grant_types: client_credentials
    autoapprove:
    authorities: clients.read password.write clients.secret clients.write uaa.admin scim.write scim.read
    lastmodified: 1536702358000
ユーザー一覧表示
uaac users
出力結果
  resources:
  -
    id: 925083e7-81cd-4d87-8751-cb631459f390
    meta
      version: 4
      created: 2018-09-10T17:44:26.000Z
      lastmodified: 2018-09-11T21:45:54.000Z
    name
      familyname:
      givenname:
    emails:
    -
      value: admin
      primary: false
    groups:
    -
      value: 3764195c-aa98-4d59-9a54-77345f9fbf67
      display: openid
      type: DIRECT
    -
      value: 8b256da8-4027-42ee-bd0f-76453c17c93e
      display: uaa.user
      type: DIRECT
    -
      value: 8bf4e1fa-28e7-430a-b0ed-bdadbcd1f120
      display: uaa.offline_token
      type: DIRECT
    -
      value: ed19972a-7abc-4c7b-8681-1e7b6ef25acf
      display: scim.me
      type: DIRECT
    -
      value: 7ae25c7c-b96a-40a1-9273-ccdeca98ac04
      display: password.write
      type: DIRECT
    approvals:
    active: true
    verified: true
    origin: uaa
    schemas: urn:scim:schemas:core:1.0
    username: admin
    zoneid: uaa
    passwordlastmodified: 2018-09-10T17:44:26.000Z
  schemas: urn:scim:schemas:core:1.0
  startindex: 1
  itemsperpage: 100
  totalresults: 1
Go版
Macの場合
brew install starkandwayne/cf/uaa-cli
Ubuntuの場合
wget -q -O - https://raw.githubusercontent.com/starkandwayne/homebrew-cf/master/public.key | apt-key add -
echo "deb http://apt.starkandwayne.com stable main" | tee /etc/apt/sources.list.d/starkandwayne.list
apt-get update

apt-get install uaa-cli
接続先UAAの設定
uaac target https://demo-uaa.cfapps.io
uaa_adminクライアントのClient Credentials Grant Typeでアクセストークンを取得してみます。
ADMIN_SECRET=$(bosh int --path /admin_client_secret credentials.yml)
uaa get-client-credentials-token uaa_admin -s ${ADMIN_SECRET}
クライアント一覧表示
uaa clients
出力結果
[
  {
    "client_id": "demo_dev",
    "scope": [
      "openid",
      "role"
    ],
    "resource_ids": [
      "none"
    ],
    "authorized_grant_types": [
      "authorization_code",
      "refresh_token",
      "password"
    ],
    "redirect_uri": [
      "http://localhost:8080/login/oauth2/code/uaa"
    ],
    "authorities": [
      "uaa.none"
    ],
    "name": "Demo Dev",
    "lastModified": 1536702358000
  },
  {
    "client_id": "uaa_admin",
    "scope": [
      "uaa.none"
    ],
    "resource_ids": [
      "none"
    ],
    "authorized_grant_types": [
      "client_credentials"
    ],
    "authorities": [
      "clients.read",
      "password.write",
      "clients.secret",
      "clients.write",
      "uaa.admin",
      "scim.write",
      "scim.read"
    ],
    "lastModified": 1536702358000
  }
]
ユーザー一覧表示
uaac users
出力結果
[
  {
    "id": "925083e7-81cd-4d87-8751-cb631459f390",
    "meta": {
      "version": 4,
      "created": "2018-09-10T17:44:26.000Z",
      "lastModified": "2018-09-11T21:45:54.000Z"
    },
    "userName": "admin",
    "name": {},
    "emails": [
      {
        "value": "admin",
        "primary": false
      }
    ],
    "groups": [
      {
        "value": "3764195c-aa98-4d59-9a54-77345f9fbf67",
        "display": "openid",
        "type": "DIRECT"
      },
      {
        "value": "8b256da8-4027-42ee-bd0f-76453c17c93e",
        "display": "uaa.user",
        "type": "DIRECT"
      },
      {
        "value": "8bf4e1fa-28e7-430a-b0ed-bdadbcd1f120",
        "display": "uaa.offline_token",
        "type": "DIRECT"
      },
      {
        "value": "ed19972a-7abc-4c7b-8681-1e7b6ef25acf",
        "display": "scim.me",
        "type": "DIRECT"
      },
      {
        "value": "7ae25c7c-b96a-40a1-9273-ccdeca98ac04",
        "display": "password.write",
        "type": "DIRECT"
      }
    ],
    "active": true,
    "verified": true,
    "origin": "uaa",
    "zoneId": "uaa",
    "passwordLastModified": "2018-09-10T17:44:26.000Z",
    "schemas": [
      "urn:scim:schemas:core:1.0"
    ]
  }
]
このドキュメントが詳しいです。
Spring Bootと連携
curl https://start.spring.io/starter.tgz \
       -d bootVersion=2.0.5.RELEASE \
       -d dependencies=web,security \
       -d artifactId=demo-boot-uaa \
       -d name=demo-boot-uaa \
       -d baseDir=demo-boot-uaa \
       -d packageName=com.example.demobootuaa \
       -d applicationName=DemoBootUaaApplication | tar -xzvf -
Spring Boot 2.0の場合は次のdependencieyを追加
    <dependency>
      <groupId>org.springframework.security</groupId>
      <artifactId>spring-security-oauth2-client</artifactId>
    </dependency>
    <dependency>
      <groupId>org.springframework.security</groupId>
      <artifactId>spring-security-oauth2-jose</artifactId>
    </dependency>
Spring Boot 2.1からは次のdependencieyを追加でOK
    <dependency>
      <groupId>org.springframework.boot</groupId>
      <artifactId>spring-boot-starter-oauth2-oidc-client</artifactId>
    </dependency>
Spring Boot 2.0の場合はapplication.propertisに次の設定を追加
spring.security.oauth2.client.provider.uaa.authorization-uri=https://demo-uaa.cfapps.io/oauth/authorize
spring.security.oauth2.client.provider.uaa.token-uri=https://demo-uaa.cfapps.io/oauth/token
spring.security.oauth2.client.provider.uaa.user-info-uri=https://demo-uaa.cfapps.io/userinfo
spring.security.oauth2.client.provider.uaa.jwk-set-uri=https://demo-uaa.cfapps.io/token_keys
spring.security.oauth2.client.provider.uaa.user-name-attribute=email
spring.security.oauth2.client.registration.uaa.client-id=demo_dev
spring.security.oauth2.client.registration.uaa.client-secret=xxxxxxxxxxxxxxxxxxxxxxxxxxxxx
# bosh int credentials.yml --path /demo_dev_client_secretで取得
spring.security.oauth2.client.registration.uaa.scope=openid
spring.security.oauth2.client.registration.uaa.authorization-grant-type=authorization_code
spring.security.oauth2.client.registration.uaa.client-name=Cloud Foundry UAA
spring.security.oauth2.client.registration.uaa.client-authentication-method=basic
spring.security.oauth2.client.registration.uaa.redirect-uri-template={baseUrl}/login/oauth2/code/{registrationId}
Spring Boot 2.1の場合はapplication.propertisに次の設定を追加
spring.security.oauth2.client.provider.uaa.issuer-uri=https://demo-uaa.cfapps.io/oauth/token
spring.security.oauth2.client.provider.uaa.user-name-attribute=email
spring.security.oauth2.client.registration.uaa.client-id=demo_dev
spring.security.oauth2.client.registration.uaa.client-secret=xxxxxxxxxxxxxxxxxxxxxxxxxxxxx
# bosh int credentials.yml --path /demo_dev_client_secretで取得
spring.security.oauth2.client.registration.uaa.scope=openid
spring.security.oauth2.client.registration.uaa.authorization-grant-type=authorization_code
spring.security.oauth2.client.registration.uaa.client-name=Cloud Foundry UAA
spring.security.oauth2.client.registration.uaa.client-authentication-method=basic
spring.security.oauth2.client.registration.uaa.redirect-uri-template={baseUrl}/login/oauth2/code/{registrationId}
SecurityConfig.javaを作成して次のコードを記述
package com.example.demobootuaa;

import org.springframework.context.annotation.Configuration;
import org.springframework.security.config.annotation.web.builders.HttpSecurity;
import org.springframework.security.config.annotation.web.configuration.WebSecurityConfigurerAdapter;

@Configuration
public class SecurityConfig extends WebSecurityConfigurerAdapter {

    @Override
    protected void configure(HttpSecurity http) throws Exception {
        http.authorizeRequests() //
                .anyRequest().authenticated() //
                .and() //
                .oauth2Login() //
                .userInfoEndpoint();
    }
}
次のHelloController.javaを追加して、アプリケーションを起動
package com.example.demobootuaa;

import org.springframework.security.core.Authentication;
import org.springframework.web.bind.annotation.GetMapping;
import org.springframework.web.bind.annotation.RestController;

@RestController
public class HelloController {
    @GetMapping("/")
    public Object hi(Authentication authentication) {
        return authentication;
    }
}
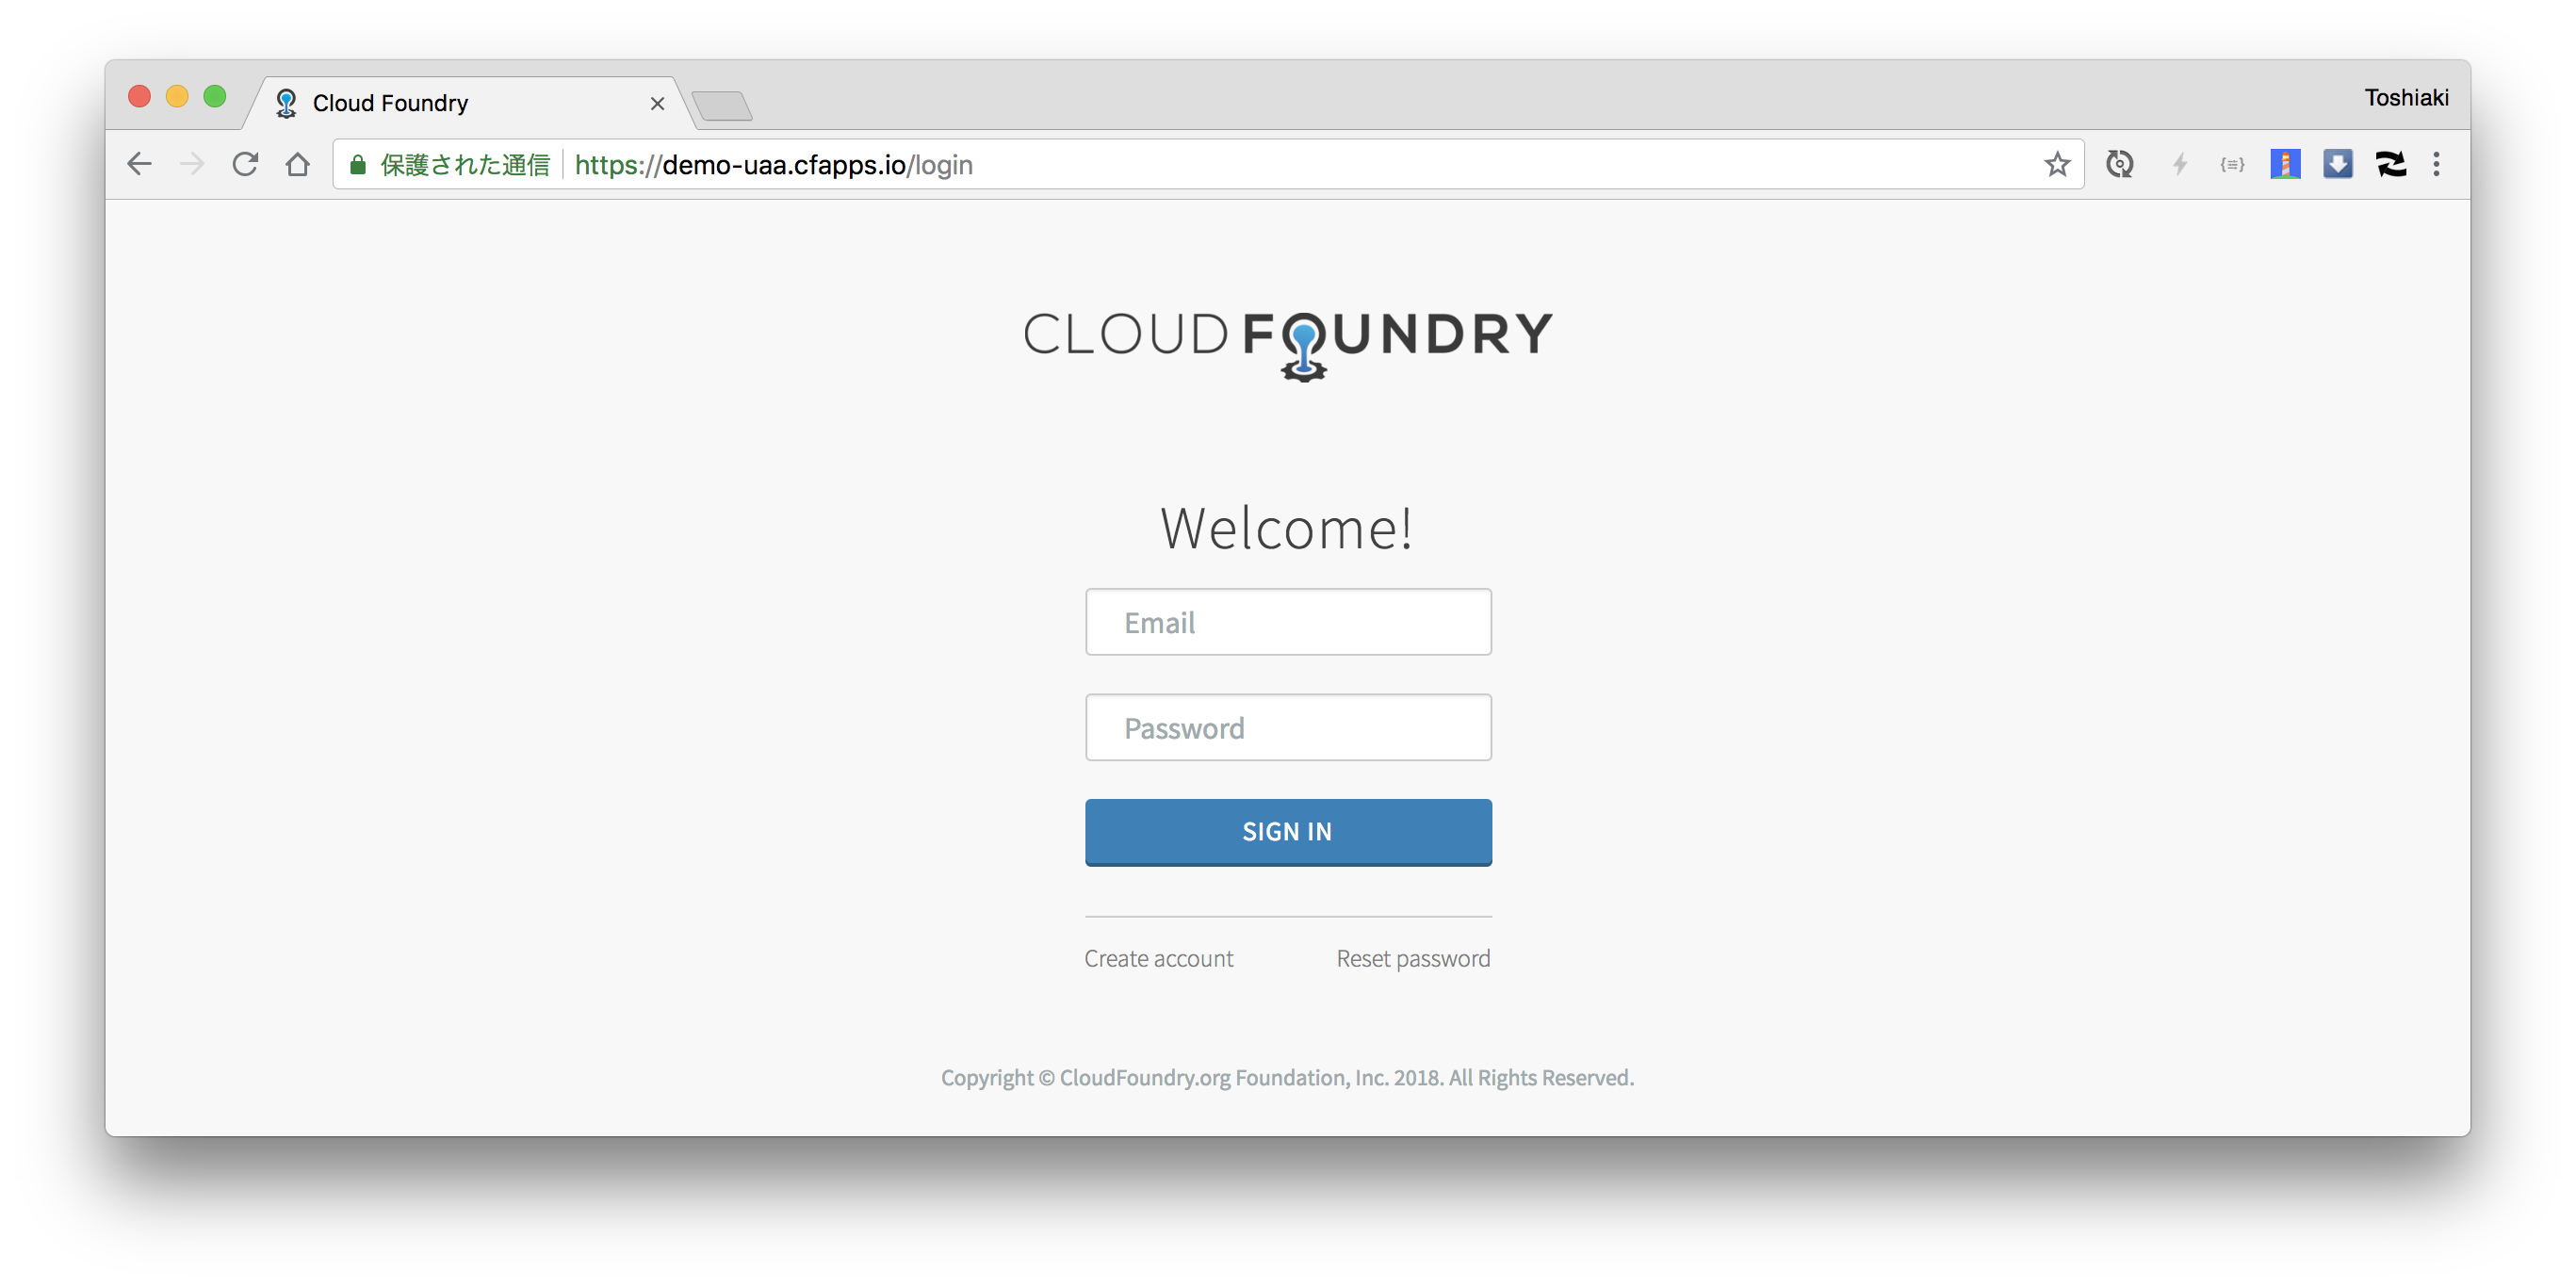
http://localhost:8080にアクセスすると次の画面にリダイレクトされます。
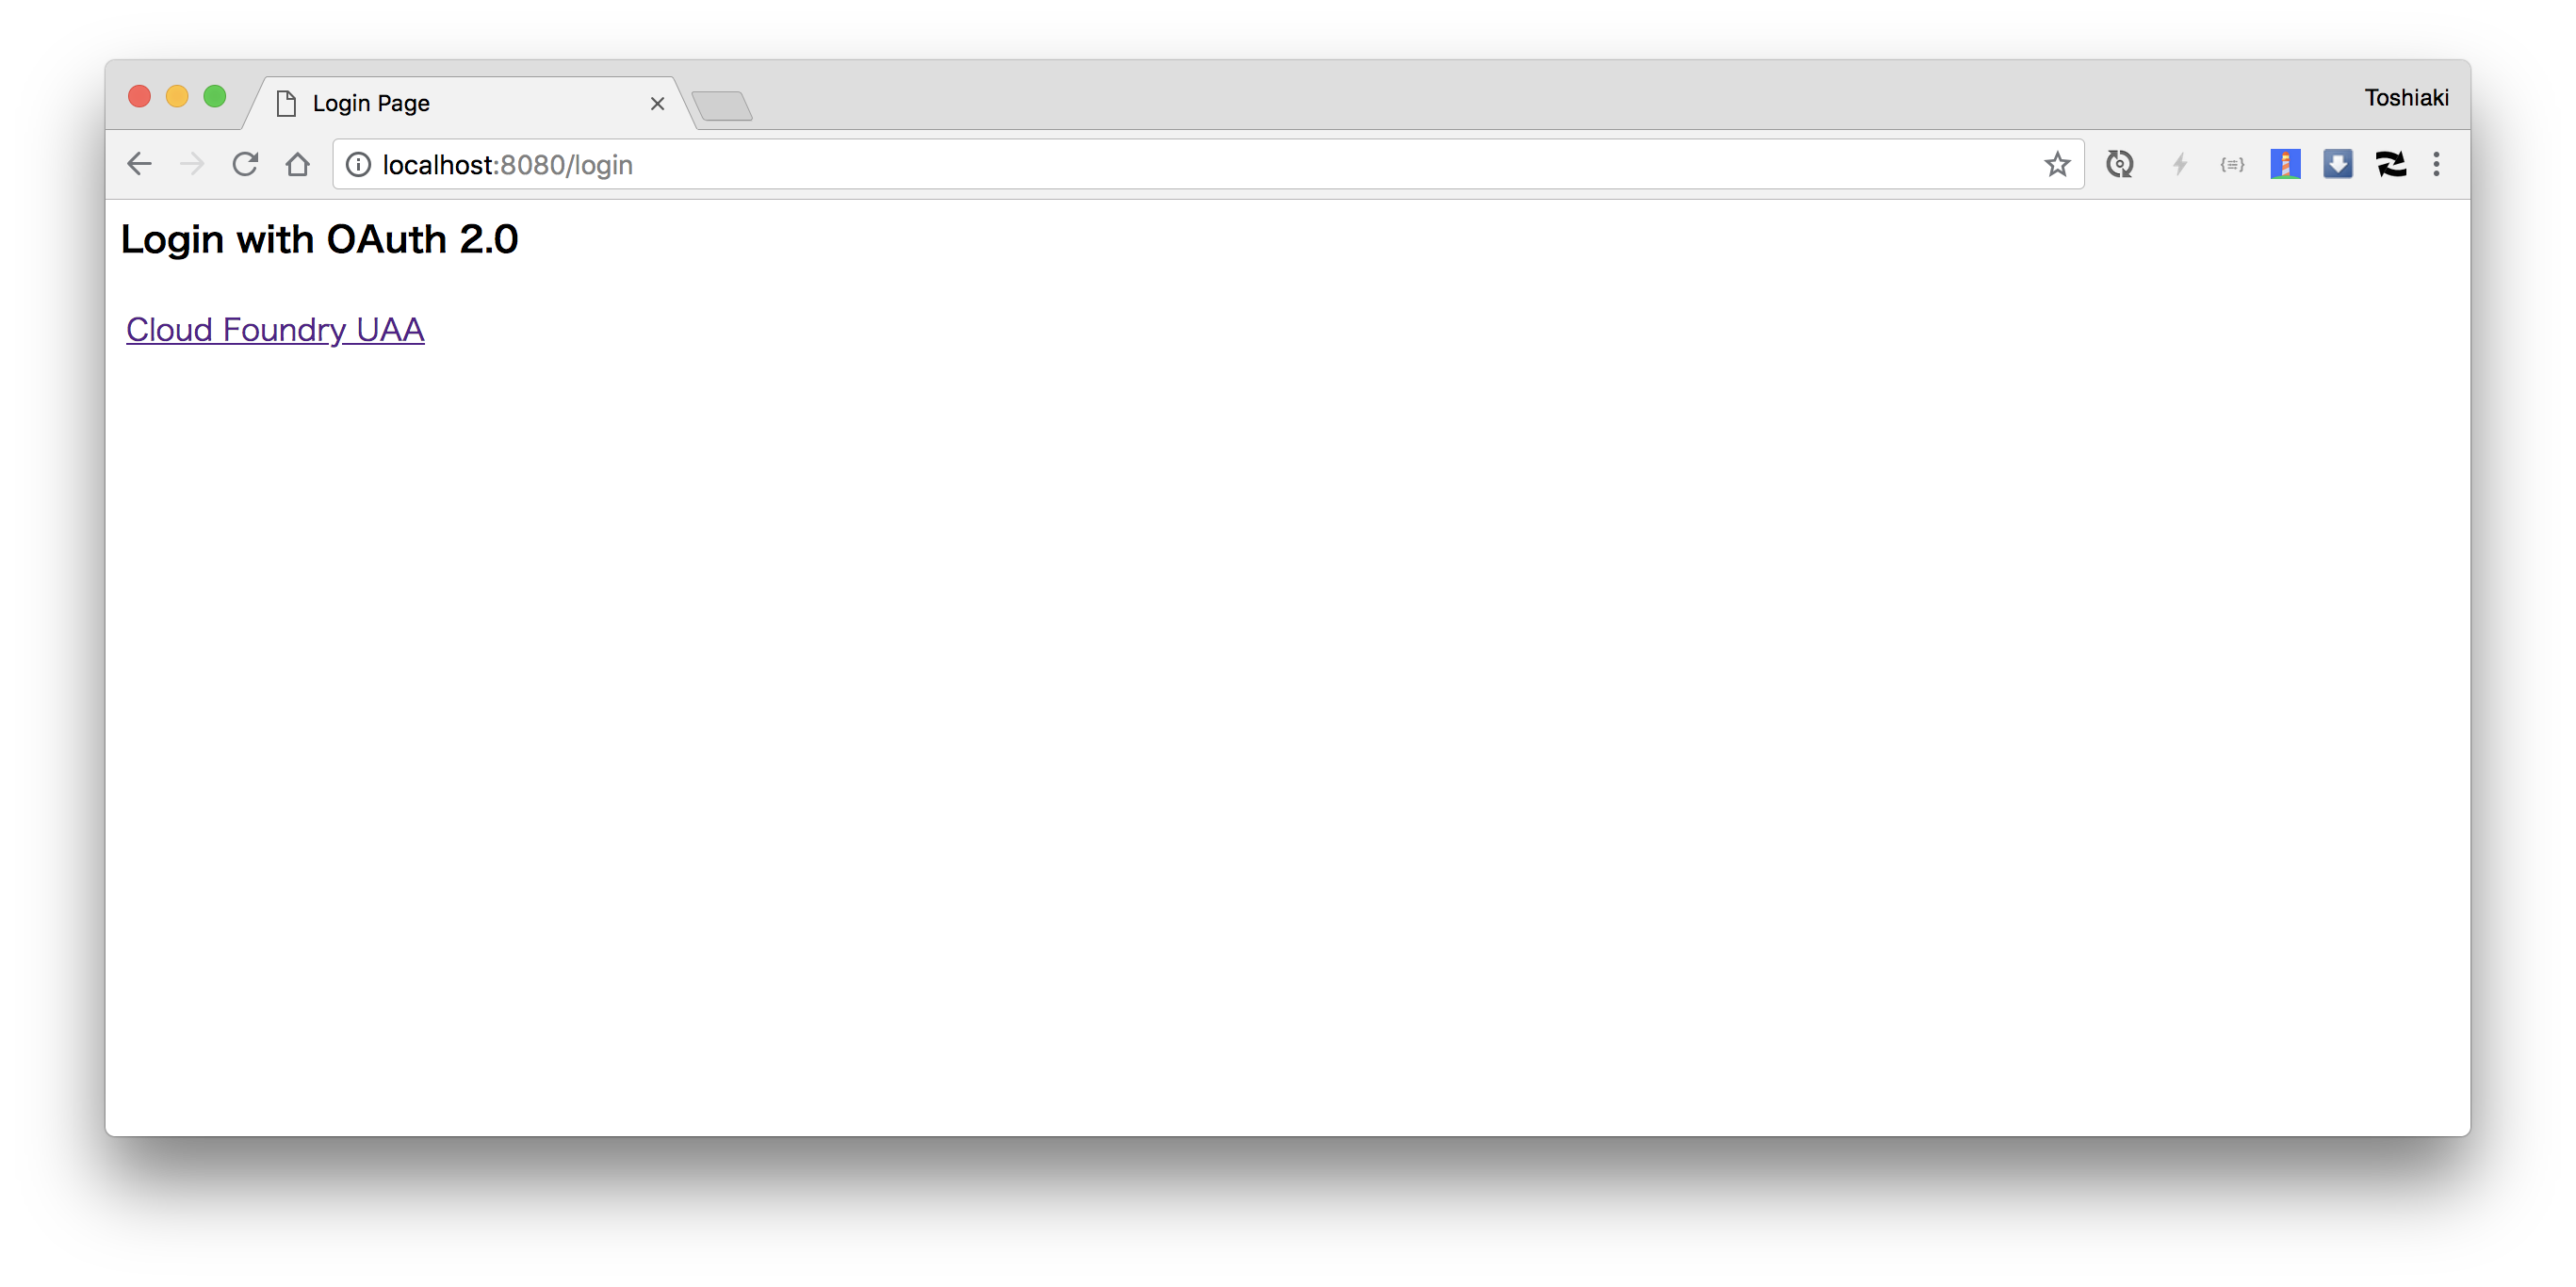
とりあえずadminユーザーでログインします。
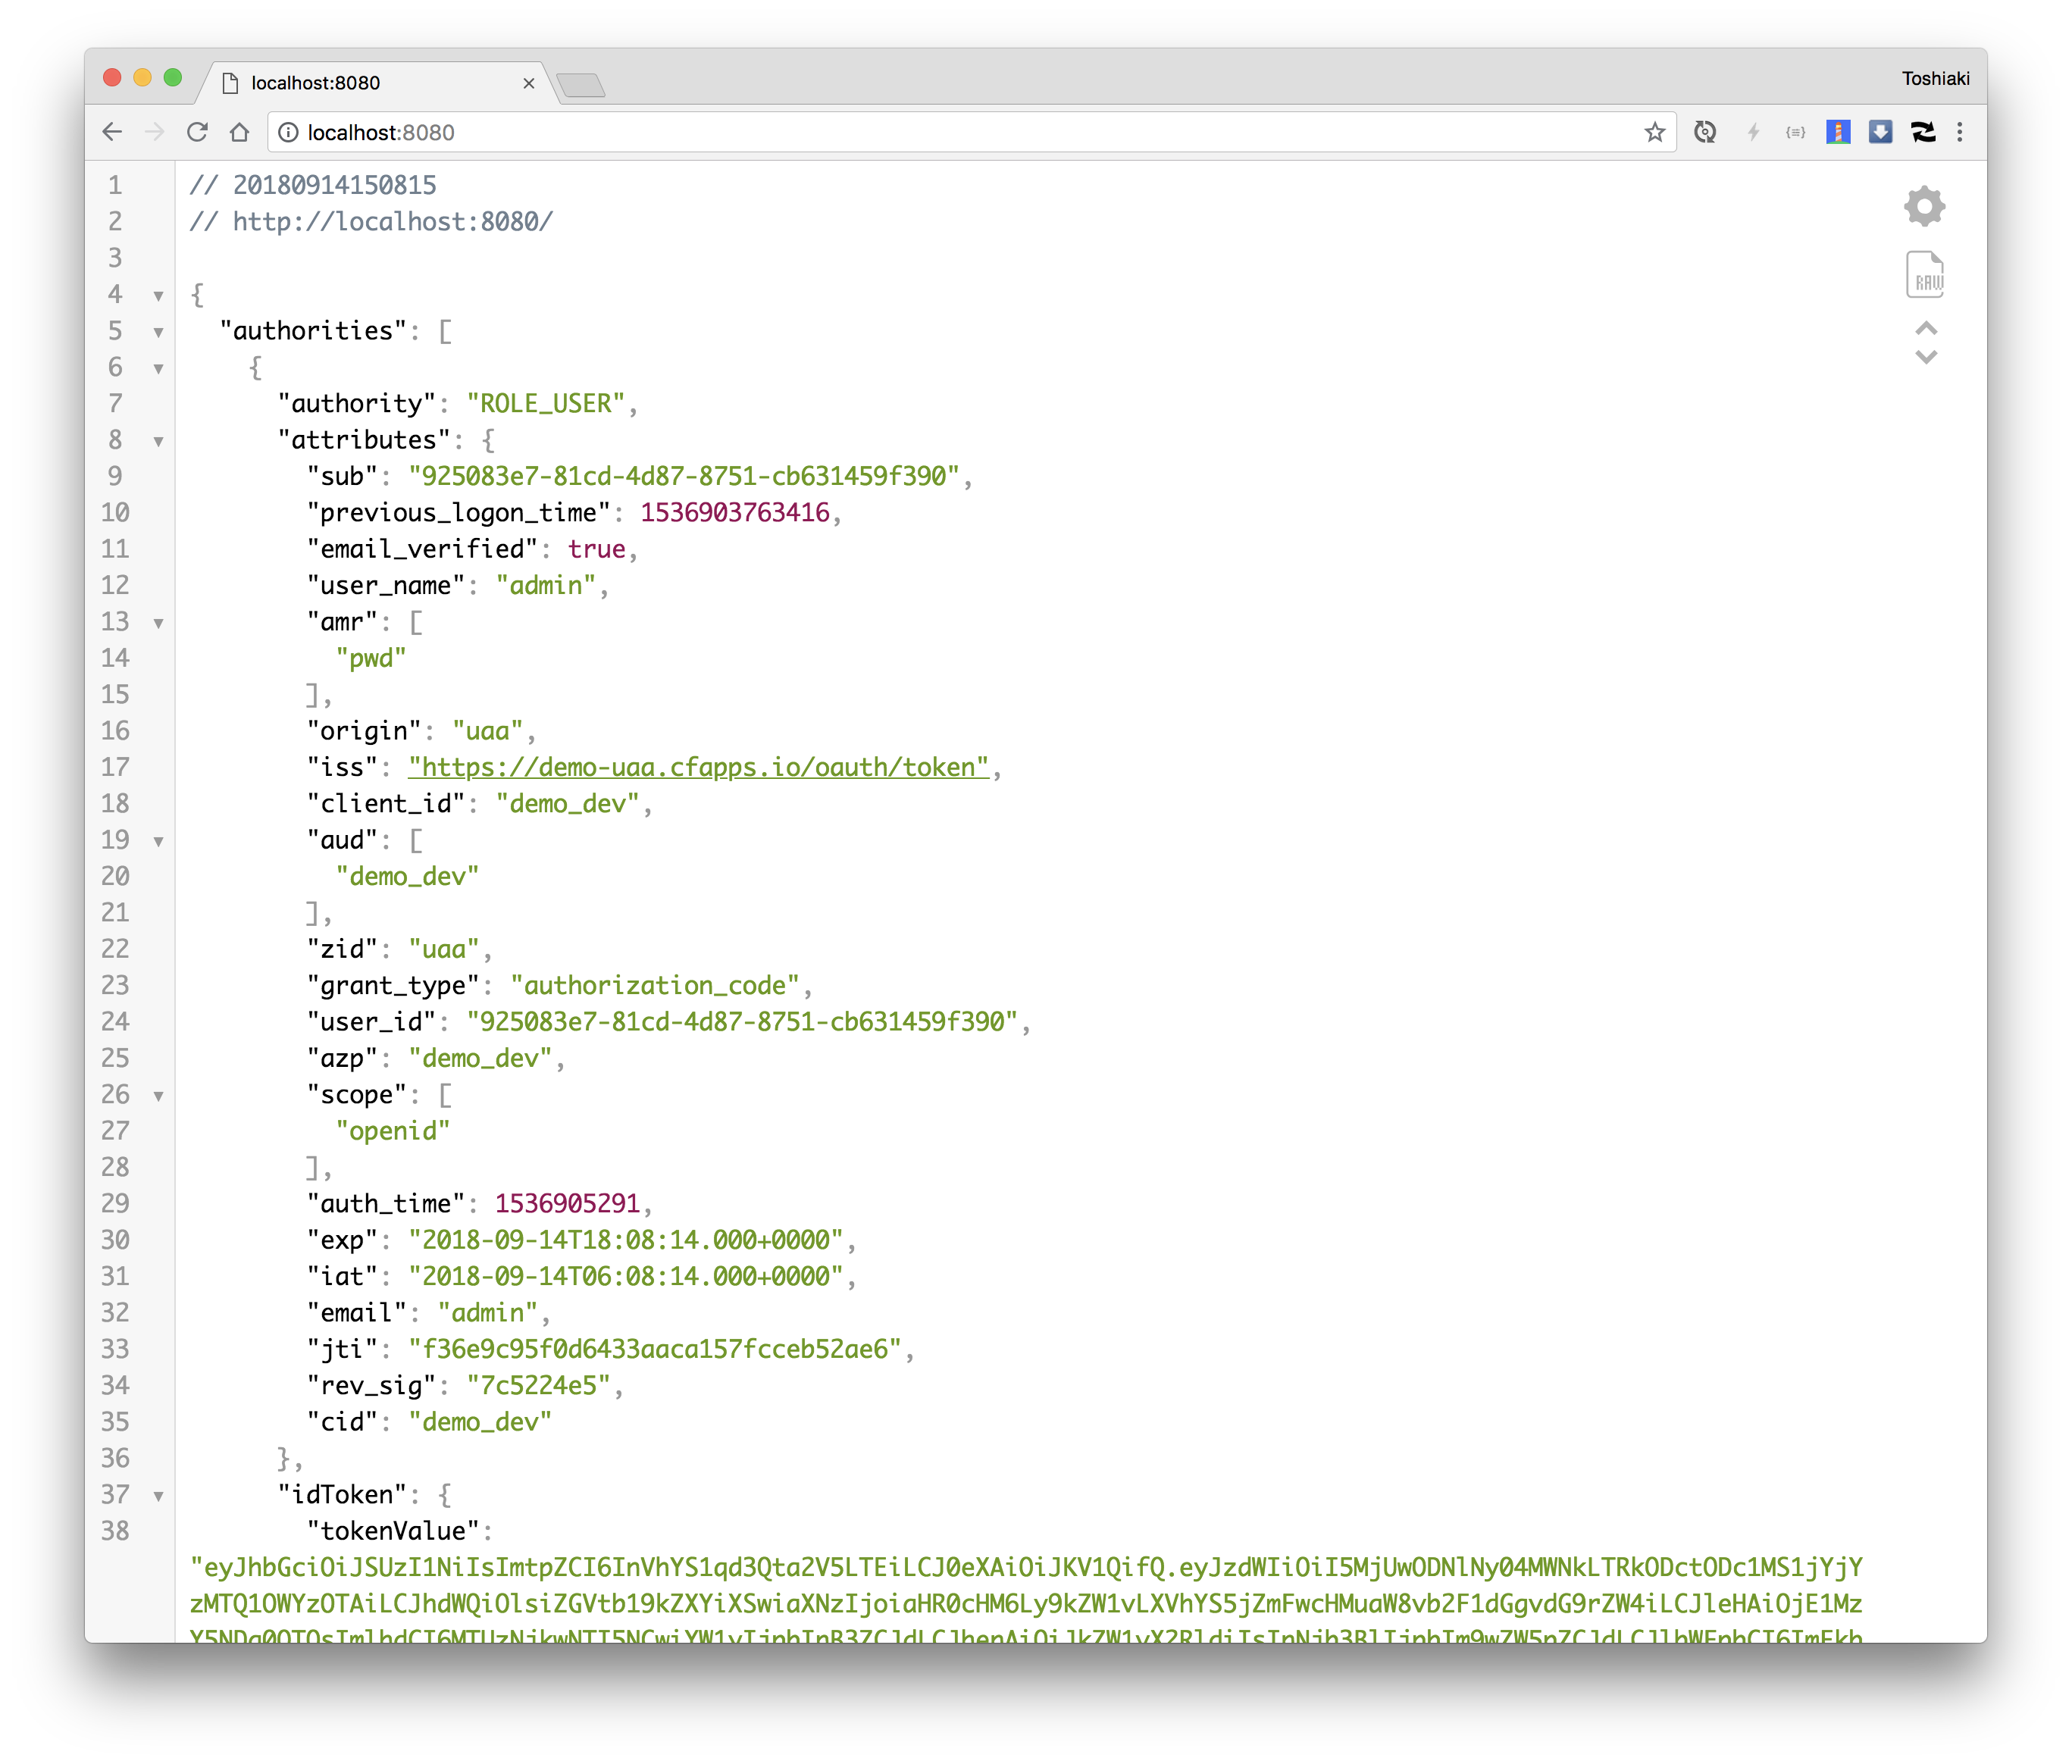
パーミッション確認画面でAUTHORIZEをクリック。

ログインユーザー情報がJSONで出力されます。
ユーザーの作成はCLIでもできますし、ログインフォームの"Create account"からもできます。通知メールが送信されます。
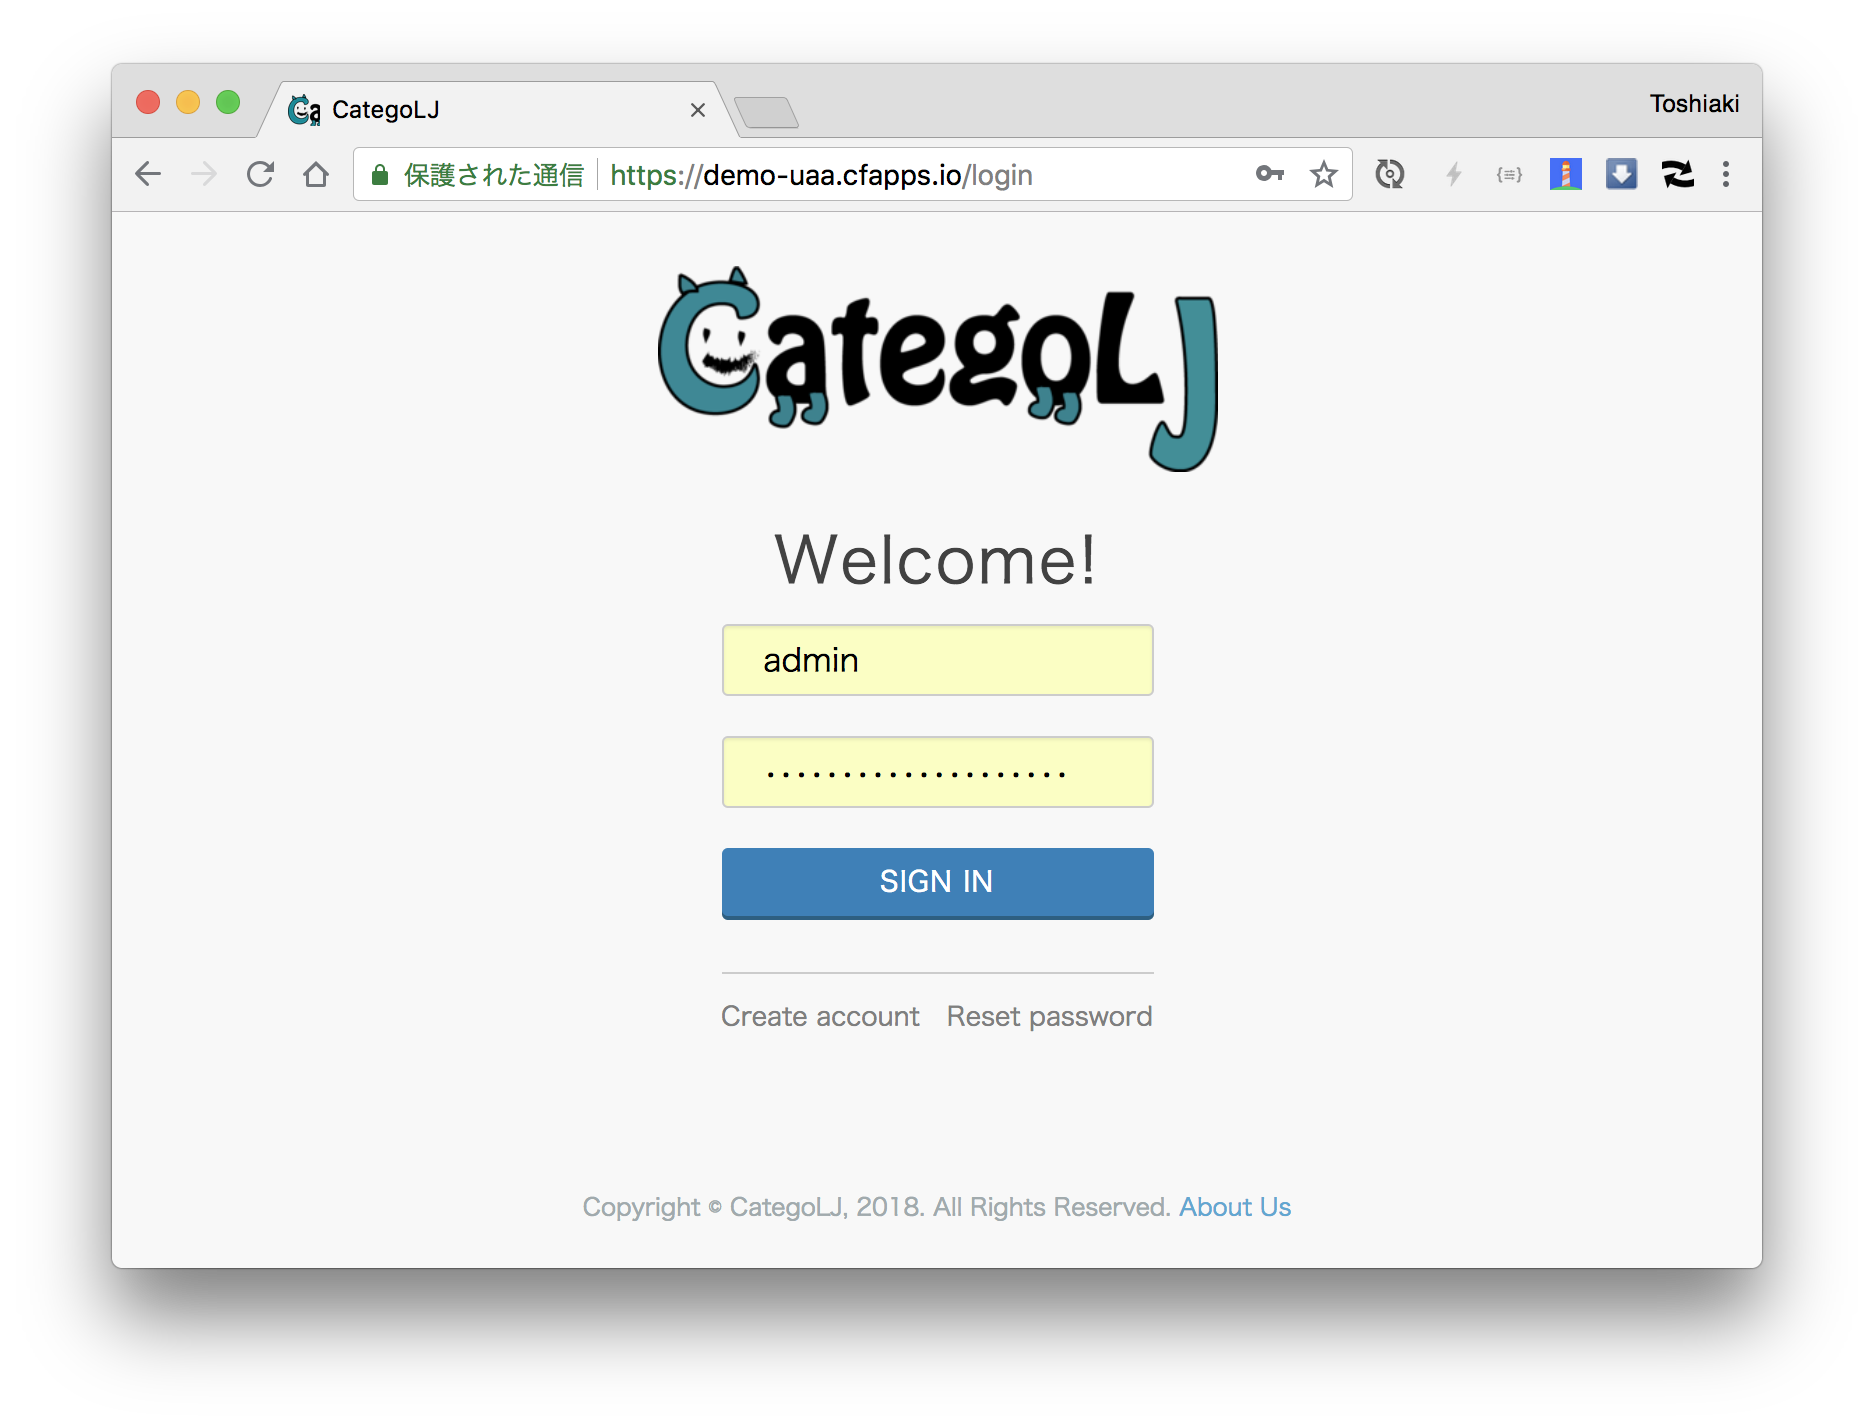
ロゴの変更
デフォルトではCloud Foundryのロゴなので、これを変えて見ます。
resources/imagesの下にproduct-logo.pngとsquare-logo.pngという名前のファイルを作成します。
mkdir -p resources/images
wget -O resources/images/product-logo.png https://github.com/categolj/categolj2-backend/raw/master/logo.png
wget -O resources/images/square-logo.png https://github.com/categolj/blog-ui/raw/develop/src/main/resources/public/favicon-96x96.png
ロゴを変更するops-file(ops-files/branding.yml)を作成。
- type: replace
  path: /login/branding?
  value:
    companyName: CategoLJ
    # product-logo.pngのbase64エンコード文字列
    productLogo: iVBORw0KGgoA..............
    # square-log.pngのbase64エンコード文字列
    squareLogo: iVBORw0KGgoA..............
    footerLegalText: Copyright © CategoLJ, 2018. All Rights Reserved.
    footerLinks:
      About Us: https://github.com/categolj
    banner:
      # product-logo.pngのbase64エンコード文字列
      logo: iVBORw0KGgoA..............
      text: Welcome to CategoLJ UAA!
      textColor: "#000000"
      backgroundColor: "#FFFFFF"
      link: https://((route))
embbed-manifest.shを更新。
cat <<'EOF' > embbed-manifest.sh
#!/bin/bash
set -e

bosh int uaa.yml \
  -o ops-files/branding.yml \
  -o ops-files/smtp.yml \
  -o ops-files/add-demo.yml \
  -v route=demo-uaa.cfapps.io \
  -v smtp_host=smtp.gmail.com \
  -v smtp_port=587 \
  --vars-store=credentials.yml \
  > WEB-INF/classes/uaa.yml

jar -uvf ROOT.war .profile WEB-INF resources
EOF
jarをアップデートしてcf push!
./embbed-manifest.sh
cf push
UAAはLDAPやSAMLとも連携できます。システム内で再利用性の高いコンポーネントなので、認証認可を自分で実装せずUAAの導入を検討してみてください。 一家に一台UAAを。