---
title: Tanzu Kubernetes Grid 1.1をAWSにインストールするメモ
tags: ["Kubernetes", "AWS", "TKG", "Tanzu", "Cluster API"]
categories: ["Dev", "CaaS", "Kubernetes", "TKG", "AWS"]
date: 2020-08-16T13:56:40Z
updated: 2020-08-21T00:41:46Z
---
本記事は、[Tanzu Kubernetes Grid (TKG)](https://docs.vmware.com/jp/VMware-Tanzu-Kubernetes-Grid/index.html) 1.1.2をAWSにインストールするメモです。
TKGは[Cluster API](https://cluster-api.sigs.k8s.io)(`clusterctl`)のラッパーのようなプロダクトです。
Cluster APIには
* Management Cluster
* Workload Cluster
という2種類のKubernetes Clusterがあります。
Workload ClusterはManagement Clusterによってライフサイクルを管理されます。
つまり、Kubernetesで管理されるKubernetes Clusterです。
では、Kubernetesを管理するKubernetesは誰が管理するのでしょうか?
...Kubernetesです😅
TKGではManagement Clusterは[Kind](https://kind.sigs.k8s.io)によってbootstrapされます。
つまり Kind -> Management Cluster -> Workload Clusterという親子関係でKubernetes Clusterが管理されるため、
Cluster APIは次のような亀のロゴになっています。
 Cluster APIについてより知りたい場合は、↓の資料や
* https://www.cncf.io/wp-content/uploads/2020/06/Cluster-API-CNCF-Webinar-20200611.pdf
次のKubeAcademyの動画を見ると良いです。
* https://kube.academy/lessons/bootstrapping-cluster-api-part-1-concepts-components-and-terminology
* https://kube.academy/lessons/bootstrapping-cluster-api-part-2-creating-a-cluster-on-aws-with-cluster-api
**Table of contents**
### CLIのインストール
[https://my.vmware.com/en/web/vmware/downloads/details?downloadGroup=TKG-112&productId=988&rPId=48121](https://my.vmware.com/en/web/vmware/downloads/details?downloadGroup=TKG-112&productId=988&rPId=48121)
から
- clusterawsadm for Mac v0.5.4
- VMware Tanzu Kubernetes Grid CLI for Mac
をダウンロードして次のようにインストールしてください。
```
gunzip tkg-darwin-amd64-v1.1.2-vmware.1.gz
gunzip clusterawsadm-darwin-amd64-v0.5.4-vmware.1.gz
mv tkg-darwin-amd64-v1.1.2-vmware.1 /usr/local/bin/tkg
mv clusterawsadm-darwin-amd64-v0.5.4-vmware.1 /usr/local/bin/clusterawsadm
chmod +x /usr/local/bin/tkg
chmod +x /usr/local/bin/clusterawsadm
```
その他、Dockerが必要です。
`clusterawsadm`は[github](https://github.com/kubernetes-sigs/cluster-api-provider-aws/releases)からもダウンロードできます。
次のバージョンで動作確認しています。
```
$ tkg version
Client:
Version: v1.1.2
Git commit: c1db5bed7bc95e2ba32cf683c50525cdff0f2396
$ clusterawsadm version
clusterawsadm version: &version.Info{Major:"", Minor:"", GitVersion:"", GitCommit:"", GitTreeState:"", BuildDate:"", GoVersion:"go1.13.6", AwsSdkVersion:"v1.31.3", Compiler:"gc", Platform:"darwin/amd64"}
```
次のコマンドを実行すると設定ファイル用のディレクトリが生成されます。
```
tkg get management-cluster
```
次のようなディレクトリが作成します。
```
$ find ~/.tkg
/Users/toshiaki/.tkg
/Users/toshiaki/.tkg/bom
/Users/toshiaki/.tkg/bom/bom-1.1.2+vmware.1.yaml
/Users/toshiaki/.tkg/bom/bom-tkg-1.0.0.yaml
/Users/toshiaki/.tkg/bom/bom-1.17.6+vmware.1.yaml
/Users/toshiaki/.tkg/bom/bom-1.1.0+vmware.1.yaml
/Users/toshiaki/.tkg/providers
/Users/toshiaki/.tkg/providers/control-plane-kubeadm
/Users/toshiaki/.tkg/providers/control-plane-kubeadm/v0.3.6
/Users/toshiaki/.tkg/providers/control-plane-kubeadm/v0.3.6/control-plane-components.yaml
/Users/toshiaki/.tkg/providers/control-plane-kubeadm/v0.3.5
/Users/toshiaki/.tkg/providers/control-plane-kubeadm/v0.3.5/control-plane-components.yaml
/Users/toshiaki/.tkg/providers/control-plane-kubeadm/v0.3.3
/Users/toshiaki/.tkg/providers/control-plane-kubeadm/v0.3.3/control-plane-components.yaml
/Users/toshiaki/.tkg/providers/providers.md5sum
/Users/toshiaki/.tkg/providers/infrastructure-vsphere
/Users/toshiaki/.tkg/providers/infrastructure-vsphere/v0.6.4
/Users/toshiaki/.tkg/providers/infrastructure-vsphere/v0.6.4/infrastructure-components.yaml
/Users/toshiaki/.tkg/providers/infrastructure-vsphere/v0.6.4/cluster-template-dev.yaml
/Users/toshiaki/.tkg/providers/infrastructure-vsphere/v0.6.4/cluster-template-prod.yaml
/Users/toshiaki/.tkg/providers/infrastructure-vsphere/v0.6.3
/Users/toshiaki/.tkg/providers/infrastructure-vsphere/v0.6.3/infrastructure-components.yaml
/Users/toshiaki/.tkg/providers/infrastructure-vsphere/v0.6.3/cluster-template-dev.yaml
/Users/toshiaki/.tkg/providers/infrastructure-vsphere/v0.6.3/cluster-template-prod.yaml
/Users/toshiaki/.tkg/providers/infrastructure-vsphere/v0.6.5
/Users/toshiaki/.tkg/providers/infrastructure-vsphere/v0.6.5/infrastructure-components.yaml
/Users/toshiaki/.tkg/providers/infrastructure-vsphere/v0.6.5/cluster-template-dev.yaml
/Users/toshiaki/.tkg/providers/infrastructure-vsphere/v0.6.5/cluster-template-prod.yaml
/Users/toshiaki/.tkg/providers/cluster-api
/Users/toshiaki/.tkg/providers/cluster-api/v0.3.6
/Users/toshiaki/.tkg/providers/cluster-api/v0.3.6/core-components.yaml
/Users/toshiaki/.tkg/providers/cluster-api/v0.3.5
/Users/toshiaki/.tkg/providers/cluster-api/v0.3.5/core-components.yaml
/Users/toshiaki/.tkg/providers/cluster-api/v0.3.3
/Users/toshiaki/.tkg/providers/cluster-api/v0.3.3/core-components.yaml
/Users/toshiaki/.tkg/providers/config.yaml
/Users/toshiaki/.tkg/providers/bootstrap-kubeadm
/Users/toshiaki/.tkg/providers/bootstrap-kubeadm/v0.3.6
/Users/toshiaki/.tkg/providers/bootstrap-kubeadm/v0.3.6/bootstrap-components.yaml
/Users/toshiaki/.tkg/providers/bootstrap-kubeadm/v0.3.5
/Users/toshiaki/.tkg/providers/bootstrap-kubeadm/v0.3.5/bootstrap-components.yaml
/Users/toshiaki/.tkg/providers/bootstrap-kubeadm/v0.3.3
/Users/toshiaki/.tkg/providers/bootstrap-kubeadm/v0.3.3/bootstrap-components.yaml
/Users/toshiaki/.tkg/providers/infrastructure-aws
/Users/toshiaki/.tkg/providers/infrastructure-aws/v0.5.4
/Users/toshiaki/.tkg/providers/infrastructure-aws/v0.5.4/infrastructure-components.yaml
/Users/toshiaki/.tkg/providers/infrastructure-aws/v0.5.4/cluster-template-dev.yaml
/Users/toshiaki/.tkg/providers/infrastructure-aws/v0.5.4/cluster-template-prod.yaml
/Users/toshiaki/.tkg/providers/infrastructure-aws/v0.5.3
/Users/toshiaki/.tkg/providers/infrastructure-aws/v0.5.3/infrastructure-components.yaml
/Users/toshiaki/.tkg/providers/infrastructure-aws/v0.5.3/cluster-template-dev.yaml
/Users/toshiaki/.tkg/providers/infrastructure-aws/v0.5.3/cluster-template-prod.yaml
/Users/toshiaki/.tkg/providers/infrastructure-aws/v0.5.2
/Users/toshiaki/.tkg/providers/infrastructure-aws/v0.5.2/infrastructure-components.yaml
/Users/toshiaki/.tkg/providers/infrastructure-aws/v0.5.2/cluster-template-dev.yaml
/Users/toshiaki/.tkg/providers/infrastructure-aws/v0.5.2/cluster-template-prod.yaml
/Users/toshiaki/.tkg/providers/infrastructure-tkg-service-vsphere
/Users/toshiaki/.tkg/providers/infrastructure-tkg-service-vsphere/v1.0.0
/Users/toshiaki/.tkg/providers/infrastructure-tkg-service-vsphere/v1.0.0/cluster-template-dev.yaml
/Users/toshiaki/.tkg/providers/infrastructure-tkg-service-vsphere/v1.0.0/cluster-template-prod.yaml
/Users/toshiaki/.tkg/config.yaml
```
### AWSのIAMリソース作成
`clusterawsadm`でTKG(で使われるCluster API)で必要なIAMリソースを作成します。
```
export AWS_ACCESS_KEY_ID=****
export AWS_SECRET_ACCESS_KEY=****
export AWS_REGION=ap-northeast-1
$ clusterawsadm alpha bootstrap create-stack
Attempting to create CloudFormation stack cluster-api-provider-aws-sigs-k8s-io
Following resources are in the stack:
Resource |Type |Status
AWS::IAM::Group |bootstrapper.cluster-api-provider-aws.sigs.k8s.io |CREATE_COMPLETE
AWS::IAM::InstanceProfile |control-plane.cluster-api-provider-aws.sigs.k8s.io |CREATE_COMPLETE
AWS::IAM::InstanceProfile |controllers.cluster-api-provider-aws.sigs.k8s.io |CREATE_COMPLETE
AWS::IAM::InstanceProfile |nodes.cluster-api-provider-aws.sigs.k8s.io |CREATE_COMPLETE
AWS::IAM::ManagedPolicy |arn:aws:iam::120200614459:policy/control-plane.cluster-api-provider-aws.sigs.k8s.io |CREATE_COMPLETE
AWS::IAM::ManagedPolicy |arn:aws:iam::120200614459:policy/nodes.cluster-api-provider-aws.sigs.k8s.io |CREATE_COMPLETE
AWS::IAM::ManagedPolicy |arn:aws:iam::120200614459:policy/controllers.cluster-api-provider-aws.sigs.k8s.io |CREATE_COMPLETE
AWS::IAM::Role |control-plane.cluster-api-provider-aws.sigs.k8s.io |CREATE_COMPLETE
AWS::IAM::Role |controllers.cluster-api-provider-aws.sigs.k8s.io |CREATE_COMPLETE
AWS::IAM::Role |nodes.cluster-api-provider-aws.sigs.k8s.io |CREATE_COMPLETE
AWS::IAM::User |bootstrapper.cluster-api-provider-aws.sigs.k8s.io |CREATE_COMPLETE
```
### SSH Keyの作成
TKGで作成されるVM用のSSH Keyを作成します。
```
export AWS_SSH_KEY_NAME=tkg-sandbox
aws ec2 create-key-pair --key-name tkg-sandbox --output json | jq .KeyMaterial -r > tkg-sandbox.pem
```
### Management ClusterをAWSに作成
TKGでWorkload Clusterを作成するための、Management Clusterを作成します。
[ドキュメント](https://docs.vmware.com/en/VMware-Tanzu-Kubernetes-Grid/1.1/vmware-tanzu-kubernetes-grid-11/GUID-install-tkg-aws-ui.html)ではGUIを使ってインストールすることを推奨されていますが、CLIでインストールします。
次のコマンドで必要な環境変数を設定します。
```
export AWS_CREDENTIALS=$(aws iam create-access-key --user-name bootstrapper.cluster-api-provider-aws.sigs.k8s.io --output json)
cat < tkg-env.sh
export AWS_ACCESS_KEY_ID=$(echo $AWS_CREDENTIALS | jq .AccessKey.AccessKeyId -r)
export AWS_SECRET_ACCESS_KEY=$(echo $AWS_CREDENTIALS | jq .AccessKey.SecretAccessKey -r)
export AWS_B64ENCODED_CREDENTIALS=$(clusterawsadm alpha bootstrap encode-aws-credentials)
EOF
source tkg-env.sh
```
AWSの情報をManagement Cluster用の設定ファイル(`~/.tkg/config.yaml`)に追記します。
```
cat <> ~/.tkg/config.yaml
AWS_REGION: ${AWS_REGION}
AWS_NODE_AZ: ${AWS_REGION}a
AWS_PRIVATE_NODE_CIDR: 10.0.0.0/24
AWS_PUBLIC_NODE_CIDR: 10.0.1.0/24
AWS_PUBLIC_SUBNET_ID:
AWS_PRIVATE_SUBNET_ID:
AWS_SSH_KEY_NAME: ${AWS_SSH_KEY_NAME}
AWS_VPC_ID:
AWS_VPC_CIDR: 10.0.0.0/16
CLUSTER_CIDR: 100.96.0.0/11
CONTROL_PLANE_MACHINE_TYPE: t3.small
NODE_MACHINE_TYPE: t3.medium
EOF
```
次のコマンドでManagement Clusterを作成します。Control Planeの台数は`dev` planが1台、`prod`が3台になります。
```
tkg init --infrastructure aws --name tkg-sandbox --plan dev
```
> `tkg init`でKindクラスタ作成、`clusterctl init`、`clusterclt config`、`kubectl apply`相当の処理が行われます。
次のようなログが出力されます。
```
Logs of the command execution can also be found at: /tmp/tkg-20200816T071656435755588.log
Validating the pre-requisites...
Setting up management cluster...
Validating configuration...
Using infrastructure provider aws:v0.5.4
Generating cluster configuration...
Setting up bootstrapper...
Bootstrapper created. Kubeconfig: /root/.kube-tkg/tmp/config_cYHcgTDa
Installing providers on bootstrapper...
Fetching providers
Installing cert-manager
Waiting for cert-manager to be available...
Installing Provider="cluster-api" Version="v0.3.6" TargetNamespace="capi-system"
Installing Provider="bootstrap-kubeadm" Version="v0.3.6" TargetNamespace="capi-kubeadm-bootstrap-system"
Installing Provider="control-plane-kubeadm" Version="v0.3.6" TargetNamespace="capi-kubeadm-control-plane-system"
Installing Provider="infrastructure-aws" Version="v0.5.4" TargetNamespace="capa-system"
Start creating management cluster...
Saving management cluster kuebconfig into /root/.kube/config
Installing providers on management cluster...
Fetching providers
Installing cert-manager
Waiting for cert-manager to be available...
Installing Provider="cluster-api" Version="v0.3.6" TargetNamespace="capi-system"
Installing Provider="bootstrap-kubeadm" Version="v0.3.6" TargetNamespace="capi-kubeadm-bootstrap-system"
Installing Provider="control-plane-kubeadm" Version="v0.3.6" TargetNamespace="capi-kubeadm-control-plane-system"
Installing Provider="infrastructure-aws" Version="v0.5.4" TargetNamespace="capa-system"
Waiting for the management cluster to get ready for move...
Moving all Cluster API objects from bootstrap cluster to management cluster...
Performing move...
Discovering Cluster API objects
Moving Cluster API objects Clusters=1
Creating objects in the target cluster
Deleting objects from the source cluster
Context set for management cluster tkg-sandbox as 'tkg-sandbox-admin@tkg-sandbox'.
Management cluster created!
You can now create your first workload cluster by running the following:
tkg create cluster [name] --kubernetes-version=[version] --plan=[plan]
```
EC2上には次のVMが作成されています。

VPCやNAT Gatewayも`config.yaml`に合わせて作成されます。


`tkg get management-cluster`コマンドでManagement Cluster一覧を取得できます。
```
$ tkg get management-cluster
MANAGEMENT-CLUSTER-NAME CONTEXT-NAME
tkg-sandbox * tkg-sandbox-admin@tkg-sandbox
```
`tkg get cluster --include-management-cluster`コマンドでWorkload Cluster及びManagement Cluster一覧を取得できます。
```
$ tkg get cluster --include-management-cluster
NAME NAMESPACE STATUS CONTROLPLANE WORKERS KUBERNETES
tkg-sandbox tkg-system running 1/1 1/1 v1.18.3+vmware.1
```
Management Clusterに`kubectl`コマンドでアクセスしてみます。
```
$ kubectl config use-context tkg-sandbox-admin@tkg-sandbox
$ kubectl cluster-info
Kubernetes master is running at https://tkg-sandbox-apiserver-831815079.ap-northeast-1.elb.amazonaws.com:6443
KubeDNS is running at https://tkg-sandbox-apiserver-831815079.ap-northeast-1.elb.amazonaws.com:6443/api/v1/namespaces/kube-system/services/kube-dns:dns/proxy
To further debug and diagnose cluster problems, use 'kubectl cluster-info dump'.
$ kubectl get node -o wide
NAME STATUS ROLES AGE VERSION INTERNAL-IP EXTERNAL-IP OS-IMAGE KERNEL-VERSION CONTAINER-RUNTIME
ip-10-0-0-108.ap-northeast-1.compute.internal Ready master 93m v1.18.3+vmware.1 10.0.0.108 Amazon Linux 2 4.14.181-140.257.amzn2.x86_64 containerd://1.3.4
ip-10-0-0-28.ap-northeast-1.compute.internal Ready 92m v1.18.3+vmware.1 10.0.0.28 Amazon Linux 2 4.14.181-140.257.amzn2.x86_64 containerd://1.3.4
$ kubectl get pod -A -o wide
NAMESPACE NAME READY STATUS RESTARTS AGE IP NODE NOMINATED NODE READINESS GATES
capa-system capa-controller-manager-86cbf677bc-5j5zr 2/2 Running 0 94m 100.119.52.4 ip-10-0-0-108.ap-northeast-1.compute.internal
capi-kubeadm-bootstrap-system capi-kubeadm-bootstrap-controller-manager-6857dfc668-gsw7p 2/2 Running 0 94m 100.100.223.199 ip-10-0-0-28.ap-northeast-1.compute.internal
capi-kubeadm-control-plane-system capi-kubeadm-control-plane-controller-manager-85f4885cf5-59rkq 2/2 Running 0 94m 100.100.223.201 ip-10-0-0-28.ap-northeast-1.compute.internal
capi-system capi-controller-manager-5df8c8fb59-w4rbt 2/2 Running 0 94m 100.100.223.197 ip-10-0-0-28.ap-northeast-1.compute.internal
capi-webhook-system capa-controller-manager-555b87ddbd-vs4m6 2/2 Running 0 94m 100.100.223.202 ip-10-0-0-28.ap-northeast-1.compute.internal
capi-webhook-system capi-controller-manager-7d8d9b87b8-v2gpw 2/2 Running 0 94m 100.100.223.196 ip-10-0-0-28.ap-northeast-1.compute.internal
capi-webhook-system capi-kubeadm-bootstrap-controller-manager-dff99d987-sg8dm 2/2 Running 0 94m 100.100.223.198 ip-10-0-0-28.ap-northeast-1.compute.internal
capi-webhook-system capi-kubeadm-control-plane-controller-manager-6cc995dd6c-7l5pk 2/2 Running 0 94m 100.100.223.200 ip-10-0-0-28.ap-northeast-1.compute.internal
cert-manager cert-manager-b56b4dc78-z9vcs 1/1 Running 0 96m 100.100.223.194 ip-10-0-0-28.ap-northeast-1.compute.internal
cert-manager cert-manager-cainjector-6b54f84d85-rz5sj 1/1 Running 0 96m 100.100.223.193 ip-10-0-0-28.ap-northeast-1.compute.internal
cert-manager cert-manager-webhook-6fbc6d7449-k9zml 1/1 Running 0 96m 100.100.223.195 ip-10-0-0-28.ap-northeast-1.compute.internal
kube-system calico-kube-controllers-54fd4b48dd-z6fdb 1/1 Running 0 96m 100.119.52.2 ip-10-0-0-108.ap-northeast-1.compute.internal
kube-system calico-node-5k4j6 1/1 Running 0 95m 10.0.0.28 ip-10-0-0-28.ap-northeast-1.compute.internal
kube-system calico-node-rm8xx 1/1 Running 0 96m 10.0.0.108 ip-10-0-0-108.ap-northeast-1.compute.internal
kube-system coredns-dbbffcb66-7hp22 1/1 Running 0 96m 100.119.52.3 ip-10-0-0-108.ap-northeast-1.compute.internal
kube-system coredns-dbbffcb66-q7zqj 1/1 Running 0 96m 100.119.52.1 ip-10-0-0-108.ap-northeast-1.compute.internal
kube-system etcd-ip-10-0-0-108.ap-northeast-1.compute.internal 1/1 Running 0 96m 10.0.0.108 ip-10-0-0-108.ap-northeast-1.compute.internal
kube-system kube-apiserver-ip-10-0-0-108.ap-northeast-1.compute.internal 1/1 Running 0 96m 10.0.0.108 ip-10-0-0-108.ap-northeast-1.compute.internal
kube-system kube-controller-manager-ip-10-0-0-108.ap-northeast-1.compute.internal 1/1 Running 0 96m 10.0.0.108 ip-10-0-0-108.ap-northeast-1.compute.internal
kube-system kube-proxy-879rs 1/1 Running 0 95m 10.0.0.28 ip-10-0-0-28.ap-northeast-1.compute.internal
kube-system kube-proxy-h7ckg 1/1 Running 0 96m 10.0.0.108 ip-10-0-0-108.ap-northeast-1.compute.internal
kube-system kube-scheduler-ip-10-0-0-108.ap-northeast-1.compute.internal 1/1 Running 0 96m 10.0.0.108 ip-10-0-0-108.ap-northeast-1.compute.internal
```
Cluster APIのリソースも見てみます。
```
$ kubectl get cluster -A
NAMESPACE NAME PHASE
tkg-system tkg-sandbox Provisioned
$ kubectl get machinedeployment -A
NAMESPACE NAME PHASE REPLICAS AVAILABLE READY
tkg-system tkg-sandbox-md-0 Running 1 1 1
$ kubectl get machineset -A
NAMESPACE NAME REPLICAS AVAILABLE READY
tkg-system tkg-sandbox-md-0-75d49d8447 1 1 1
$ kubectl get machine -A
NAMESPACE NAME PROVIDERID PHASE
tkg-system tkg-sandbox-control-plane-8ldnq aws:///ap-northeast-1a/i-042acfd83946a4758 Running
tkg-system tkg-sandbox-md-0-75d49d8447-bqvd7 aws:///ap-northeast-1a/i-0d04c2727bf7727f7 Running
$ kubectl get machinehealthcheck -A
NAMESPACE NAME MAXUNHEALTHY EXPECTEDMACHINES CURRENTHEALTHY
tkg-system tkg-sandbox 100% 1 1
$ kubectl get kubeadmcontrolplane -A
NAMESPACE NAME READY INITIALIZED REPLICAS READY REPLICAS UPDATED REPLICAS UNAVAILABLE REPLICAS
tkg-system tkg-sandbox-control-plane true true
$ kubectl get kubeadmconfigtemplate -A
NAMESPACE NAME AGE
tkg-system tkg-sandbox-md-0 3h59m
```
AWS実装のリソースも見てみます。
```
$ kubectl get awscluster -A
NAMESPACE NAME CLUSTER READY VPC BASTION IP
tkg-system tkg-sandbox tkg-sandbox true vpc-0b1166959b313d695 52.193.190.32
$ kubectl get awsmachine -A
NAMESPACE NAME CLUSTER STATE READY INSTANCEID MACHINE
tkg-system tkg-sandbox-control-plane-t8w2g tkg-sandbox running true aws:///ap-northeast-1a/i-042acfd83946a4758 tkg-sandbox-control-plane-8ldnq
tkg-system tkg-sandbox-md-0-gdfk8 tkg-sandbox running true aws:///ap-northeast-1a/i-0d04c2727bf7727f7 tkg-sandbox-md-0-75d49d8447-bqvd7
$ kubectl get awsmachinetemplate -A
NAMESPACE NAME AGE
tkg-system tkg-sandbox-control-plane 4h
tkg-system tkg-sandbox-md-0 4h
```
### Workload Clusterを作成
対象のManagement Clusterを`tkg set management-cluster`で指定します。1つしかなければ不要です。
```
$ tkg set management-cluster tkg-sandbox
The current management cluster context is switched to tkg-sandbox
```
対象となっているManagement Clusterを`tkg set management-cluster`で確認できます。`*`がついているクラスタが対象です。
```
$ tkg get management-cluster
MANAGEMENT-CLUSTER-NAME CONTEXT-NAME
tkg-sandbox * tkg-sandbox-admin@tkg-sandbox
```
`tkg create cluster`でWorkload Clusterを作成します。
```
tkg create cluster demo --plan dev
```
次のようなログが出力されます。
```
Logs of the command execution can also be found at: /var/folders/76/vg4pyy253pbgwzncmx2mb1gh0000gq/T/tkg-20200816T203809287331044.log
Validating configuration...
Creating workload cluster 'demo'...
Waiting for cluster to be initialized...
Waiting for cluster nodes to be available...
Workload cluster 'demo' created
```
EC2上には次のVMが作成されています。
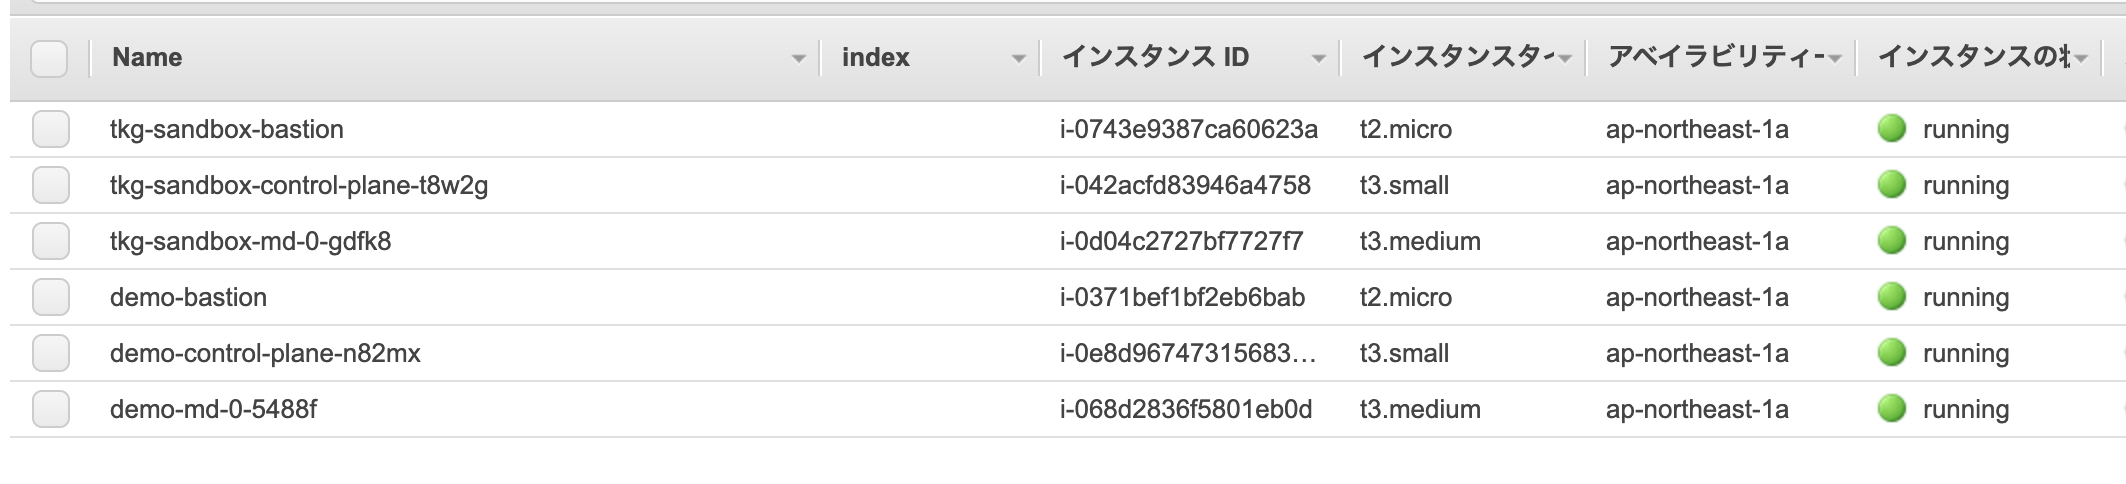
Workload Cluster用にも専用のVPCやNAT Gatewayが`config.yaml`に合わせて作成されます。


Workload ClusterをManagement Clusterと同じVPCに作成する方法は後述します。
`tkg get cluster`でWorkload Clusterを確認できます。
```
$ tkg get cluster
NAME NAMESPACE STATUS CONTROLPLANE WORKERS KUBERNETES
demo default running 1/1 1/1 v1.18.3+vmware.1
```
Cluster APIのリソースを確認します。
```
$ kubectl get cluster -A
NAMESPACE NAME PHASE
default demo Provisioned
tkg-system tkg-sandbox Provisioned
$ kubectl get machinedeployment -A
NAMESPACE NAME PHASE REPLICAS AVAILABLE READY
default demo-md-0 Running 1 1 1
tkg-system tkg-sandbox-md-0 Running 1 1 1
$ kubectl get machineset -A
NAMESPACE NAME REPLICAS AVAILABLE READY
default demo-md-0-558dbbdfdc 1 1 1
tkg-system tkg-sandbox-md-0-75d49d8447 1 1 1
$ kubectl get machine -A
NAMESPACE NAME PROVIDERID PHASE
default demo-control-plane-r4rkt aws:///ap-northeast-1a/i-0e8d967473156836d Running
default demo-md-0-558dbbdfdc-xctfb aws:///ap-northeast-1a/i-068d2836f5801eb0d Running
tkg-system tkg-sandbox-control-plane-8ldnq aws:///ap-northeast-1a/i-042acfd83946a4758 Running
tkg-system tkg-sandbox-md-0-75d49d8447-bqvd7 aws:///ap-northeast-1a/i-0d04c2727bf7727f7 Running
$ kubectl get machinehealthcheck -A
NAMESPACE NAME MAXUNHEALTHY EXPECTEDMACHINES CURRENTHEALTHY
default demo 100% 1 1
tkg-system tkg-sandbox 100% 1 1
$ kubectl get kubeadmcontrolplane -A
NAMESPACE NAME READY INITIALIZED REPLICAS READY REPLICAS UPDATED REPLICAS UNAVAILABLE REPLICAS
default demo-control-plane true true 1 1 1
tkg-system tkg-sandbox-control-plane true true 1 1 1
$ kubectl get kubeadmconfigtemplate -A
NAMESPACE NAME AGE
default demo-md-0 21m
tkg-system tkg-sandbox-md-0 4h29m
$ kubectl get awscluster -A
NAMESPACE NAME CLUSTER READY VPC BASTION IP
default demo demo true vpc-03c82dac6a9aabf5a 52.69.53.60
tkg-system tkg-sandbox tkg-sandbox true vpc-0b1166959b313d695 52.193.190.32
$ kubectl get awsmachine -A
NAMESPACE NAME CLUSTER STATE READY INSTANCEID MACHINE
default demo-control-plane-n82mx demo running true aws:///ap-northeast-1a/i-0e8d967473156836d demo-control-plane-r4rkt
default demo-md-0-5488f demo running true aws:///ap-northeast-1a/i-068d2836f5801eb0d demo-md-0-558dbbdfdc-xctfb
tkg-system tkg-sandbox-control-plane-t8w2g tkg-sandbox running true aws:///ap-northeast-1a/i-042acfd83946a4758 tkg-sandbox-control-plane-8ldnq
tkg-system tkg-sandbox-md-0-gdfk8 tkg-sandbox running true aws:///ap-northeast-1a/i-0d04c2727bf7727f7 tkg-sandbox-md-0-75d49d8447-bqvd7
$ kubectl get awsmachinetemplate -A
NAMESPACE NAME AGE
default demo-control-plane 21m
default demo-md-0 21m
tkg-system tkg-sandbox-control-plane 4h29m
tkg-system tkg-sandbox-md-0 4h29m
```
Workload Cluster `demo`のconfigを取得して、Current Contextに設定します。
```
tkg get credentials demo
kubectl config use-context demo-admin@demo
```
Workload Cluster `demo`を確認します。
```
$ kubectl cluster-info
Kubernetes master is running at https://demo-apiserver-929202159.ap-northeast-1.elb.amazonaws.com:6443
KubeDNS is running at https://demo-apiserver-929202159.ap-northeast-1.elb.amazonaws.com:6443/api/v1/namespaces/kube-system/services/kube-dns:dns/proxy
To further debug and diagnose cluster problems, use 'kubectl cluster-info dump'.
$ kubectl get node -o wide
NAME STATUS ROLES AGE VERSION INTERNAL-IP EXTERNAL-IP OS-IMAGE KERNEL-VERSION CONTAINER-RUNTIME
ip-10-0-0-176.ap-northeast-1.compute.internal Ready master 39m v1.18.3+vmware.1 10.0.0.176 Amazon Linux 2 4.14.181-140.257.amzn2.x86_64 containerd://1.3.4
ip-10-0-0-18.ap-northeast-1.compute.internal Ready 38m v1.18.3+vmware.1 10.0.0.18 Amazon Linux 2 4.14.181-140.257.amzn2.x86_64 containerd://1.3.4
$ kubectl get pod -A -o wide
NAMESPACE NAME READY STATUS RESTARTS AGE IP NODE NOMINATED NODE READINESS GATES
kube-system calico-kube-controllers-54fd4b48dd-nvbn8 1/1 Running 0 40m 100.125.242.195 ip-10-0-0-176.ap-northeast-1.compute.internal
kube-system calico-node-t8mls 1/1 Running 0 40m 10.0.0.18 ip-10-0-0-18.ap-northeast-1.compute.internal
kube-system calico-node-wttxn 1/1 Running 0 40m 10.0.0.176 ip-10-0-0-176.ap-northeast-1.compute.internal
kube-system coredns-dbbffcb66-2pg8v 1/1 Running 0 41m 100.125.242.194 ip-10-0-0-176.ap-northeast-1.compute.internal
kube-system coredns-dbbffcb66-76chs 1/1 Running 0 41m 100.125.242.193 ip-10-0-0-176.ap-northeast-1.compute.internal
kube-system etcd-ip-10-0-0-176.ap-northeast-1.compute.internal 1/1 Running 0 41m 10.0.0.176 ip-10-0-0-176.ap-northeast-1.compute.internal
kube-system kube-apiserver-ip-10-0-0-176.ap-northeast-1.compute.internal 1/1 Running 0 41m 10.0.0.176 ip-10-0-0-176.ap-northeast-1.compute.internal
kube-system kube-controller-manager-ip-10-0-0-176.ap-northeast-1.compute.internal 1/1 Running 0 41m 10.0.0.176 ip-10-0-0-176.ap-northeast-1.compute.internal
kube-system kube-proxy-g2bgf 1/1 Running 0 40m 10.0.0.18 ip-10-0-0-18.ap-northeast-1.compute.internal
kube-system kube-proxy-tvtf2 1/1 Running 0 41m 10.0.0.176 ip-10-0-0-176.ap-northeast-1.compute.internal
kube-system kube-scheduler-ip-10-0-0-176.ap-northeast-1.compute.internal 1/1 Running 0 41m 10.0.0.176 ip-10-0-0-176.ap-northeast-1.compute.internal
```
動作確認用にサンプルアプリをデプロイします。
```
kubectl create deployment demo --image=making/hello-cnb --dry-run -o=yaml > /tmp/deployment.yaml
echo --- >> /tmp/deployment.yaml
kubectl create service loadbalancer demo --tcp=80:8080 --dry-run -o=yaml >> /tmp/deployment.yaml
kubectl apply -f /tmp/deployment.yaml
```
PodとServiceを確認します。
```
$ kubectl get pod,svc -l app=demo
NAME READY STATUS RESTARTS AGE
pod/demo-84b79888b4-df2zz 1/1 Running 0 91s
NAME TYPE CLUSTER-IP EXTERNAL-IP PORT(S) AGE
service/demo LoadBalancer 10.97.118.247 a8ee5042f3fea494b880d599f6f92267-379929389.ap-northeast-1.elb.amazonaws.com 80:30183/TCP 91s
```
アプリにアクセスします。
```
$ curl http://a8ee5042f3fea494b880d599f6f92267-379929389.ap-northeast-1.elb.amazonaws.com/actuator/health
{"status":"UP","groups":["liveness","readiness"]}
```
デプロイしたリソースを削除します。
```
kubectl delete -f /tmp/deployment.yaml
```
### Workload Clusterを削除
いったん`demo` Workload Clusterを削除します。
```
tkg delete cluster demo -y
```
`tkg get cluster`を確認するとSTATUSが`deleting`になります。
```
$ tkg get cluster
NAME NAMESPACE STATUS CONTROLPLANE WORKERS KUBERNETES
demo default deleting
```
しばらくすると`tkg get cluster`の結果から`demo`が消えます。
```
$ tkg get cluster
NAME NAMESPACE STATUS CONTROLPLANE WORKERS KUBERNETES
```
### Workload ClusterをManagement Clusterと同じVPC/Subnetに作成
次にWorkload ClusterをManagement Clusterと同じVPC/Subnetに作成します。Bastion VMやNAT GatewayをManagement Clusterと共用できます。
`~/.tkg/config.yaml`を編集し、次の箇所を設定します。
```
# ... (略) ...
AWS_PUBLIC_SUBNET_ID:
AWS_PRIVATE_SUBNET_ID:
AWS_SSH_KEY_NAME: tkg-sandbox
AWS_VPC_ID:
# ... (略) ...
```
次の図の例だと、

`~/.tkg/config.yaml`は次のようになります。
```
# ... (略) ...
AWS_PUBLIC_SUBNET_ID: subnet-06054c4866dafd2ad
AWS_PRIVATE_SUBNET_ID: subnet-01061ff8fbb3eb50f
AWS_SSH_KEY_NAME: tkg-sandbox
AWS_VPC_ID: vpc-0b1166959b313d695
# ... (略) ...
```
このConfigを使ってWorkload Clusterを作成します。
```
tkg create cluster demo --plan dev
```
EC2上のVMを確認するとWorkload Cluster用のBastionがいないことを確認できます。

VPCもNAT Gatewayも一つのままです。


`AWSCluster`と`AWSMachine`は次のようになります。
```
$ kubectl get awscluster -A
NAMESPACE NAME CLUSTER READY VPC BASTION IP
default demo demo true vpc-0b1166959b313d695
tkg-system tkg-sandbox tkg-sandbox true vpc-0b1166959b313d695 52.193.190.32
$ kubectl get awsmachine -A
NAMESPACE NAME CLUSTER STATE READY INSTANCEID MACHINE
default demo-control-plane-ctcft demo running true aws:///ap-northeast-1a/i-09c433f3993b0ea8b demo-control-plane-9jndn
default demo-md-0-s6cqm demo running true aws:///ap-northeast-1a/i-0750a5c8002f880c8 demo-md-0-558dbbdfdc-48fps
tkg-system tkg-sandbox-control-plane-t8w2g tkg-sandbox running true aws:///ap-northeast-1a/i-042acfd83946a4758 tkg-sandbox-control-plane-8ldnq
tkg-system tkg-sandbox-md-0-gdfk8 tkg-sandbox running true aws:///ap-northeast-1a/i-0d04c2727bf7727f7 tkg-sandbox-md-0-75d49d8447-bqvd7
```
先ほどと同じように、Workload Cluster demoのconfigを取得して、Current Contextに設定します。
```
tkg get credentials demo
kubectl config use-context demo-admin@demo
```
Workload Cluster `demo`を確認します。
```
$ kubectl cluster-info
Kubernetes master is running at https://demo-apiserver-1921586626.ap-northeast-1.elb.amazonaws.com:6443
KubeDNS is running at https://demo-apiserver-1921586626.ap-northeast-1.elb.amazonaws.com:6443/api/v1/namespaces/kube-system/services/kube-dns:dns/proxy
$ kubectl get node -o wide
NAME STATUS ROLES AGE VERSION INTERNAL-IP EXTERNAL-IP OS-IMAGE KERNEL-VERSION CONTAINER-RUNTIME
ip-10-0-0-116.ap-northeast-1.compute.internal Ready 18m v1.18.3+vmware.1 10.0.0.116 Amazon Linux 2 4.14.181-140.257.amzn2.x86_64 containerd://1.3.4
ip-10-0-0-177.ap-northeast-1.compute.internal Ready master 20m v1.18.3+vmware.1 10.0.0.177 Amazon Linux 2 4.14.181-140.257.amzn2.x86_64 containerd://1.3.4
```
### Workload Clusterのスケールアウト
`tkg scale cluster`コマンドでWorkload Clusterをスケールアウトできます。
```
tkg scale cluster demo -w 3
```
Workerが3台に増えたことが確認できます。
```
kubectl get node -o wide
NAME STATUS ROLES AGE VERSION INTERNAL-IP EXTERNAL-IP OS-IMAGE KERNEL-VERSION CONTAINER-RUNTIME
ip-10-0-0-11.ap-northeast-1.compute.internal Ready 54s v1.18.3+vmware.1 10.0.0.11 Amazon Linux 2 4.14.181-140.257.amzn2.x86_64 containerd://1.3.4
ip-10-0-0-116.ap-northeast-1.compute.internal Ready 21m v1.18.3+vmware.1 10.0.0.116 Amazon Linux 2 4.14.181-140.257.amzn2.x86_64 containerd://1.3.4
ip-10-0-0-135.ap-northeast-1.compute.internal Ready 39s v1.18.3+vmware.1 10.0.0.135 Amazon Linux 2 4.14.181-140.257.amzn2.x86_64 containerd://1.3.4
ip-10-0-0-177.ap-northeast-1.compute.internal Ready master 22m v1.18.3+vmware.1 10.0.0.177 Amazon Linux 2 4.14.181-140.257.amzn2.x86_64 containerd://1.3.4
```
### Clusterの削除
次のコマンドでWorkload Clusterを削除します。
```
tkg delete cluster demo -y
```
Workload Clusterが削除された後、Management Clusterを削除します。
```
source tkg-env.sh
tkg delete management-cluster tkg-sandbox -y
```
Management Clusterの削除はKindが使われます。
---
TKGでAWS上にKubernetesクラスタを作成しました。
`tkg`コマンド(+ Cluster API)により一貫した手法でAWSでもvSphereでも同じようにクラスタを作成・管理できるため、
マルチクラウドでKubernetesを管理している場合は特に有用だと思います。
AzureとGCPは今後対応するようです。
Cluster APIについてより知りたい場合は、↓の資料や
* https://www.cncf.io/wp-content/uploads/2020/06/Cluster-API-CNCF-Webinar-20200611.pdf
次のKubeAcademyの動画を見ると良いです。
* https://kube.academy/lessons/bootstrapping-cluster-api-part-1-concepts-components-and-terminology
* https://kube.academy/lessons/bootstrapping-cluster-api-part-2-creating-a-cluster-on-aws-with-cluster-api
**Table of contents**
### CLIのインストール
[https://my.vmware.com/en/web/vmware/downloads/details?downloadGroup=TKG-112&productId=988&rPId=48121](https://my.vmware.com/en/web/vmware/downloads/details?downloadGroup=TKG-112&productId=988&rPId=48121)
から
- clusterawsadm for Mac v0.5.4
- VMware Tanzu Kubernetes Grid CLI for Mac
をダウンロードして次のようにインストールしてください。
```
gunzip tkg-darwin-amd64-v1.1.2-vmware.1.gz
gunzip clusterawsadm-darwin-amd64-v0.5.4-vmware.1.gz
mv tkg-darwin-amd64-v1.1.2-vmware.1 /usr/local/bin/tkg
mv clusterawsadm-darwin-amd64-v0.5.4-vmware.1 /usr/local/bin/clusterawsadm
chmod +x /usr/local/bin/tkg
chmod +x /usr/local/bin/clusterawsadm
```
その他、Dockerが必要です。
`clusterawsadm`は[github](https://github.com/kubernetes-sigs/cluster-api-provider-aws/releases)からもダウンロードできます。
次のバージョンで動作確認しています。
```
$ tkg version
Client:
Version: v1.1.2
Git commit: c1db5bed7bc95e2ba32cf683c50525cdff0f2396
$ clusterawsadm version
clusterawsadm version: &version.Info{Major:"", Minor:"", GitVersion:"", GitCommit:"", GitTreeState:"", BuildDate:"", GoVersion:"go1.13.6", AwsSdkVersion:"v1.31.3", Compiler:"gc", Platform:"darwin/amd64"}
```
次のコマンドを実行すると設定ファイル用のディレクトリが生成されます。
```
tkg get management-cluster
```
次のようなディレクトリが作成します。
```
$ find ~/.tkg
/Users/toshiaki/.tkg
/Users/toshiaki/.tkg/bom
/Users/toshiaki/.tkg/bom/bom-1.1.2+vmware.1.yaml
/Users/toshiaki/.tkg/bom/bom-tkg-1.0.0.yaml
/Users/toshiaki/.tkg/bom/bom-1.17.6+vmware.1.yaml
/Users/toshiaki/.tkg/bom/bom-1.1.0+vmware.1.yaml
/Users/toshiaki/.tkg/providers
/Users/toshiaki/.tkg/providers/control-plane-kubeadm
/Users/toshiaki/.tkg/providers/control-plane-kubeadm/v0.3.6
/Users/toshiaki/.tkg/providers/control-plane-kubeadm/v0.3.6/control-plane-components.yaml
/Users/toshiaki/.tkg/providers/control-plane-kubeadm/v0.3.5
/Users/toshiaki/.tkg/providers/control-plane-kubeadm/v0.3.5/control-plane-components.yaml
/Users/toshiaki/.tkg/providers/control-plane-kubeadm/v0.3.3
/Users/toshiaki/.tkg/providers/control-plane-kubeadm/v0.3.3/control-plane-components.yaml
/Users/toshiaki/.tkg/providers/providers.md5sum
/Users/toshiaki/.tkg/providers/infrastructure-vsphere
/Users/toshiaki/.tkg/providers/infrastructure-vsphere/v0.6.4
/Users/toshiaki/.tkg/providers/infrastructure-vsphere/v0.6.4/infrastructure-components.yaml
/Users/toshiaki/.tkg/providers/infrastructure-vsphere/v0.6.4/cluster-template-dev.yaml
/Users/toshiaki/.tkg/providers/infrastructure-vsphere/v0.6.4/cluster-template-prod.yaml
/Users/toshiaki/.tkg/providers/infrastructure-vsphere/v0.6.3
/Users/toshiaki/.tkg/providers/infrastructure-vsphere/v0.6.3/infrastructure-components.yaml
/Users/toshiaki/.tkg/providers/infrastructure-vsphere/v0.6.3/cluster-template-dev.yaml
/Users/toshiaki/.tkg/providers/infrastructure-vsphere/v0.6.3/cluster-template-prod.yaml
/Users/toshiaki/.tkg/providers/infrastructure-vsphere/v0.6.5
/Users/toshiaki/.tkg/providers/infrastructure-vsphere/v0.6.5/infrastructure-components.yaml
/Users/toshiaki/.tkg/providers/infrastructure-vsphere/v0.6.5/cluster-template-dev.yaml
/Users/toshiaki/.tkg/providers/infrastructure-vsphere/v0.6.5/cluster-template-prod.yaml
/Users/toshiaki/.tkg/providers/cluster-api
/Users/toshiaki/.tkg/providers/cluster-api/v0.3.6
/Users/toshiaki/.tkg/providers/cluster-api/v0.3.6/core-components.yaml
/Users/toshiaki/.tkg/providers/cluster-api/v0.3.5
/Users/toshiaki/.tkg/providers/cluster-api/v0.3.5/core-components.yaml
/Users/toshiaki/.tkg/providers/cluster-api/v0.3.3
/Users/toshiaki/.tkg/providers/cluster-api/v0.3.3/core-components.yaml
/Users/toshiaki/.tkg/providers/config.yaml
/Users/toshiaki/.tkg/providers/bootstrap-kubeadm
/Users/toshiaki/.tkg/providers/bootstrap-kubeadm/v0.3.6
/Users/toshiaki/.tkg/providers/bootstrap-kubeadm/v0.3.6/bootstrap-components.yaml
/Users/toshiaki/.tkg/providers/bootstrap-kubeadm/v0.3.5
/Users/toshiaki/.tkg/providers/bootstrap-kubeadm/v0.3.5/bootstrap-components.yaml
/Users/toshiaki/.tkg/providers/bootstrap-kubeadm/v0.3.3
/Users/toshiaki/.tkg/providers/bootstrap-kubeadm/v0.3.3/bootstrap-components.yaml
/Users/toshiaki/.tkg/providers/infrastructure-aws
/Users/toshiaki/.tkg/providers/infrastructure-aws/v0.5.4
/Users/toshiaki/.tkg/providers/infrastructure-aws/v0.5.4/infrastructure-components.yaml
/Users/toshiaki/.tkg/providers/infrastructure-aws/v0.5.4/cluster-template-dev.yaml
/Users/toshiaki/.tkg/providers/infrastructure-aws/v0.5.4/cluster-template-prod.yaml
/Users/toshiaki/.tkg/providers/infrastructure-aws/v0.5.3
/Users/toshiaki/.tkg/providers/infrastructure-aws/v0.5.3/infrastructure-components.yaml
/Users/toshiaki/.tkg/providers/infrastructure-aws/v0.5.3/cluster-template-dev.yaml
/Users/toshiaki/.tkg/providers/infrastructure-aws/v0.5.3/cluster-template-prod.yaml
/Users/toshiaki/.tkg/providers/infrastructure-aws/v0.5.2
/Users/toshiaki/.tkg/providers/infrastructure-aws/v0.5.2/infrastructure-components.yaml
/Users/toshiaki/.tkg/providers/infrastructure-aws/v0.5.2/cluster-template-dev.yaml
/Users/toshiaki/.tkg/providers/infrastructure-aws/v0.5.2/cluster-template-prod.yaml
/Users/toshiaki/.tkg/providers/infrastructure-tkg-service-vsphere
/Users/toshiaki/.tkg/providers/infrastructure-tkg-service-vsphere/v1.0.0
/Users/toshiaki/.tkg/providers/infrastructure-tkg-service-vsphere/v1.0.0/cluster-template-dev.yaml
/Users/toshiaki/.tkg/providers/infrastructure-tkg-service-vsphere/v1.0.0/cluster-template-prod.yaml
/Users/toshiaki/.tkg/config.yaml
```
### AWSのIAMリソース作成
`clusterawsadm`でTKG(で使われるCluster API)で必要なIAMリソースを作成します。
```
export AWS_ACCESS_KEY_ID=****
export AWS_SECRET_ACCESS_KEY=****
export AWS_REGION=ap-northeast-1
$ clusterawsadm alpha bootstrap create-stack
Attempting to create CloudFormation stack cluster-api-provider-aws-sigs-k8s-io
Following resources are in the stack:
Resource |Type |Status
AWS::IAM::Group |bootstrapper.cluster-api-provider-aws.sigs.k8s.io |CREATE_COMPLETE
AWS::IAM::InstanceProfile |control-plane.cluster-api-provider-aws.sigs.k8s.io |CREATE_COMPLETE
AWS::IAM::InstanceProfile |controllers.cluster-api-provider-aws.sigs.k8s.io |CREATE_COMPLETE
AWS::IAM::InstanceProfile |nodes.cluster-api-provider-aws.sigs.k8s.io |CREATE_COMPLETE
AWS::IAM::ManagedPolicy |arn:aws:iam::120200614459:policy/control-plane.cluster-api-provider-aws.sigs.k8s.io |CREATE_COMPLETE
AWS::IAM::ManagedPolicy |arn:aws:iam::120200614459:policy/nodes.cluster-api-provider-aws.sigs.k8s.io |CREATE_COMPLETE
AWS::IAM::ManagedPolicy |arn:aws:iam::120200614459:policy/controllers.cluster-api-provider-aws.sigs.k8s.io |CREATE_COMPLETE
AWS::IAM::Role |control-plane.cluster-api-provider-aws.sigs.k8s.io |CREATE_COMPLETE
AWS::IAM::Role |controllers.cluster-api-provider-aws.sigs.k8s.io |CREATE_COMPLETE
AWS::IAM::Role |nodes.cluster-api-provider-aws.sigs.k8s.io |CREATE_COMPLETE
AWS::IAM::User |bootstrapper.cluster-api-provider-aws.sigs.k8s.io |CREATE_COMPLETE
```
### SSH Keyの作成
TKGで作成されるVM用のSSH Keyを作成します。
```
export AWS_SSH_KEY_NAME=tkg-sandbox
aws ec2 create-key-pair --key-name tkg-sandbox --output json | jq .KeyMaterial -r > tkg-sandbox.pem
```
### Management ClusterをAWSに作成
TKGでWorkload Clusterを作成するための、Management Clusterを作成します。
[ドキュメント](https://docs.vmware.com/en/VMware-Tanzu-Kubernetes-Grid/1.1/vmware-tanzu-kubernetes-grid-11/GUID-install-tkg-aws-ui.html)ではGUIを使ってインストールすることを推奨されていますが、CLIでインストールします。
次のコマンドで必要な環境変数を設定します。
```
export AWS_CREDENTIALS=$(aws iam create-access-key --user-name bootstrapper.cluster-api-provider-aws.sigs.k8s.io --output json)
cat < tkg-env.sh
export AWS_ACCESS_KEY_ID=$(echo $AWS_CREDENTIALS | jq .AccessKey.AccessKeyId -r)
export AWS_SECRET_ACCESS_KEY=$(echo $AWS_CREDENTIALS | jq .AccessKey.SecretAccessKey -r)
export AWS_B64ENCODED_CREDENTIALS=$(clusterawsadm alpha bootstrap encode-aws-credentials)
EOF
source tkg-env.sh
```
AWSの情報をManagement Cluster用の設定ファイル(`~/.tkg/config.yaml`)に追記します。
```
cat <> ~/.tkg/config.yaml
AWS_REGION: ${AWS_REGION}
AWS_NODE_AZ: ${AWS_REGION}a
AWS_PRIVATE_NODE_CIDR: 10.0.0.0/24
AWS_PUBLIC_NODE_CIDR: 10.0.1.0/24
AWS_PUBLIC_SUBNET_ID:
AWS_PRIVATE_SUBNET_ID:
AWS_SSH_KEY_NAME: ${AWS_SSH_KEY_NAME}
AWS_VPC_ID:
AWS_VPC_CIDR: 10.0.0.0/16
CLUSTER_CIDR: 100.96.0.0/11
CONTROL_PLANE_MACHINE_TYPE: t3.small
NODE_MACHINE_TYPE: t3.medium
EOF
```
次のコマンドでManagement Clusterを作成します。Control Planeの台数は`dev` planが1台、`prod`が3台になります。
```
tkg init --infrastructure aws --name tkg-sandbox --plan dev
```
> `tkg init`でKindクラスタ作成、`clusterctl init`、`clusterclt config`、`kubectl apply`相当の処理が行われます。
次のようなログが出力されます。
```
Logs of the command execution can also be found at: /tmp/tkg-20200816T071656435755588.log
Validating the pre-requisites...
Setting up management cluster...
Validating configuration...
Using infrastructure provider aws:v0.5.4
Generating cluster configuration...
Setting up bootstrapper...
Bootstrapper created. Kubeconfig: /root/.kube-tkg/tmp/config_cYHcgTDa
Installing providers on bootstrapper...
Fetching providers
Installing cert-manager
Waiting for cert-manager to be available...
Installing Provider="cluster-api" Version="v0.3.6" TargetNamespace="capi-system"
Installing Provider="bootstrap-kubeadm" Version="v0.3.6" TargetNamespace="capi-kubeadm-bootstrap-system"
Installing Provider="control-plane-kubeadm" Version="v0.3.6" TargetNamespace="capi-kubeadm-control-plane-system"
Installing Provider="infrastructure-aws" Version="v0.5.4" TargetNamespace="capa-system"
Start creating management cluster...
Saving management cluster kuebconfig into /root/.kube/config
Installing providers on management cluster...
Fetching providers
Installing cert-manager
Waiting for cert-manager to be available...
Installing Provider="cluster-api" Version="v0.3.6" TargetNamespace="capi-system"
Installing Provider="bootstrap-kubeadm" Version="v0.3.6" TargetNamespace="capi-kubeadm-bootstrap-system"
Installing Provider="control-plane-kubeadm" Version="v0.3.6" TargetNamespace="capi-kubeadm-control-plane-system"
Installing Provider="infrastructure-aws" Version="v0.5.4" TargetNamespace="capa-system"
Waiting for the management cluster to get ready for move...
Moving all Cluster API objects from bootstrap cluster to management cluster...
Performing move...
Discovering Cluster API objects
Moving Cluster API objects Clusters=1
Creating objects in the target cluster
Deleting objects from the source cluster
Context set for management cluster tkg-sandbox as 'tkg-sandbox-admin@tkg-sandbox'.
Management cluster created!
You can now create your first workload cluster by running the following:
tkg create cluster [name] --kubernetes-version=[version] --plan=[plan]
```
EC2上には次のVMが作成されています。

VPCやNAT Gatewayも`config.yaml`に合わせて作成されます。


`tkg get management-cluster`コマンドでManagement Cluster一覧を取得できます。
```
$ tkg get management-cluster
MANAGEMENT-CLUSTER-NAME CONTEXT-NAME
tkg-sandbox * tkg-sandbox-admin@tkg-sandbox
```
`tkg get cluster --include-management-cluster`コマンドでWorkload Cluster及びManagement Cluster一覧を取得できます。
```
$ tkg get cluster --include-management-cluster
NAME NAMESPACE STATUS CONTROLPLANE WORKERS KUBERNETES
tkg-sandbox tkg-system running 1/1 1/1 v1.18.3+vmware.1
```
Management Clusterに`kubectl`コマンドでアクセスしてみます。
```
$ kubectl config use-context tkg-sandbox-admin@tkg-sandbox
$ kubectl cluster-info
Kubernetes master is running at https://tkg-sandbox-apiserver-831815079.ap-northeast-1.elb.amazonaws.com:6443
KubeDNS is running at https://tkg-sandbox-apiserver-831815079.ap-northeast-1.elb.amazonaws.com:6443/api/v1/namespaces/kube-system/services/kube-dns:dns/proxy
To further debug and diagnose cluster problems, use 'kubectl cluster-info dump'.
$ kubectl get node -o wide
NAME STATUS ROLES AGE VERSION INTERNAL-IP EXTERNAL-IP OS-IMAGE KERNEL-VERSION CONTAINER-RUNTIME
ip-10-0-0-108.ap-northeast-1.compute.internal Ready master 93m v1.18.3+vmware.1 10.0.0.108 Amazon Linux 2 4.14.181-140.257.amzn2.x86_64 containerd://1.3.4
ip-10-0-0-28.ap-northeast-1.compute.internal Ready 92m v1.18.3+vmware.1 10.0.0.28 Amazon Linux 2 4.14.181-140.257.amzn2.x86_64 containerd://1.3.4
$ kubectl get pod -A -o wide
NAMESPACE NAME READY STATUS RESTARTS AGE IP NODE NOMINATED NODE READINESS GATES
capa-system capa-controller-manager-86cbf677bc-5j5zr 2/2 Running 0 94m 100.119.52.4 ip-10-0-0-108.ap-northeast-1.compute.internal
capi-kubeadm-bootstrap-system capi-kubeadm-bootstrap-controller-manager-6857dfc668-gsw7p 2/2 Running 0 94m 100.100.223.199 ip-10-0-0-28.ap-northeast-1.compute.internal
capi-kubeadm-control-plane-system capi-kubeadm-control-plane-controller-manager-85f4885cf5-59rkq 2/2 Running 0 94m 100.100.223.201 ip-10-0-0-28.ap-northeast-1.compute.internal
capi-system capi-controller-manager-5df8c8fb59-w4rbt 2/2 Running 0 94m 100.100.223.197 ip-10-0-0-28.ap-northeast-1.compute.internal
capi-webhook-system capa-controller-manager-555b87ddbd-vs4m6 2/2 Running 0 94m 100.100.223.202 ip-10-0-0-28.ap-northeast-1.compute.internal
capi-webhook-system capi-controller-manager-7d8d9b87b8-v2gpw 2/2 Running 0 94m 100.100.223.196 ip-10-0-0-28.ap-northeast-1.compute.internal
capi-webhook-system capi-kubeadm-bootstrap-controller-manager-dff99d987-sg8dm 2/2 Running 0 94m 100.100.223.198 ip-10-0-0-28.ap-northeast-1.compute.internal
capi-webhook-system capi-kubeadm-control-plane-controller-manager-6cc995dd6c-7l5pk 2/2 Running 0 94m 100.100.223.200 ip-10-0-0-28.ap-northeast-1.compute.internal
cert-manager cert-manager-b56b4dc78-z9vcs 1/1 Running 0 96m 100.100.223.194 ip-10-0-0-28.ap-northeast-1.compute.internal
cert-manager cert-manager-cainjector-6b54f84d85-rz5sj 1/1 Running 0 96m 100.100.223.193 ip-10-0-0-28.ap-northeast-1.compute.internal
cert-manager cert-manager-webhook-6fbc6d7449-k9zml 1/1 Running 0 96m 100.100.223.195 ip-10-0-0-28.ap-northeast-1.compute.internal
kube-system calico-kube-controllers-54fd4b48dd-z6fdb 1/1 Running 0 96m 100.119.52.2 ip-10-0-0-108.ap-northeast-1.compute.internal
kube-system calico-node-5k4j6 1/1 Running 0 95m 10.0.0.28 ip-10-0-0-28.ap-northeast-1.compute.internal
kube-system calico-node-rm8xx 1/1 Running 0 96m 10.0.0.108 ip-10-0-0-108.ap-northeast-1.compute.internal
kube-system coredns-dbbffcb66-7hp22 1/1 Running 0 96m 100.119.52.3 ip-10-0-0-108.ap-northeast-1.compute.internal
kube-system coredns-dbbffcb66-q7zqj 1/1 Running 0 96m 100.119.52.1 ip-10-0-0-108.ap-northeast-1.compute.internal
kube-system etcd-ip-10-0-0-108.ap-northeast-1.compute.internal 1/1 Running 0 96m 10.0.0.108 ip-10-0-0-108.ap-northeast-1.compute.internal
kube-system kube-apiserver-ip-10-0-0-108.ap-northeast-1.compute.internal 1/1 Running 0 96m 10.0.0.108 ip-10-0-0-108.ap-northeast-1.compute.internal
kube-system kube-controller-manager-ip-10-0-0-108.ap-northeast-1.compute.internal 1/1 Running 0 96m 10.0.0.108 ip-10-0-0-108.ap-northeast-1.compute.internal
kube-system kube-proxy-879rs 1/1 Running 0 95m 10.0.0.28 ip-10-0-0-28.ap-northeast-1.compute.internal
kube-system kube-proxy-h7ckg 1/1 Running 0 96m 10.0.0.108 ip-10-0-0-108.ap-northeast-1.compute.internal
kube-system kube-scheduler-ip-10-0-0-108.ap-northeast-1.compute.internal 1/1 Running 0 96m 10.0.0.108 ip-10-0-0-108.ap-northeast-1.compute.internal
```
Cluster APIのリソースも見てみます。
```
$ kubectl get cluster -A
NAMESPACE NAME PHASE
tkg-system tkg-sandbox Provisioned
$ kubectl get machinedeployment -A
NAMESPACE NAME PHASE REPLICAS AVAILABLE READY
tkg-system tkg-sandbox-md-0 Running 1 1 1
$ kubectl get machineset -A
NAMESPACE NAME REPLICAS AVAILABLE READY
tkg-system tkg-sandbox-md-0-75d49d8447 1 1 1
$ kubectl get machine -A
NAMESPACE NAME PROVIDERID PHASE
tkg-system tkg-sandbox-control-plane-8ldnq aws:///ap-northeast-1a/i-042acfd83946a4758 Running
tkg-system tkg-sandbox-md-0-75d49d8447-bqvd7 aws:///ap-northeast-1a/i-0d04c2727bf7727f7 Running
$ kubectl get machinehealthcheck -A
NAMESPACE NAME MAXUNHEALTHY EXPECTEDMACHINES CURRENTHEALTHY
tkg-system tkg-sandbox 100% 1 1
$ kubectl get kubeadmcontrolplane -A
NAMESPACE NAME READY INITIALIZED REPLICAS READY REPLICAS UPDATED REPLICAS UNAVAILABLE REPLICAS
tkg-system tkg-sandbox-control-plane true true
$ kubectl get kubeadmconfigtemplate -A
NAMESPACE NAME AGE
tkg-system tkg-sandbox-md-0 3h59m
```
AWS実装のリソースも見てみます。
```
$ kubectl get awscluster -A
NAMESPACE NAME CLUSTER READY VPC BASTION IP
tkg-system tkg-sandbox tkg-sandbox true vpc-0b1166959b313d695 52.193.190.32
$ kubectl get awsmachine -A
NAMESPACE NAME CLUSTER STATE READY INSTANCEID MACHINE
tkg-system tkg-sandbox-control-plane-t8w2g tkg-sandbox running true aws:///ap-northeast-1a/i-042acfd83946a4758 tkg-sandbox-control-plane-8ldnq
tkg-system tkg-sandbox-md-0-gdfk8 tkg-sandbox running true aws:///ap-northeast-1a/i-0d04c2727bf7727f7 tkg-sandbox-md-0-75d49d8447-bqvd7
$ kubectl get awsmachinetemplate -A
NAMESPACE NAME AGE
tkg-system tkg-sandbox-control-plane 4h
tkg-system tkg-sandbox-md-0 4h
```
### Workload Clusterを作成
対象のManagement Clusterを`tkg set management-cluster`で指定します。1つしかなければ不要です。
```
$ tkg set management-cluster tkg-sandbox
The current management cluster context is switched to tkg-sandbox
```
対象となっているManagement Clusterを`tkg set management-cluster`で確認できます。`*`がついているクラスタが対象です。
```
$ tkg get management-cluster
MANAGEMENT-CLUSTER-NAME CONTEXT-NAME
tkg-sandbox * tkg-sandbox-admin@tkg-sandbox
```
`tkg create cluster`でWorkload Clusterを作成します。
```
tkg create cluster demo --plan dev
```
次のようなログが出力されます。
```
Logs of the command execution can also be found at: /var/folders/76/vg4pyy253pbgwzncmx2mb1gh0000gq/T/tkg-20200816T203809287331044.log
Validating configuration...
Creating workload cluster 'demo'...
Waiting for cluster to be initialized...
Waiting for cluster nodes to be available...
Workload cluster 'demo' created
```
EC2上には次のVMが作成されています。

Workload Cluster用にも専用のVPCやNAT Gatewayが`config.yaml`に合わせて作成されます。


Workload ClusterをManagement Clusterと同じVPCに作成する方法は後述します。
`tkg get cluster`でWorkload Clusterを確認できます。
```
$ tkg get cluster
NAME NAMESPACE STATUS CONTROLPLANE WORKERS KUBERNETES
demo default running 1/1 1/1 v1.18.3+vmware.1
```
Cluster APIのリソースを確認します。
```
$ kubectl get cluster -A
NAMESPACE NAME PHASE
default demo Provisioned
tkg-system tkg-sandbox Provisioned
$ kubectl get machinedeployment -A
NAMESPACE NAME PHASE REPLICAS AVAILABLE READY
default demo-md-0 Running 1 1 1
tkg-system tkg-sandbox-md-0 Running 1 1 1
$ kubectl get machineset -A
NAMESPACE NAME REPLICAS AVAILABLE READY
default demo-md-0-558dbbdfdc 1 1 1
tkg-system tkg-sandbox-md-0-75d49d8447 1 1 1
$ kubectl get machine -A
NAMESPACE NAME PROVIDERID PHASE
default demo-control-plane-r4rkt aws:///ap-northeast-1a/i-0e8d967473156836d Running
default demo-md-0-558dbbdfdc-xctfb aws:///ap-northeast-1a/i-068d2836f5801eb0d Running
tkg-system tkg-sandbox-control-plane-8ldnq aws:///ap-northeast-1a/i-042acfd83946a4758 Running
tkg-system tkg-sandbox-md-0-75d49d8447-bqvd7 aws:///ap-northeast-1a/i-0d04c2727bf7727f7 Running
$ kubectl get machinehealthcheck -A
NAMESPACE NAME MAXUNHEALTHY EXPECTEDMACHINES CURRENTHEALTHY
default demo 100% 1 1
tkg-system tkg-sandbox 100% 1 1
$ kubectl get kubeadmcontrolplane -A
NAMESPACE NAME READY INITIALIZED REPLICAS READY REPLICAS UPDATED REPLICAS UNAVAILABLE REPLICAS
default demo-control-plane true true 1 1 1
tkg-system tkg-sandbox-control-plane true true 1 1 1
$ kubectl get kubeadmconfigtemplate -A
NAMESPACE NAME AGE
default demo-md-0 21m
tkg-system tkg-sandbox-md-0 4h29m
$ kubectl get awscluster -A
NAMESPACE NAME CLUSTER READY VPC BASTION IP
default demo demo true vpc-03c82dac6a9aabf5a 52.69.53.60
tkg-system tkg-sandbox tkg-sandbox true vpc-0b1166959b313d695 52.193.190.32
$ kubectl get awsmachine -A
NAMESPACE NAME CLUSTER STATE READY INSTANCEID MACHINE
default demo-control-plane-n82mx demo running true aws:///ap-northeast-1a/i-0e8d967473156836d demo-control-plane-r4rkt
default demo-md-0-5488f demo running true aws:///ap-northeast-1a/i-068d2836f5801eb0d demo-md-0-558dbbdfdc-xctfb
tkg-system tkg-sandbox-control-plane-t8w2g tkg-sandbox running true aws:///ap-northeast-1a/i-042acfd83946a4758 tkg-sandbox-control-plane-8ldnq
tkg-system tkg-sandbox-md-0-gdfk8 tkg-sandbox running true aws:///ap-northeast-1a/i-0d04c2727bf7727f7 tkg-sandbox-md-0-75d49d8447-bqvd7
$ kubectl get awsmachinetemplate -A
NAMESPACE NAME AGE
default demo-control-plane 21m
default demo-md-0 21m
tkg-system tkg-sandbox-control-plane 4h29m
tkg-system tkg-sandbox-md-0 4h29m
```
Workload Cluster `demo`のconfigを取得して、Current Contextに設定します。
```
tkg get credentials demo
kubectl config use-context demo-admin@demo
```
Workload Cluster `demo`を確認します。
```
$ kubectl cluster-info
Kubernetes master is running at https://demo-apiserver-929202159.ap-northeast-1.elb.amazonaws.com:6443
KubeDNS is running at https://demo-apiserver-929202159.ap-northeast-1.elb.amazonaws.com:6443/api/v1/namespaces/kube-system/services/kube-dns:dns/proxy
To further debug and diagnose cluster problems, use 'kubectl cluster-info dump'.
$ kubectl get node -o wide
NAME STATUS ROLES AGE VERSION INTERNAL-IP EXTERNAL-IP OS-IMAGE KERNEL-VERSION CONTAINER-RUNTIME
ip-10-0-0-176.ap-northeast-1.compute.internal Ready master 39m v1.18.3+vmware.1 10.0.0.176 Amazon Linux 2 4.14.181-140.257.amzn2.x86_64 containerd://1.3.4
ip-10-0-0-18.ap-northeast-1.compute.internal Ready 38m v1.18.3+vmware.1 10.0.0.18 Amazon Linux 2 4.14.181-140.257.amzn2.x86_64 containerd://1.3.4
$ kubectl get pod -A -o wide
NAMESPACE NAME READY STATUS RESTARTS AGE IP NODE NOMINATED NODE READINESS GATES
kube-system calico-kube-controllers-54fd4b48dd-nvbn8 1/1 Running 0 40m 100.125.242.195 ip-10-0-0-176.ap-northeast-1.compute.internal
kube-system calico-node-t8mls 1/1 Running 0 40m 10.0.0.18 ip-10-0-0-18.ap-northeast-1.compute.internal
kube-system calico-node-wttxn 1/1 Running 0 40m 10.0.0.176 ip-10-0-0-176.ap-northeast-1.compute.internal
kube-system coredns-dbbffcb66-2pg8v 1/1 Running 0 41m 100.125.242.194 ip-10-0-0-176.ap-northeast-1.compute.internal
kube-system coredns-dbbffcb66-76chs 1/1 Running 0 41m 100.125.242.193 ip-10-0-0-176.ap-northeast-1.compute.internal
kube-system etcd-ip-10-0-0-176.ap-northeast-1.compute.internal 1/1 Running 0 41m 10.0.0.176 ip-10-0-0-176.ap-northeast-1.compute.internal
kube-system kube-apiserver-ip-10-0-0-176.ap-northeast-1.compute.internal 1/1 Running 0 41m 10.0.0.176 ip-10-0-0-176.ap-northeast-1.compute.internal
kube-system kube-controller-manager-ip-10-0-0-176.ap-northeast-1.compute.internal 1/1 Running 0 41m 10.0.0.176 ip-10-0-0-176.ap-northeast-1.compute.internal
kube-system kube-proxy-g2bgf 1/1 Running 0 40m 10.0.0.18 ip-10-0-0-18.ap-northeast-1.compute.internal
kube-system kube-proxy-tvtf2 1/1 Running 0 41m 10.0.0.176 ip-10-0-0-176.ap-northeast-1.compute.internal
kube-system kube-scheduler-ip-10-0-0-176.ap-northeast-1.compute.internal 1/1 Running 0 41m 10.0.0.176 ip-10-0-0-176.ap-northeast-1.compute.internal
```
動作確認用にサンプルアプリをデプロイします。
```
kubectl create deployment demo --image=making/hello-cnb --dry-run -o=yaml > /tmp/deployment.yaml
echo --- >> /tmp/deployment.yaml
kubectl create service loadbalancer demo --tcp=80:8080 --dry-run -o=yaml >> /tmp/deployment.yaml
kubectl apply -f /tmp/deployment.yaml
```
PodとServiceを確認します。
```
$ kubectl get pod,svc -l app=demo
NAME READY STATUS RESTARTS AGE
pod/demo-84b79888b4-df2zz 1/1 Running 0 91s
NAME TYPE CLUSTER-IP EXTERNAL-IP PORT(S) AGE
service/demo LoadBalancer 10.97.118.247 a8ee5042f3fea494b880d599f6f92267-379929389.ap-northeast-1.elb.amazonaws.com 80:30183/TCP 91s
```
アプリにアクセスします。
```
$ curl http://a8ee5042f3fea494b880d599f6f92267-379929389.ap-northeast-1.elb.amazonaws.com/actuator/health
{"status":"UP","groups":["liveness","readiness"]}
```
デプロイしたリソースを削除します。
```
kubectl delete -f /tmp/deployment.yaml
```
### Workload Clusterを削除
いったん`demo` Workload Clusterを削除します。
```
tkg delete cluster demo -y
```
`tkg get cluster`を確認するとSTATUSが`deleting`になります。
```
$ tkg get cluster
NAME NAMESPACE STATUS CONTROLPLANE WORKERS KUBERNETES
demo default deleting
```
しばらくすると`tkg get cluster`の結果から`demo`が消えます。
```
$ tkg get cluster
NAME NAMESPACE STATUS CONTROLPLANE WORKERS KUBERNETES
```
### Workload ClusterをManagement Clusterと同じVPC/Subnetに作成
次にWorkload ClusterをManagement Clusterと同じVPC/Subnetに作成します。Bastion VMやNAT GatewayをManagement Clusterと共用できます。
`~/.tkg/config.yaml`を編集し、次の箇所を設定します。
```
# ... (略) ...
AWS_PUBLIC_SUBNET_ID:
AWS_PRIVATE_SUBNET_ID:
AWS_SSH_KEY_NAME: tkg-sandbox
AWS_VPC_ID:
# ... (略) ...
```
次の図の例だと、

`~/.tkg/config.yaml`は次のようになります。
```
# ... (略) ...
AWS_PUBLIC_SUBNET_ID: subnet-06054c4866dafd2ad
AWS_PRIVATE_SUBNET_ID: subnet-01061ff8fbb3eb50f
AWS_SSH_KEY_NAME: tkg-sandbox
AWS_VPC_ID: vpc-0b1166959b313d695
# ... (略) ...
```
このConfigを使ってWorkload Clusterを作成します。
```
tkg create cluster demo --plan dev
```
EC2上のVMを確認するとWorkload Cluster用のBastionがいないことを確認できます。

VPCもNAT Gatewayも一つのままです。


`AWSCluster`と`AWSMachine`は次のようになります。
```
$ kubectl get awscluster -A
NAMESPACE NAME CLUSTER READY VPC BASTION IP
default demo demo true vpc-0b1166959b313d695
tkg-system tkg-sandbox tkg-sandbox true vpc-0b1166959b313d695 52.193.190.32
$ kubectl get awsmachine -A
NAMESPACE NAME CLUSTER STATE READY INSTANCEID MACHINE
default demo-control-plane-ctcft demo running true aws:///ap-northeast-1a/i-09c433f3993b0ea8b demo-control-plane-9jndn
default demo-md-0-s6cqm demo running true aws:///ap-northeast-1a/i-0750a5c8002f880c8 demo-md-0-558dbbdfdc-48fps
tkg-system tkg-sandbox-control-plane-t8w2g tkg-sandbox running true aws:///ap-northeast-1a/i-042acfd83946a4758 tkg-sandbox-control-plane-8ldnq
tkg-system tkg-sandbox-md-0-gdfk8 tkg-sandbox running true aws:///ap-northeast-1a/i-0d04c2727bf7727f7 tkg-sandbox-md-0-75d49d8447-bqvd7
```
先ほどと同じように、Workload Cluster demoのconfigを取得して、Current Contextに設定します。
```
tkg get credentials demo
kubectl config use-context demo-admin@demo
```
Workload Cluster `demo`を確認します。
```
$ kubectl cluster-info
Kubernetes master is running at https://demo-apiserver-1921586626.ap-northeast-1.elb.amazonaws.com:6443
KubeDNS is running at https://demo-apiserver-1921586626.ap-northeast-1.elb.amazonaws.com:6443/api/v1/namespaces/kube-system/services/kube-dns:dns/proxy
$ kubectl get node -o wide
NAME STATUS ROLES AGE VERSION INTERNAL-IP EXTERNAL-IP OS-IMAGE KERNEL-VERSION CONTAINER-RUNTIME
ip-10-0-0-116.ap-northeast-1.compute.internal Ready 18m v1.18.3+vmware.1 10.0.0.116 Amazon Linux 2 4.14.181-140.257.amzn2.x86_64 containerd://1.3.4
ip-10-0-0-177.ap-northeast-1.compute.internal Ready master 20m v1.18.3+vmware.1 10.0.0.177 Amazon Linux 2 4.14.181-140.257.amzn2.x86_64 containerd://1.3.4
```
### Workload Clusterのスケールアウト
`tkg scale cluster`コマンドでWorkload Clusterをスケールアウトできます。
```
tkg scale cluster demo -w 3
```
Workerが3台に増えたことが確認できます。
```
kubectl get node -o wide
NAME STATUS ROLES AGE VERSION INTERNAL-IP EXTERNAL-IP OS-IMAGE KERNEL-VERSION CONTAINER-RUNTIME
ip-10-0-0-11.ap-northeast-1.compute.internal Ready 54s v1.18.3+vmware.1 10.0.0.11 Amazon Linux 2 4.14.181-140.257.amzn2.x86_64 containerd://1.3.4
ip-10-0-0-116.ap-northeast-1.compute.internal Ready 21m v1.18.3+vmware.1 10.0.0.116 Amazon Linux 2 4.14.181-140.257.amzn2.x86_64 containerd://1.3.4
ip-10-0-0-135.ap-northeast-1.compute.internal Ready 39s v1.18.3+vmware.1 10.0.0.135 Amazon Linux 2 4.14.181-140.257.amzn2.x86_64 containerd://1.3.4
ip-10-0-0-177.ap-northeast-1.compute.internal Ready master 22m v1.18.3+vmware.1 10.0.0.177 Amazon Linux 2 4.14.181-140.257.amzn2.x86_64 containerd://1.3.4
```
### Clusterの削除
次のコマンドでWorkload Clusterを削除します。
```
tkg delete cluster demo -y
```
Workload Clusterが削除された後、Management Clusterを削除します。
```
source tkg-env.sh
tkg delete management-cluster tkg-sandbox -y
```
Management Clusterの削除はKindが使われます。
---
TKGでAWS上にKubernetesクラスタを作成しました。
`tkg`コマンド(+ Cluster API)により一貫した手法でAWSでもvSphereでも同じようにクラスタを作成・管理できるため、
マルチクラウドでKubernetesを管理している場合は特に有用だと思います。
AzureとGCPは今後対応するようです。