Warning
This article was automatically translated by OpenAI (claude-sonnet-4-20250514).It may be edited eventually, but please be aware that it may contain incorrect information at this time.
This explains the procedure for installing Tanzu Gemfire on Kubernetes 2.5 and building a GemFire cluster in a Kubernetes environment.
Table of Contents
- Obtaining Access Token for Tanzu GemFire on Kubernetes Docker Registry
- Relocating Helm Charts and Container Images to Container Registry
- Installing Tanzu GemFire on Kubernetes
- Creating a GemFireCluster
- Connecting to GemFire Cluster and Operation Verification
- Setting up External gfsh Access to GemFire
- Connecting to GemFire from Java Applications
- Connecting to GemFire from External Java Applications
- Cleanup
Obtaining Access Token for Tanzu GemFire on Kubernetes Docker Registry
Log in to Broadcom Support and obtain the Docker registry token from the Tanzu GemFire page.


Log in to registry.packages.broadcom.com with the following command. Replace the credentials with your own.
BC_SUPPORT_USERNAME=your-email@example.com
BC_SUPPORT_PASSWORD=eyJ2ZX*************************************
docker login registry.packages.broadcom.com -u ${BC_SUPPORT_USERNAME} -p ${BC_SUPPORT_PASSWORD}
WARNING! Using --password via the CLI is insecure. Use --password-stdin.
Login Succeeded
This time, we will relocate the container images to a Self-Hosted Container Registry on a Private Network for use.
Please be careful as relocating to a location not on a Private Network may violate the EULA.
Relocating Helm Charts and Container Images to Container Registry
Log in to the Container Registry with the following command. Replace the credentials with your own.
REGISTRY_HOSTNAME=my-private-registry.example.com
REGISTRY_USERNAME=your-username
REGISTRY_PASSWORD=your-password
docker login ${REGISTRY_HOSTNAME} -u ${REGISTRY_USERNAME} -p ${REGISTRY_PASSWORD}
We use imgpkg for relocation. If imgpkg is not installed, please refer to the official documentation to install it.
imgpkg copy -i registry.packages.broadcom.com/tanzu-gemfire-for-kubernetes/gemfire-crd:2.5.0 --to-repo ${REGISTRY_HOSTNAME}/tanzu-gemfire-for-kubernetes/gemfire-crd
imgpkg copy -i registry.packages.broadcom.com/tanzu-gemfire-for-kubernetes/gemfire-operator:2.5.0 --to-repo ${REGISTRY_HOSTNAME}/tanzu-gemfire-for-kubernetes/gemfire-operator
Access the relocated Helm Chart to check the configurable values.
$ helm show values oci://${REGISTRY_HOSTNAME}/tanzu-gemfire-for-kubernetes/gemfire-operator --version 2.5.0
Pulled: my-private-registry.example.com/tanzu-gemfire-for-kubernetes/gemfire-operator:2.5.0
Digest: sha256:6e6553b72dd5a6237c967676d6c88614982cfd31aefd44a94ecef587c916967a
controllerImage: registry.packages.broadcom.com/tanzu-gemfire-for-kubernetes/gemfire-controller:2.5.0
certManagerNamespace: cert-manager
Also relocate the controllerImage from registry.packages.broadcom.com to my-private-registry.example.com with the following command.
imgpkg copy -i registry.packages.broadcom.com/tanzu-gemfire-for-kubernetes/gemfire-controller:2.5.0 --to-repo ${REGISTRY_HOSTNAME}/tanzu-gemfire-for-kubernetes/gemfire-controller
Installing Tanzu GemFire on Kubernetes
Install the CRD and Operator for Tanzu GemFire for Kubernetes.
First, create a Kubernetes namespace and create a Container Registry Secret.
kubectl create namespace gemfire-system
kubectl create secret docker-registry gemfire-registry-secret \
    --docker-server=${REGISTRY_HOSTNAME} \
    --docker-username=${REGISTRY_USERNAME} \
    --docker-password="${REGISTRY_PASSWORD}" \
    -n gemfire-system
Install the Gemfire CRD with the following command.
helm upgrade --install \
  -n gemfire-system \
  gemfire-crd \
  oci://${REGISTRY_HOSTNAME}/tanzu-gemfire-for-kubernetes/gemfire-crd \
  --version 2.5.0 \
  --set operatorReleaseName=gemfire-operator \
  --wait
Install the Gemfire Operator with the following command. Specify the relocated Chart and container image.
helm upgrade --install \
  -n gemfire-system \
  gemfire-operator \
  oci://${REGISTRY_HOSTNAME}/tanzu-gemfire-for-kubernetes/gemfire-operator \
  --version 2.5.0 \
  --set controllerImage=${REGISTRY_HOSTNAME}/tanzu-gemfire-for-kubernetes/gemfire-controller:2.5.0 \
  --set imagePullSecretName=gemfire-registry-secret \
  --wait
The installation will complete after a while. Check the installation status with helm list.
$ helm list -n gemfire-system
NAME            	NAMESPACE     	REVISION	UPDATED                             	STATUS  	CHART                 	APP VERSION
gemfire-crd     	gemfire-system	1       	2025-06-20 11:55:13.47622 +0900 JST 	deployed	gemfire-crd-2.5.0     	2.5.0
gemfire-operator	gemfire-system	1       	2025-06-20 11:56:56.713258 +0900 JST	deployed	gemfire-operator-2.5.0	2.5.0
Check the Pod status to confirm that the Operator is running normally.
$ kubectl get pod -n gemfire-system
NAME                                                 READY   STATUS    RESTARTS   AGE
gemfire-operator-controller-manager-c4d8dfd5-nx6p5   1/1     Running   0          2m42s
Check the available custom resources.
$ kubectl api-resources --api-group=gemfire.vmware.com
NAME              SHORTNAMES   APIVERSION              NAMESPACED   KIND
gemfireclusters                gemfire.vmware.com/v1   true         GemFireCluster
Creating a GemFireCluster
Use the Gemfire Operator to create a GemFireCluster instance in the demo namespace.
The GemFire container image needs to be specified separately, and this should also be relocated to my-private-registry.example.com as before. You can use the latest supported GemFire container image independently of the Operator version.
Here we use version 10.1.3, which is the latest version at the time of writing.
imgpkg copy -i registry.packages.broadcom.com/pivotal-gemfire/vmware-gemfire:10.1.3 --to-repo ${REGISTRY_HOSTNAME}/pivotal-gemfire/vmware-gemfire
Create the namespace and docker pull secret with the following command.
kubectl create namespace demo
kubectl create secret docker-registry gemfire-registry-secret \
    --docker-server=${REGISTRY_HOSTNAME} \
    --docker-username=${REGISTRY_USERNAME} \
    --docker-password="${REGISTRY_PASSWORD}" \
    -n  demo
Create a GemFireCluster instance with the following command. Configure it with 2 Locators and 3 Servers.
cat <<EOF > /tmp/demo-gemfire.yaml
---
apiVersion: gemfire.vmware.com/v1
kind: GemFireCluster
metadata:
  name: demo
spec:
  image: ${REGISTRY_HOSTNAME}/pivotal-gemfire/vmware-gemfire:10.1.3
  imagePullSecrets:
  - name: gemfire-registry-secret
  persistentVolumeClaim:
    deleteOnShutdown: true
  locators:
    replicas: 2
  servers:
    replicas: 3
    resources:
      requests:
        memory: 4Gi
      limits:
        memory: 4Gi
---
EOF

kubectl apply -f /tmp/demo-gemfire.yaml -n demo
Note
Setting spec.persistentVolumeClaim.deleteOnShutdown to true will delete the PersistentVolumeClaim when the GemFireCluster is deleted.
By default it is false, so the PersistentVolumeClaim remains even when the GemFireCluster is deleted. For production, it's better to keep it as false just in case.
Check the status of the GemFireCluster with the following command.
$ kubectl get gemfirecluster,sts,pod,pvc -n demo -owide
NAME                                     LOCATORS   SERVERS   CLUSTER IMAGE                                                           OPERATOR VERSION
gemfirecluster.gemfire.vmware.com/demo   2/2        3/3       my-private-registry.example.com/pivotal-gemfire/vmware-gemfire:10.1.3   2.5.0

NAME                            READY   AGE     CONTAINERS   IMAGES
statefulset.apps/demo-locator   2/2     5m32s   locator      my-private-registry.example.com/pivotal-gemfire/vmware-gemfire:10.1.3
statefulset.apps/demo-server    3/3     4m9s    server       my-private-registry.example.com/pivotal-gemfire/vmware-gemfire:10.1.3

NAME                 READY   STATUS    RESTARTS   AGE     IP             NODE     NOMINATED NODE   READINESS GATES
pod/demo-locator-0   1/1     Running   0          5m32s   10.1.42.145    banana   <none>           <none>
pod/demo-locator-1   1/1     Running   0          5m32s   10.1.42.146    banana   <none>           <none>
pod/demo-server-0    1/1     Running   0          4m9s    10.1.42.147    banana   <none>           <none>
pod/demo-server-1    1/1     Running   0          4m9s    10.1.173.139   cherry   <none>           <none>
pod/demo-server-2    1/1     Running   0          4m9s    10.1.42.148    banana   <none>           <none>

NAME                                        STATUS   VOLUME                                     CAPACITY   ACCESS MODES   STORAGECLASS   VOLUMEATTRIBUTESCLASS   AGE     VOLUMEMODE
persistentvolumeclaim/data-demo-locator-0   Bound    pvc-50d09d5f-bcac-4e74-889f-372fa212c05c   2Gi        RWO            nfs-csi        <unset>                 5m32s   Filesystem
persistentvolumeclaim/data-demo-locator-1   Bound    pvc-cd7d814a-d5e4-455c-b890-d88713778e7b   2Gi        RWO            nfs-csi        <unset>                 5m32s   Filesystem
persistentvolumeclaim/data-demo-server-0    Bound    pvc-baa12461-2220-4142-96d6-820a78a4379a   4Gi        RWO            nfs-csi        <unset>                 4m9s    Filesystem
persistentvolumeclaim/data-demo-server-1    Bound    pvc-423de0c1-782b-442d-8aeb-55909b14e9ab   4Gi        RWO            nfs-csi        <unset>                 4m9s    Filesystem
persistentvolumeclaim/data-demo-server-2    Bound    pvc-90253b95-16f4-4569-adba-9b568daa256a   4Gi        RWO            nfs-csi        <unset>                 4m9s    Filesystem
Connecting to GemFire Cluster and Operation Verification
Execute bash inside the Locator Pod with the following command.
kubectl -n demo exec -it demo-locator-0 -- bash
The Gemfire cluster created with Tanzu Gemfire on Kubernetes has TLS enabled by default. Confirm that GemFire certificates are created in the /certs directory.
[root@demo-locator-0 data]# ls -l /certs
total 0
lrwxrwxrwx 1 root root 13 Jun 20 05:42 ca.crt -> ..data/ca.crt
lrwxrwxrwx 1 root root 19 Jun 20 05:42 keystore.p12 -> ..data/keystore.p12
lrwxrwxrwx 1 root root 15 Jun 20 05:42 password -> ..data/password
lrwxrwxrwx 1 root root 14 Jun 20 05:42 tls.crt -> ..data/tls.crt
lrwxrwxrwx 1 root root 14 Jun 20 05:42 tls.key -> ..data/tls.key
lrwxrwxrwx 1 root root 21 Jun 20 05:42 truststore.p12 -> ..data/truststore.p12
The password for the certificate Truststore and Keystore is stored in /certs/password. Use this to connect to GemFire with gfsh.
[root@demo-locator-0 data]# echo $(cat /certs/password)
rpUt17JjuLLoxN7S9CzRZ8WbwYqMaDjINTZ9OxetAU4=
Run gfsh to connect to GemFire.
[root@demo-locator-0 data]# gfsh
/gemfire/bin/gfsh: line 36: tput: command not found
    _________________________     __
   / _____/ ______/ ______/ /____/ /
  / /  __/ /___  /_____  / _____  /
 / /__/ / ____/  _____/ / /    / /
/______/_/      /______/_/    /_/    10.1.3

Monitor and Manage Tanzu GemFire
gfsh>
Execute the connect command to connect to the Locator. Here, specify the Locator's hostname and port number. Specify the certificate paths with the --trust-store and --key-store options, and use the password confirmed earlier.
connect --locator=demo-locator-0.demo-locator.demo.svc.cluster.local[10334] --trust-store=/certs/truststore.p12 --trust-store-password=rpUt17JjuLLoxN7S9CzRZ8WbwYqMaDjINTZ9OxetAU4= --key-store=/certs/keystore.p12 --key-store-password=rpUt17JjuLLoxN7S9CzRZ8WbwYqMaDjINTZ9OxetAU4=
You will be prompted to enter the following items on the prompt, but press Enter with all defaults to proceed.
key-store-type(default: JKS):
trust-store-type(default: JKS):
ssl-ciphers(default: any):
ssl-protocols(default: any):
ssl-enabled-components(default: all):
You can now connect to GemFire. The following message will be displayed:
Connecting to Locator at [host=demo-locator-0.demo-locator.demo.svc.cluster.local, port=10334] ..
Connecting to Manager at [host=demo-locator-0.demo-locator.demo.svc.cluster.local, port=1099] ..
Successfully connected to: [host=demo-locator-0.demo-locator.demo.svc.cluster.local, port=1099]

You are connected to a cluster of version 10.1.3.
Note that from inside the Pod, you can also connect by executing connect --url=https://demo-locator.demo.svc.cluster.local:7070/gemfire/v1 --skip-ssl-validation.
Use the list members command to confirm that GemFire members (Locators and Servers) are running correctly:
gfsh>list members
Member Count : 5

     Name      |                                  Id                                  |  Type   | Status
-------------- | -------------------------------------------------------------------- | ------- | ------
demo-locator-0 | demo-locator-0(demo-locator-0:1:locator)<ec><v0>:60681 [Coordinator] | Locator | Ready
demo-locator-1 | demo-locator-1(demo-locator-1:1:locator)<ec><v1>:54760               | Locator | Ready
demo-server-0  | demo-server-0(demo-server-0:1)<v2>:42292                             | Server  | Ready
demo-server-1  | demo-server-1(demo-server-1:1)<v3>:56073                             | Server  | Ready
demo-server-2  | demo-server-2(demo-server-2:1)<v2>:57696                             | Server  | Ready
Create a PARTITION_PERSISTENT type Region with redundancy 1 (each data is stored on 2 Servers), then add test data:
create region --name=demo --type=PARTITION_PERSISTENT --redundant-copies=1

put --region=/demo --key=aaa --value=1
put --region=/demo --key=bbb --value=2
put --region=/demo --key=ccc --value=3
put --region=/demo --key=ddd --value=4
put --region=/demo --key=eee --value=5
Verify that the data is stored correctly with a query:
gfsh>query --query="SELECT * FROM /demo"
Result : true
Limit  : 100
Rows   : 5

Result
------
3
5
2
1
4
Setting up External gfsh Access to GemFire
To connect to GemFire with gfsh from outside the Pod, expose the Locator's management API. Here we use Contour's HTTPProxy with the Upstream TLS feature.
Note
This example assumes that Certificate default-tls (Let's Encrypt wildcard certificate) created in the projectcontoure namespace is exposed via TLSCertificateDelegation. Please configure appropriate certificate settings according to your environment.
Create a Service and HTTPProxy to expose the Locator's management API with the following command.
cat <<EOF > /tmp/demo-locator-management-api.yaml
apiVersion: v1
kind: Service
metadata:
  name: demo-locator-management-api
  namespace: demo
  annotations:
    projectcontour.io/upstream-protocol.tls: "7070"
spec:
  type: ClusterIP
  ports:
  - name: locator-management-api
    port: 7070
  selector:
    gemfire.vmware.com/app: demo-locator
---
apiVersion: projectcontour.io/v1
kind: HTTPProxy
metadata:
  name: demo-locator-management-api
  namespace: demo
spec:
  virtualhost:
    fqdn: demo-locator.lan.ik.am
    tls:
      secretName: projectcontour/default-tls
  routes:
  - services:
    - name: demo-locator-management-api
      port: 7070
      validation:
        caSecret: demo-cert
        subjectName: demo-locator.demo.svc.cluster.local
---
EOF

kubectl apply -f /tmp/demo-locator-management-api.yaml
Now you can connect to GemFire from outside the Pod using gfsh as follows.
connect --url=https://demo-locator.lan.ik.am/gemfire/v1
Connecting to GemFire from Java Applications
Similar to this article, let's connect to Gemfire from the sample app at https://github.com/making/demo-gemfire. Please refer to Github for the source code.
First, create a Region with gfsh:
create region --name=Customers --type=PARTITION_PERSISTENT --redundant-copies=1
Tanzu Gemfire on Kubernetes automatically configures the following disk store and pdx settings, so you can use PDX with PARTITION_PERSISTENT type Regions without additional configuration.
    <disk-store name="pdxmetadata">
        <disk-dirs>
            <disk-dir>/data/pdxmetadata</disk-dir>
        </disk-dirs>
    </disk-store>
    <pdx read-serialized="true" persistent="true" disk-store-name="pdxmetadata"/>
To deploy the demo app on K8s, we use the generic Helm Chart from https://github.com/stakater/application.
helm repo add stakater https://stakater.github.io/stakater-charts
Create a values file for Helm. The content to set in env was referenced from the following documentation.
- https://techdocs.broadcom.com/us/en/vmware-tanzu/data-solutions/tanzu-gemfire-on-kubernetes/2-5/gf-k8s/app-dev.html
- https://techdocs.broadcom.com/us/en/vmware-tanzu/data-solutions/tanzu-gemfire-on-kubernetes/2-5/gf-k8s/security-tls-security.html
cat <<EOF > helm-values.yaml
---
applicationName: demo-gemfire
deployment:
  image:
    repository: ghcr.io/making/demo-gemfire
    tag: jvm
    pullPolicy: Always
  ports:
  - name: http
    containerPort: 8080
    protocol: TCP
  env:
    gemfire.locators:
      value: demo-locator-0.demo-locator.demo.svc.cluster.local:10334,demo-locator-1.demo-locator.demo.svc.cluster.local:10334
    gemfire.properties.ssl-enabled-components:
      value: all
    gemfire.properties.ssl-endpoint-identification-enabled:
      value: "true"
    gemfire.properties.ssl-keystore:
      value: /certs/truststore.p12
    gemfire.properties.ssl-keystore-password:
      valueFrom:
        secretKeyRef:
          name: demo-cert
          key: password
    gemfire.properties.ssl-truststore:
      value: /certs/keystore.p12
    gemfire.properties.ssl-truststore-password:
      valueFrom:
        secretKeyRef:
          name: demo-cert
          key: password
  volumeMounts:
    cert-volume:
      mountPath: /certs
  volumes:
    cert-volume:
      secret:
        secretName: demo-cert
  resources:
    limits:
      cpu:
      memory: 768Mi
    requests:
      cpu:
      memory: 768Mi
  livenessProbe:
    enabled: true
    httpGet:
      path: /actuator/health/liveness
      port: 8080
      scheme: HTTP
  readinessProbe:
    enabled: true
    httpGet:
      path: /actuator/health/readiness
      port: 8080
      scheme: HTTP
  containerSecurityContext:
    allowPrivilegeEscalation: false
    capabilities:
      drop:
      - ALL
    readOnlyRootFilesystem: false
    runAsNonRoot: true
    runAsUser: 1002
    seccompProfile:
      type: RuntimeDefault
  affinity:
    podAntiAffinity:
      preferredDuringSchedulingIgnoredDuringExecution:
      - podAffinityTerm:
          labelSelector:
            matchLabels:
              app.kubernetes.io/part-of: demo-gemfire
          topologyKey: kubernetes.io/hostname
        weight: 1
ingress:
  enabled: true
  annotations:
    projectcontour.io/tls-cert-namespace: projectcontour
  hosts:
  - host: demo-gemfire.lan.ik.am
    paths:
    - path: /
      pathType: Prefix
  tls:
  - hosts:
    - demo-gemfire.lan.ik.am
    secretName: default-tls
---
EOF
Note
The YAML generated by the following helm template command using this helm-values.yaml is available at https://gist.github.com/making/3d32b0ac35ece4ac7f3ef70f168e58f2.
helm template demo-gemfire stakater/application -n demo -f helm-values.yaml
Deploy with the following command:
helm upgrade --install demo-gemfire stakater/application -n demo -f helm-values.yaml --wait
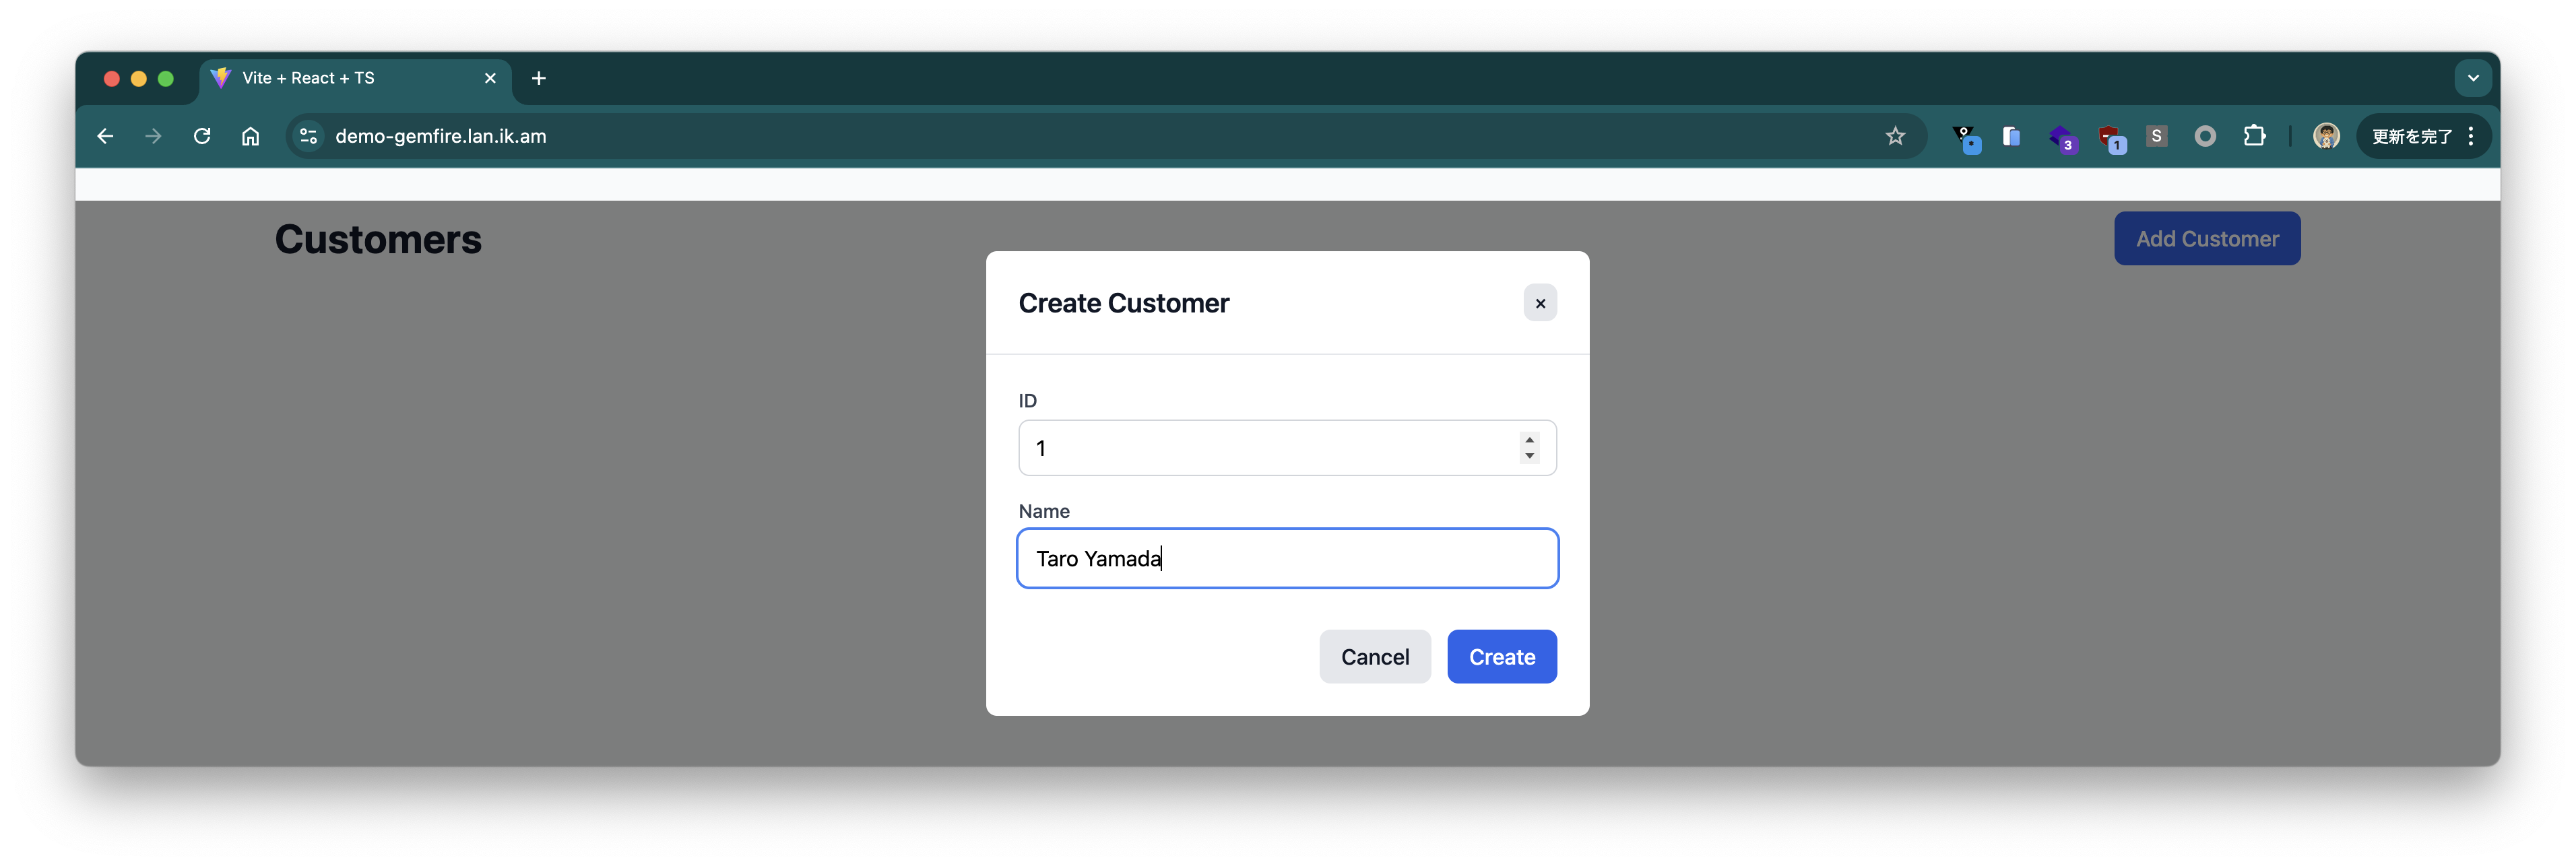
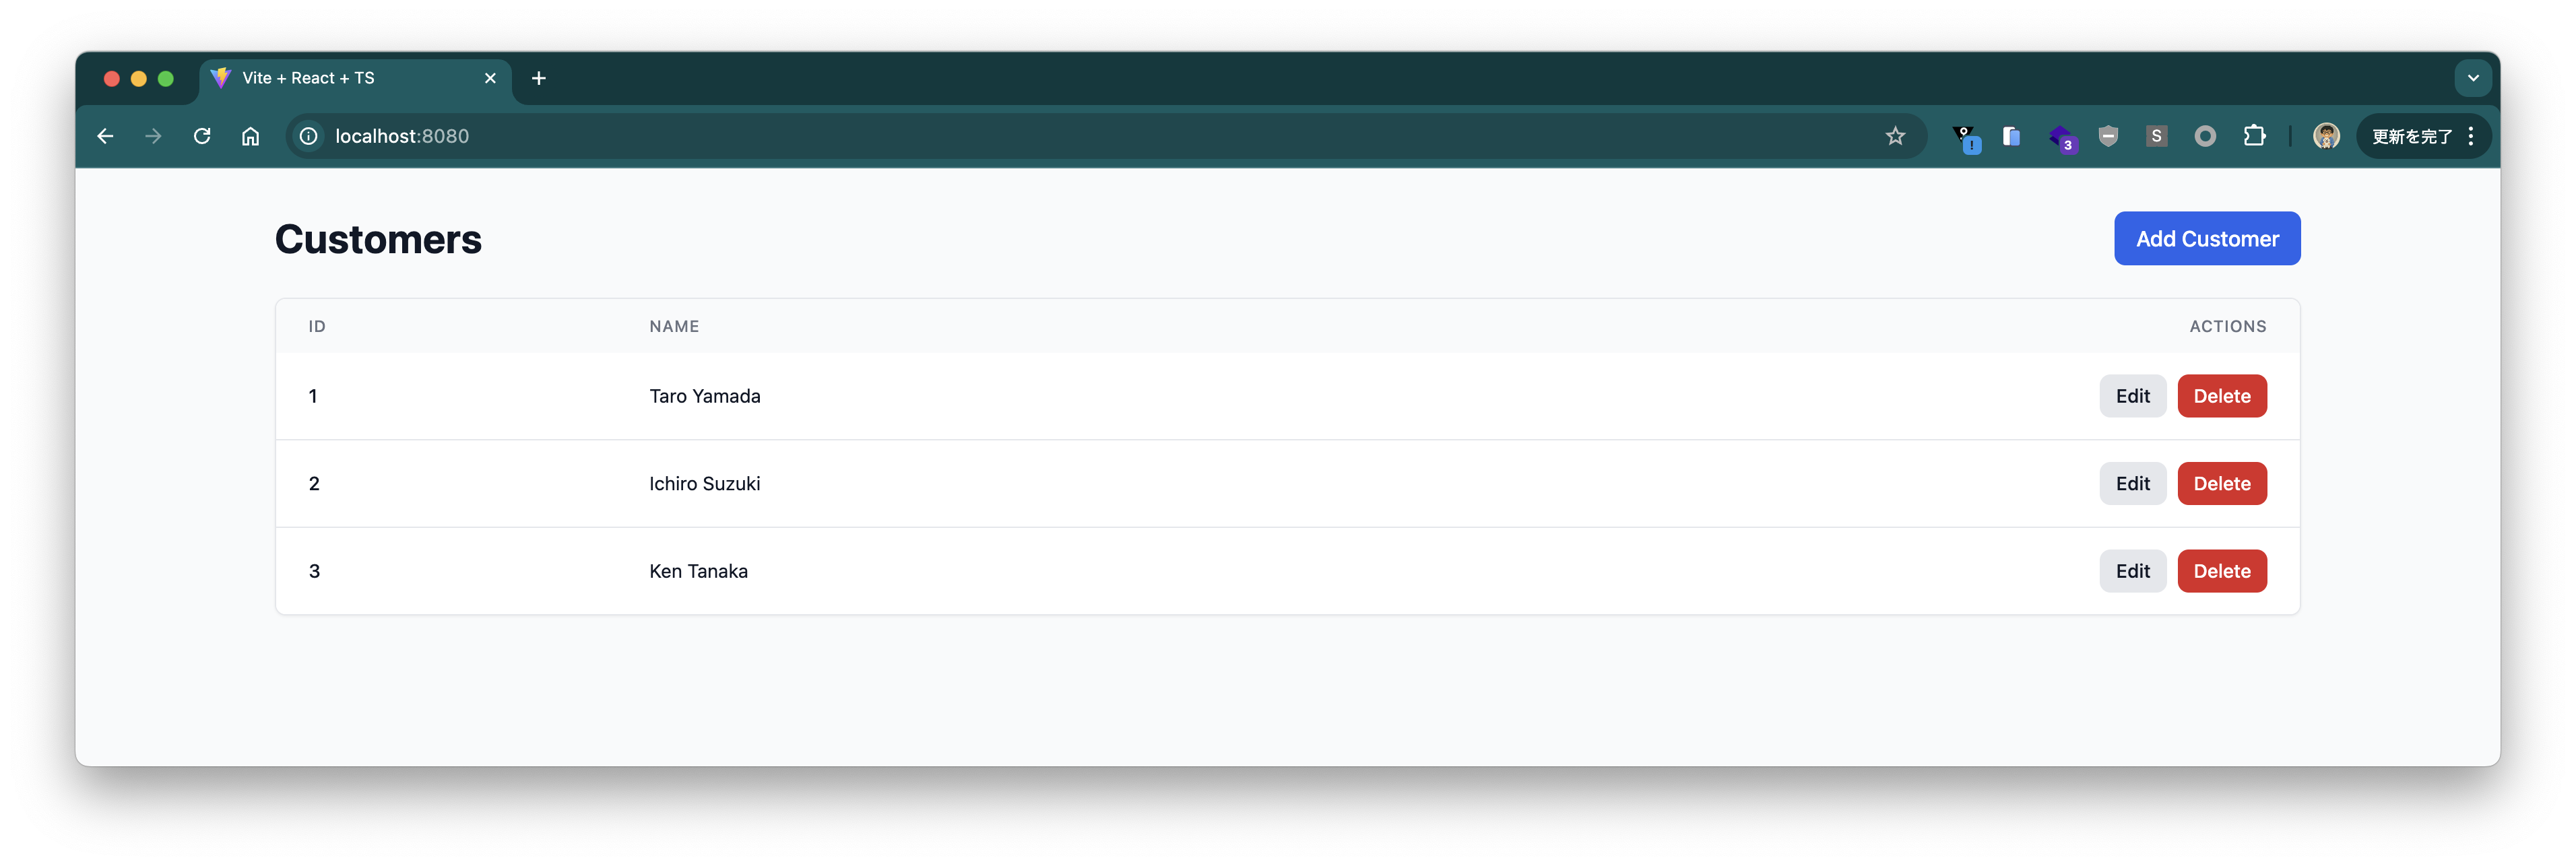
When you access the domain configured in Ingress (in this example https://demo-gemfire.lan.ik.am), the following screen will be displayed:
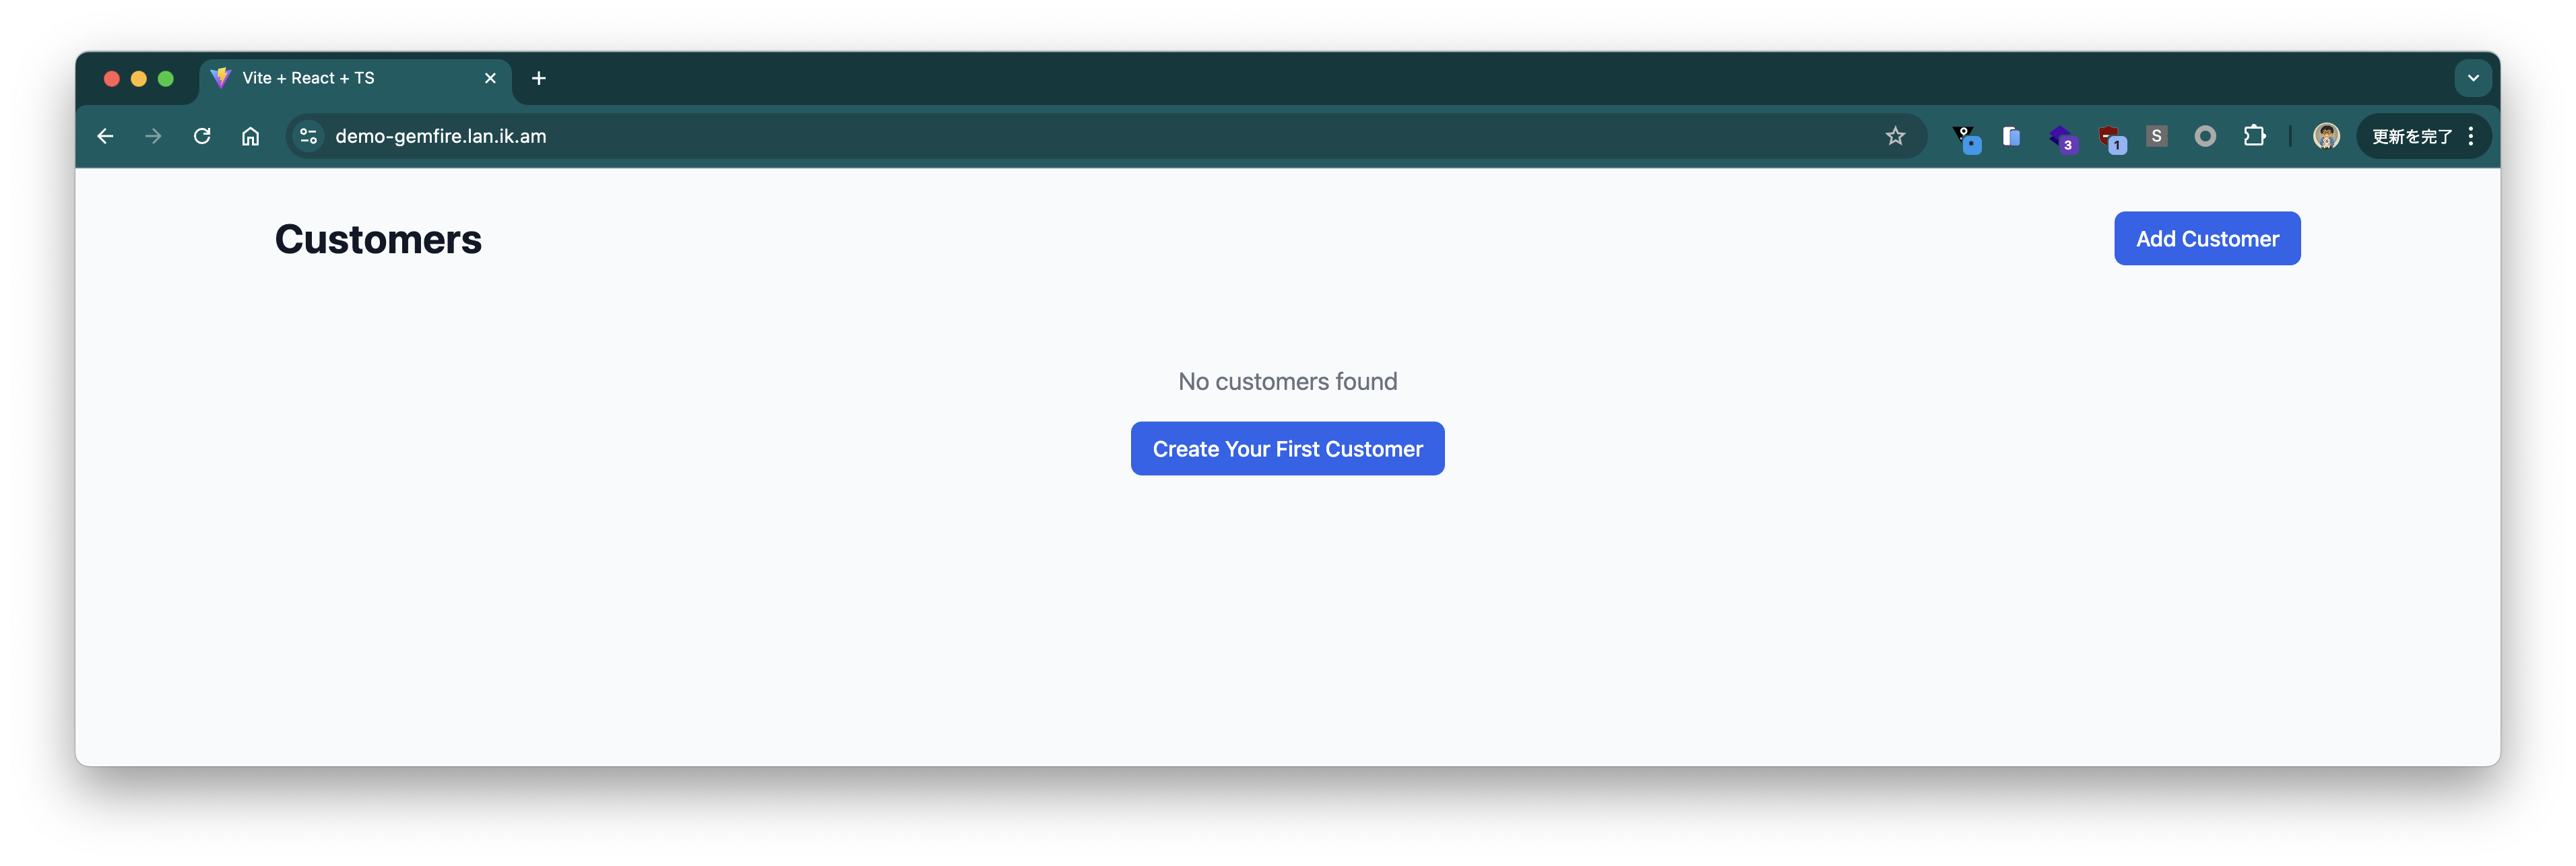
Register some customer information.
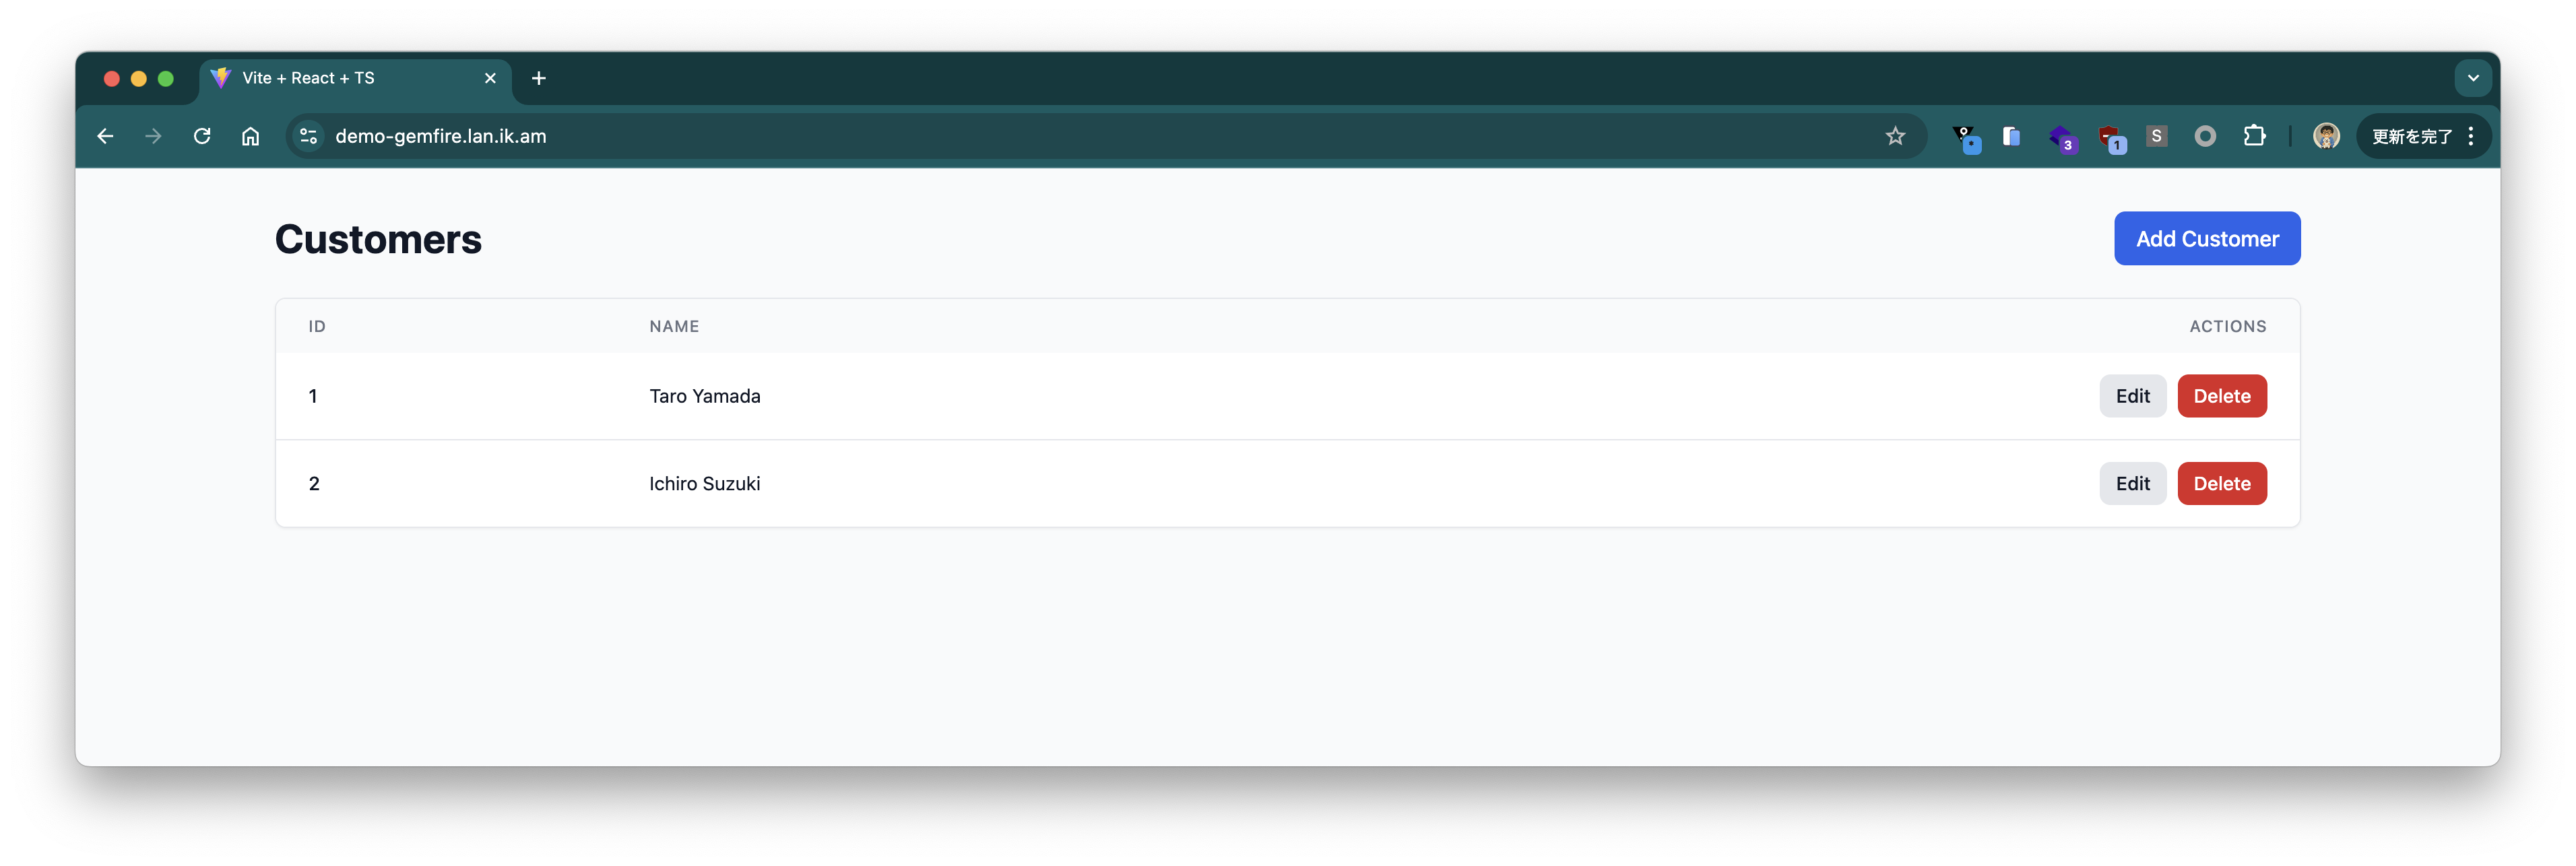
The registered customer information is displayed on the UI. When checked with gfsh, you can see that the registered customer information is stored in the Region:
gfsh>query --query="SELECT * FROM /Customers"
Result : true
Limit  : 100
Rows   : 2

id | name
-- | -------------
2  | Ichiro Suzuki
1  | Taro Yamada
Connecting to GemFire from External Java Applications
We have already confirmed that we can connect to GemFire with gfsh, but external Java applications can also connect to GemFire in the same way.
To access Gemfire from Java applications outside the cluster, you need to use an SNI Proxy.
Although this documentation explains the method using Gateway API, this approach is difficult to adopt in environments where Contour is already installed, so this time we use Contour's HTTPProxy TLS Session Passthrough.
Note that following the code in this documentation, the demo app has been adapted for SNI Proxy.
Create the following HTTPProxy to configure SNI Proxy for the existing GemFire cluster. Since the Locator returns Server information that should be accessed with cluster-internal hostnames, you need to create HTTPProxy for not only the Locator but also for each Server instance.
cat <<EOF > /tmp/sni-proxy.yaml
---
apiVersion: projectcontour.io/v1
kind: HTTPProxy
metadata:
  name: demo-locator-0
  namespace: demo
spec:
  virtualhost:
    fqdn: demo-locator-0.demo-locator.demo.svc.cluster.local
    tls:
      passthrough: true
  tcpproxy:
    services:
    - name: demo-locator-0
      port: 10334
---
apiVersion: projectcontour.io/v1
kind: HTTPProxy
metadata:
  name: demo-locator-1
  namespace: demo
spec:
  virtualhost:
    fqdn: demo-locator-1.demo-locator.demo.svc.cluster.local
    tls:
      passthrough: true
  tcpproxy:
    services:
    - name: demo-locator-1
      port: 10334
---
apiVersion: projectcontour.io/v1
kind: HTTPProxy
metadata:
  name: demo-server-0
  namespace: demo
spec:
  virtualhost:
    fqdn: demo-server-0.demo-server.demo.svc.cluster.local
    tls:
      passthrough: true
  tcpproxy:
    services:
    - name: demo-server-0
      port: 40404
---
apiVersion: projectcontour.io/v1
kind: HTTPProxy
metadata:
  name: demo-server-1
  namespace: demo
spec:
  virtualhost:
    fqdn: demo-server-1.demo-server.demo.svc.cluster.local
    tls:
      passthrough: true
  tcpproxy:
    services:
    - name: demo-server-1
      port: 40404
---
apiVersion: projectcontour.io/v1
kind: HTTPProxy
metadata:
  name: demo-server-2
  namespace: demo
spec:
  virtualhost:
    fqdn: demo-server-2.demo-server.demo.svc.cluster.local
    tls:
      passthrough: true
  tcpproxy:
    services:
    - name: demo-server-2
      port: 40404
---
EOF

kubectl apply -f /tmp/sni-proxy.yaml
Confirm that all HTTPProxy statuses are valid.
$ kubectl get httpproxy -n demo
NAME                          FQDN                                                 TLS SECRET                   STATUS   STATUS DESCRIPTION
demo-locator-0                demo-locator-0.demo-locator.demo.svc.cluster.local                                valid    Valid HTTPProxy
demo-locator-1                demo-locator-1.demo-locator.demo.svc.cluster.local                                valid    Valid HTTPProxy
demo-locator-management-api   demo-locator.lan.ik.am                               projectcontour/default-tls   valid    Valid HTTPProxy
demo-server-0                 demo-server-0.demo-server.demo.svc.cluster.local                                  valid    Valid HTTPProxy
demo-server-1                 demo-server-1.demo-server.demo.svc.cluster.local                                  valid    Valid HTTPProxy
demo-server-2                 demo-server-2.demo-server.demo.svc.cluster.local                                  valid    Valid HTTPProxy
Check the IP address and port of Envoy. Here it's 192.168.11.240 and 443. Java applications will connect to GemFire using this IP address and port as the SNI Proxy, using the same hostnames as inside the K8s cluster.
$ kubectl get svc -n projectcontour
NAME            TYPE           CLUSTER-IP       EXTERNAL-IP      PORT(S)                      AGE
contour         ClusterIP      10.152.183.197   <none>           8001/TCP                     79m
contour-envoy   LoadBalancer   10.152.183.23    192.168.11.240   80:31496/TCP,443:31967/TCP   79m
As an external Java application, we use the ghcr.io/making/demo-gemfire:jvm container image from Docker.
Obtain the GemFire certificates with the following commands and create the files necessary for running the application.
mkdir certs
kubectl get secret -n demo demo-cert -o=template='{{index .data "password" | base64decode}}' > ./certs/password
kubectl get secret -n demo demo-cert -o=template='{{index .data "keystore.p12" | base64decode}}' > ./certs/keystore.p12
kubectl get secret -n demo demo-cert -o=template='{{index .data "truststore.p12" | base64decode}}' > ./certs/truststore.p12
Start the application with the following properties configured.
export CERT_PASSWORD=$(cat ./certs/password)

docker run \
  --rm \
  --name demo-gemfire \
  --pull always \
  -p 8080:8080 \
  -v $(pwd)/certs:/certs \
  -e gemfire.locators=demo-locator-0.demo-locator.demo.svc.cluster.local:10334,demo-locator-1.demo-locator.demo.svc.cluster.local:10334 \
  -e gemfire.sni-proxy.host=192.168.11.240 \
  -e gemfire.sni-proxy.port=443 \
  -e gemfire.properties.ssl-enabled-components=all \
  -e gemfire.properties.ssl-endpoint-identification-enabled=true \
  -e gemfire.properties.ssl-keystore=/certs/keystore.p12 \
  -e gemfire.properties.ssl-keystore-password=${CERT_PASSWORD} \
  -e gemfire.properties.ssl-truststore=/certs/truststore.p12 \
  -e gemfire.properties.ssl-truststore-password=${CERT_PASSWORD} \
  ghcr.io/making/demo-gemfire:jvm
It took some time to start, but the application starts up. If it doesn't start, there may be an issue with the Contour configuration.
  .   ____          _            __ _ _
 /\\ / ___'_ __ _ _(_)_ __  __ _ \ \ \ \
( ( )\___ | '_ | '_| | '_ \/ _` | \ \ \ \
 \\/  ___)| |_)| | | | | || (_| |  ) ) ) )
  '  |____| .__|_| |_|_| |_\__, | / / / /
 =========|_|==============|___/=/_/_/_/

 :: Spring Boot ::                (v3.5.3)

2025-06-24T03:30:18.821Z  INFO 1 --- [demo-gemfire] [           main] am.ik.demo.DemoGemfireApplication        : Starting DemoGemfireApplication v0.0.1.6bcdb85dc79968717e19d67d0de88335e9e5e9ef using Java 21.0.7 with PID 1 (/workspace/BOOT-INF/classes started by cnb in /workspace)
2025-06-24T03:30:18.822Z  INFO 1 --- [demo-gemfire] [           main] am.ik.demo.DemoGemfireApplication        : No active profile set, falling back to 1 default profile: "default"
2025-06-24T03:30:19.263Z  INFO 1 --- [demo-gemfire] [           main] o.s.b.w.embedded.tomcat.TomcatWebServer  : Tomcat initialized with port 8080 (http)
2025-06-24T03:30:19.268Z  INFO 1 --- [demo-gemfire] [           main] o.apache.catalina.core.StandardService   : Starting service [Tomcat]
2025-06-24T03:30:19.268Z  INFO 1 --- [demo-gemfire] [           main] o.apache.catalina.core.StandardEngine    : Starting Servlet engine: [Apache Tomcat/10.1.42]
2025-06-24T03:30:19.278Z  INFO 1 --- [demo-gemfire] [           main] o.a.c.c.C.[Tomcat].[localhost].[/]       : Initializing Spring embedded WebApplicationContext
2025-06-24T03:30:19.279Z  INFO 1 --- [demo-gemfire] [           main] w.s.c.ServletWebServerApplicationContext : Root WebApplicationContext: initialization completed in 434 ms
2025-06-24T03:30:19.525Z  INFO 1 --- [demo-gemfire] [           main] o.a.g.l.internal.LoggingProviderLoader   : Using org.apache.geode.logging.internal.SimpleLoggingProvider for service org.apache.geode.logging.internal.spi.LoggingProvider
2025-06-24T03:30:19.554Z  INFO 1 --- [demo-gemfire] [           main] o.a.g.internal.InternalDataSerializer    : initializing InternalDataSerializer with 4 services
2025-06-24T03:30:19.555Z  INFO 1 --- [demo-gemfire] [           main] o.a.g.i.s.f.SanctionedSerializables      : loaded 43 sanctioned serializables from ManagementSanctionedSerializablesService
2025-06-24T03:30:19.558Z  INFO 1 --- [demo-gemfire] [           main] o.a.g.i.s.f.SanctionedSerializables      : loaded 462 sanctioned serializables from CoreSanctionedSerializablesService
2025-06-24T03:30:19.559Z  INFO 1 --- [demo-gemfire] [           main] o.a.g.i.s.f.SanctionedSerializables      : loaded 6 sanctioned serializables from SerializationSanctionedSerializablesService
2025-06-24T03:30:19.559Z  INFO 1 --- [demo-gemfire] [           main] o.a.g.i.s.f.SanctionedSerializables      : loaded 0 sanctioned serializables from MembershipSanctionedSerializablesService
2025-06-24T03:30:19.571Z  INFO 1 --- [demo-gemfire] [           main] org.apache.geode                         : [ThreadsMonitor] New Monitor object and process were created.

2025-06-24T03:30:19.582Z  INFO 1 --- [demo-gemfire] [    StatSampler] o.a.g.i.statistics.StatArchiveHandler    : Disabling statistic archival.
2025-06-24T03:30:19.616Z  INFO 1 --- [demo-gemfire] [           main] o.a.g.internal.cache.GemFireCacheImpl    : Running in client mode
2025-06-24T03:30:19.635Z  INFO 1 --- [demo-gemfire] [           main] o.a.g.internal.cache.GemFireCacheImpl    : Initialized cache service org.apache.geode.cache.query.internal.QueryConfigurationServiceImpl
2025-06-24T03:30:59.827Z  INFO 1 --- [demo-gemfire] [           main] i.n.f.FileWatchingX509ExtendedKeyManager : Initialized KeyManager for /certs/keystore.p12
2025-06-24T03:30:59.829Z  INFO 1 --- [demo-gemfire] [           main] o.a.g.i.n.filewatch.PollingFileWatcher   : Started watching /certs/keystore.p12
2025-06-24T03:30:59.831Z  INFO 1 --- [demo-gemfire] [           main] n.f.FileWatchingX509ExtendedTrustManager : Initialized TrustManager for /certs/truststore.p12
2025-06-24T03:30:59.831Z  INFO 1 --- [demo-gemfire] [           main] o.a.g.i.n.filewatch.PollingFileWatcher   : Started watching /certs/truststore.p12
2025-06-24T03:30:59.839Z  INFO 1 --- [demo-gemfire] [           main] o.a.g.c.c.i.AutoConnectionSourceImpl     : AutoConnectionSource UpdateLocatorListTask started with interval=10000 ms.
2025-06-24T03:30:59.842Z  INFO 1 --- [demo-gemfire] [           main] o.a.g.cache.client.internal.PoolImpl     : Pool DEFAULT started with multiuser-authentication=false
2025-06-24T03:31:00.098Z  INFO 1 --- [demo-gemfire] [Timer-DEFAULT-2] o.a.g.c.c.i.AutoConnectionSourceImpl     : online locators was 0 and is now 2
2025-06-24T03:31:10.156Z  INFO 1 --- [demo-gemfire] [Timer-DEFAULT-4] org.apache.geode                         : Updating membership port.  Port changed from 0 to 43084.  ID is now 1b9f0b56148a(1:loner):0:2f93fc9f
2025-06-24T03:31:39.983Z  INFO 1 --- [demo-gemfire] [           main] o.s.b.a.w.s.WelcomePageHandlerMapping    : Adding welcome page: class path resource [META-INF/resources/index.html]
2025-06-24T03:31:40.120Z  INFO 1 --- [demo-gemfire] [           main] o.s.b.a.e.web.EndpointLinksResolver      : Exposing 1 endpoint beneath base path '/actuator'
2025-06-24T03:31:40.157Z  INFO 1 --- [demo-gemfire] [           main] o.s.b.w.embedded.tomcat.TomcatWebServer  : Tomcat started on port 8080 (http) with context path '/'
2025-06-24T03:31:40.164Z  INFO 1 --- [demo-gemfire] [           main] am.ik.demo.DemoGemfireApplication        : Started DemoGemfireApplication in 81.507 seconds (process running for 81.635)
Once the application starts, access http://localhost:8080 in your browser. The existing data on Gemfire should be displayed.
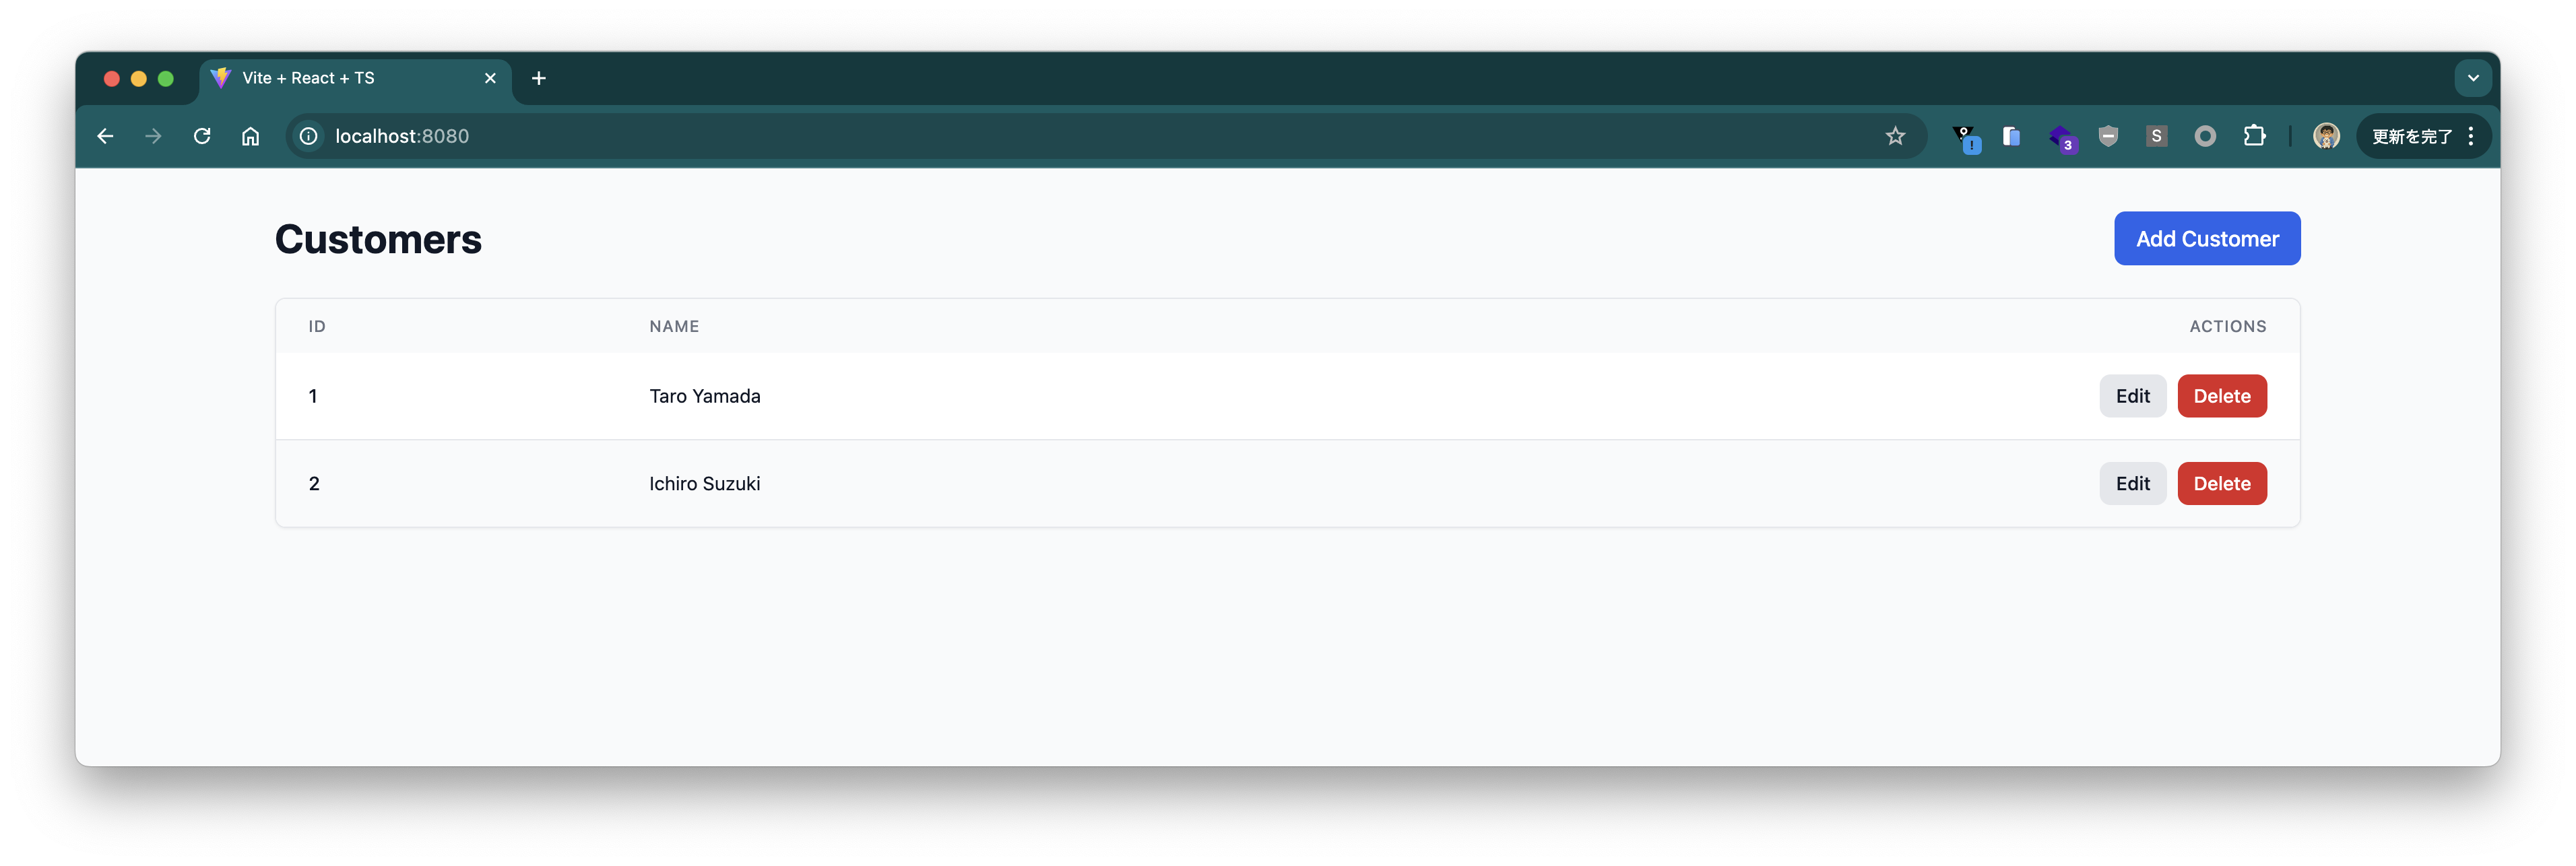
You can of course add data as well.
We have confirmed that we can connect to GemFire from outside the K8s cluster.
Cleanup
Delete the application.
helm delete -n demo demo-gemfire --wait
Delete the GemFireCluster.
kubectl delete -f /tmp/demo-gemfire.yaml -n demo
kubectl delete -f /tmp/demo-locator-management-api.yaml -n demo
Delete the GemFire Operator and CRD.
helm delete -n gemfire-system gemfire-operator --wait
helm delete -n gemfire-system gemfire-crd --wait
We have introduced the complete flow from installing Tanzu GemFire on Kubernetes to connecting from Java applications. Using the GemFire Operator makes it easy to manage GemFire clusters on Kubernetes, allowing application developers to easily utilize GemFire's features.
With TLS enabled by default, security is also enhanced, providing peace of mind for production use.