Spring Cloud Configで動的コンフィギュレーション管理
Spring Cloud Configとは
Spring Cloud Configは分散システムにおけるコンフィギュレーションの仕組みを提供するプロジェクト。SpringOne 2gx 2014に参加して、一番面白いと思ったネタである。
Spring Cloud ConfigはClientとServerで構成される。
SeverはGitやファイル等の外部コンフィギュレーションを管理し、中央集権的に全てのClinetにコンフィギュレーションを提供し、
ClientはSpring Frameworkが元々もっているEnvironmentやPropertySourceといった設定の抽象化の仕組みを利用して、Severから取得したコンフィギュレーションを保持する。また、コンフィギュレーションを再読み込みする仕組みも提供する。
これらを利用したシステムの最小構成は以下のようになる。
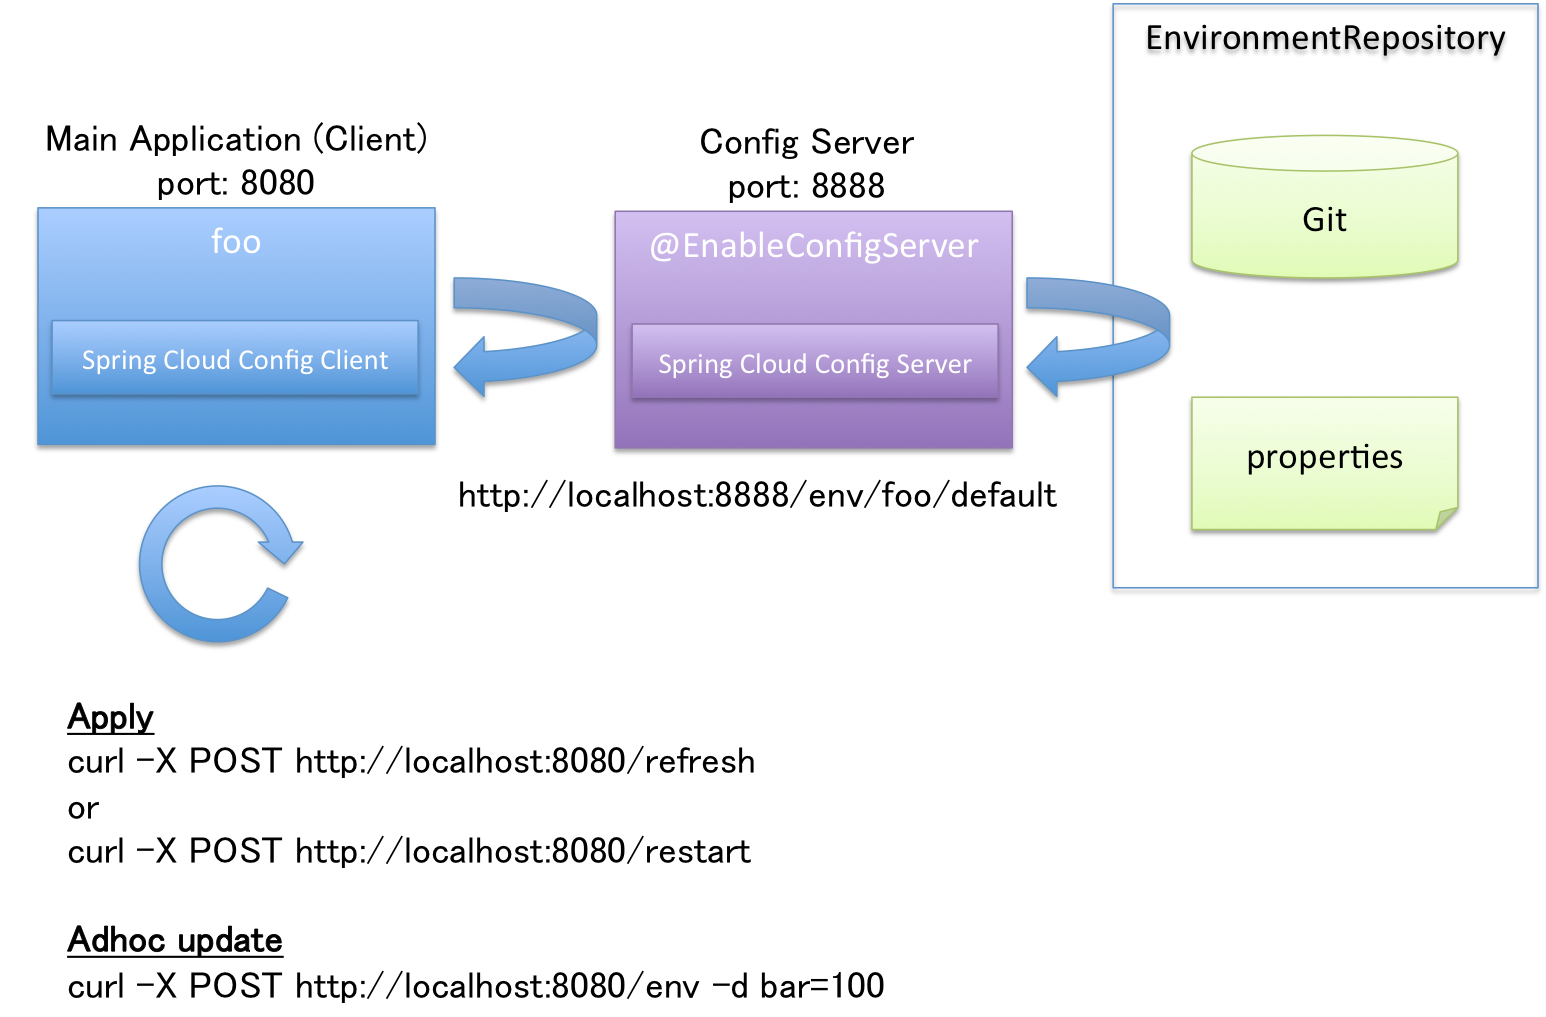
コンフィギュレーションを必要とする、"通常のアプリケーション"がClientになる。Clientが複数台あっても、Serverでコンフィギュレーションを一元管理することができる。
使い方
以下の内容は1.0.0.M1バージョンにおける設定方法で、今後大きく変わる可能性がある。
Config Serverの構築
Config Serverの構築は極めて簡単。org.springframework.cloud:spring-cloud-config-serverの依存関係を追加して、エントリポイントに@EnableConfigServerを付けるだけ。
pom.xmlの設定例は後述する。
エントリポイントクラスは以下のように作成する。
package demo;

import org.springframework.boot.SpringApplication;
import org.springframework.boot.autoconfigure.EnableAutoConfiguration;
import org.springframework.cloud.config.server.EnableConfigServer;
import org.springframework.context.annotation.ComponentScan;

@EnableAutoConfiguration
@EnableConfigServer // important!!
@ComponentScan
public class App {
    public static void main(String[] args) {
        SpringApplication.run(App.class, args);
    }
}
あとはコンフィギュレーションをどこから取ってくるかをクラスパス直下のbootstrap.ymlに記述する(application.ymlではないので注意)。
デフォルトではspring-cloud-samples/config-repoから取得する設定になっているが、プロパティの変更を行いたいため、このプロジェクトをforkしたmaking/config-repoから取得するように変更する。Gitの共有レポジトリのURLをspring.platform.config.server.uriプロパティに設定する。
spring.platform.config.server.uri: https://github.com/making/config-repo
最後にpom.xmlの設定。まだ正式版がリリースされていないため、少し冗長な記述になっているが、1.0.0.RELEASEが出たらもう少し簡潔に書けるはず。重要なのはorg.springframework.cloud:spring-cloud-config-serverの設定だけ。
<?xml version="1.0" encoding="UTF-8"?>
<project xmlns="http://maven.apache.org/POM/4.0.0" xmlns:xsi="http://www.w3.org/2001/XMLSchema-instance"
         xsi:schemaLocation="http://maven.apache.org/POM/4.0.0 http://maven.apache.org/xsd/maven-4.0.0.xsd">
    <modelVersion>4.0.0</modelVersion>

    <groupId>demo</groupId>
    <artifactId>configserver</artifactId>
    <version>1.0-SNAPSHOT</version>
    <packaging>jar</packaging>

    <parent>
        <groupId>org.springframework.boot</groupId>
        <artifactId>spring-boot-starter-parent</artifactId>
        <version>1.1.5.RELEASE</version>
        <relativePath/>
    </parent>

    <dependencyManagement>
        <dependencies>
            <dependency>
                <groupId>org.springframework.cloud</groupId>
                <artifactId>spring-cloud-starters</artifactId>
                <version>1.0.0.M1</version>
                <type>pom</type>
                <scope>import</scope>
            </dependency>
        </dependencies>
    </dependencyManagement>

    <properties>
        <project.build.sourceEncoding>UTF-8</project.build.sourceEncoding>
        <start-class>demo.App</start-class>
        <java.version>1.8</java.version>
    </properties>
    <dependencies>
        <dependency>
            <groupId>org.springframework.boot</groupId>
            <artifactId>spring-boot-starter-web</artifactId>
        </dependency>
        <dependency>
            <groupId>org.springframework.cloud</groupId>
            <artifactId>spring-cloud-config-server</artifactId>
        </dependency>
        <dependency>
            <groupId>org.springframework.boot</groupId>
            <artifactId>spring-boot-starter-test</artifactId>
            <scope>test</scope>
        </dependency>
    </dependencies>
    <repositories>
        <repository>
            <id>spring-milestones</id>
            <name>Spring Milestones</name>
            <url>http://repo.spring.io/milestone</url>
            <snapshots>
                <enabled>false</enabled>
            </snapshots>
        </repository>
    </repositories>
    <pluginRepositories>
        <pluginRepository>
            <id>spring-milestones</id>
            <name>Spring Milestones</name>
            <url>http://repo.spring.io/milestone</url>
            <snapshots>
                <enabled>false</enabled>
            </snapshots>
        </pluginRepository>
    </pluginRepositories>
    <build>
        <plugins>
            <plugin>
                <groupId>org.springframework.boot</groupId>
                <artifactId>spring-boot-maven-plugin</artifactId>
                <dependencies>
                    <dependency>
                        <groupId>org.springframework</groupId>
                        <artifactId>springloaded</artifactId>
                        <version>${spring-loaded.version}</version>
                    </dependency>
                </dependencies>
            </plugin>
        </plugins>
    </build>

</project>
プロジェクト構成は以下のようになる。
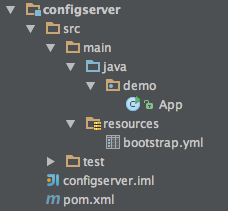
Appクラスを実行すると8888番ポートでサーバーが起動する。spring-cloud-config-server-1.0.0.M1.jarにデフォルト設定が行われたapplication.ymlが含まれている。
http://localhost:8888/{name}/{env}/{label}にアクセスすることで、アプリケーション毎の環境(profile)毎のコンフィギュレーションを取得できる。
name=アプリケーション名env=profile名 (デフォルトはdefault)label=branch名 (デフォルトはmaster)
だと思えば良い。labelは省略可能である。
making/config-repoの例だと以下の扱いとなる。
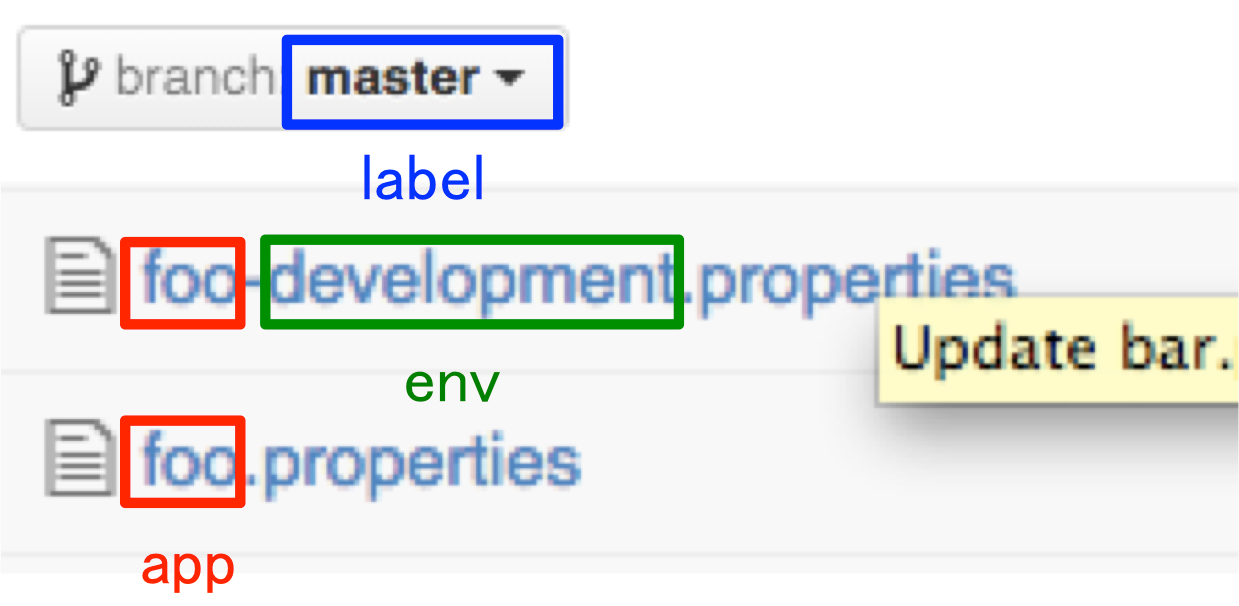
- http://localhost:8888/foo/default にアクセスするとfoo.propertiesのコンフィギュレーションを取得でき、
- http://localhost:8888/foo/development にアクセスするとfoo.propertiesのコンフィギュレーションをfoo-development.propertiesで上書きして取得できる。
$ curl -X GET http://localhost:8888/foo/default | jq .
{
  "propertySources": [
    {
      "source": {
        "foo": "b",
        "test": "This is a test",
        "bar": "123456"
      },
      "name": "https://github.com/making/config-repo/foo.properties"
    },
    {
      "source": {
        "info.url": "https://github.com/spring-cloud-samples",
        "info.description": "Spring Cloud Samples"
      },
      "name": "https://github.com/making/config-repo/application.yml"
    }
  ],
  "label": "master",
  "name": "default"
}
次にenvをdevelopmentに変えてリクエストを送る。
$ curl -X GET http://localhost:8888/foo/development | jq .
{
  "propertySources": [
    {
      "source": {
        "bar": "spam"
      },
      "name": "https://github.com/making/config-repo/foo-development.properties"
    },
    {
      "source": {
        "foo": "b",
        "test": "This is a test",
        "bar": "123456"
      },
      "name": "https://github.com/making/config-repo/foo.properties"
    },
    {
      "source": {
        "info.url": "https://github.com/spring-cloud-samples",
        "info.description": "Spring Cloud Samples"
      },
      "name": "https://github.com/making/config-repo/application.yml"
    }
  ],
  "label": "master",
  "name": "development"
}
defaultとdevelopmentの値が両方返ってくる。Client側でどちらを使うか判断することになる(この場合はdevelopmentを優先する)
Github上のfoo-development.propertiesを以下のように変更する。
bar: Updated!
foo: Added!
再度http://localhost:8888/foo/developmentにリクエストを送ると、
$ curl -X GET http://localhost:8888/foo/development | jq .
{
  "propertySources": [
    {
      "source": {
        "foo": "Added!",
        "bar": "Updated!"
      },
      "name": "https://github.com/making/config-repo/foo-development.properties"
    },
    {
      "source": {
        "foo": "b",
        "test": "This is a test",
        "bar": "123456"
      },
      "name": "https://github.com/making/config-repo/foo.properties"
    },
    {
      "source": {
        "info.url": "https://github.com/spring-cloud-samples",
        "info.description": "Spring Cloud Samples"
      },
      "name": "https://github.com/making/config-repo/application.yml"
    }
  ],
  "label": "master",
  "name": "development"
}
Gitをpullして、最新の値を返す。(以降の説明ではgit push -f origin HEAD^:mastereで内容を元に戻している)
認証・認可設定やプロパティ値の暗号化・復号に関してはドキュメントを参照。
Config Clientの構築
次にClientについて説明する。Clientは普通のSpring Bootアプリケーションにorg.springframework.cloud:spring-cloud-config-clientの依存関係を追加するだけでいい。自動的にConfig Serverに接続し、Config Server経由でプロパティを使用するようになる。
org.springframework.boot:spring-boot-starter-actuatorも依存関係に加えておく。
Clientのアプリケーション名はbootstrap.ymlにspring.application.nameキーで定義する。
spring:
  application:
    name: foo
Config Serverの接続先ははデフォルトではhttp://localhost:8888のenv=default、label=masterを使用される。上書きしたい場合は以下のように設定できる。
spring:
  application:
    name: foo
  cloud:
    config:
      env: default # optional
      label: master # optional
      uri: http://localhost:8888 # optional
クライアントのエントリポイントとなるClientAppクラスに、簡単なControllerを実装する。barプロパティを使うようにしておく。
package demo;

import org.springframework.beans.factory.annotation.Value;
import org.springframework.boot.SpringApplication;
import org.springframework.boot.autoconfigure.EnableAutoConfiguration;
import org.springframework.context.annotation.ComponentScan;
import org.springframework.web.bind.annotation.RequestMapping;
import org.springframework.web.bind.annotation.RestController;

@EnableAutoConfiguration
@ComponentScan
@RestController
public class ClientApp {
    @Value("${bar:World!}")
    String bar;

    @RequestMapping("/")
    String hello() {
        return "Hello " + bar + "!";
    }

    public static void main(String[] args) {
        SpringApplication.run(ClientApp.class, args);
    }
}
pom.xmlは以下の通り
<?xml version="1.0" encoding="UTF-8"?>
<project xmlns="http://maven.apache.org/POM/4.0.0" xmlns:xsi="http://www.w3.org/2001/XMLSchema-instance"
         xsi:schemaLocation="http://maven.apache.org/POM/4.0.0 http://maven.apache.org/xsd/maven-4.0.0.xsd">
    <modelVersion>4.0.0</modelVersion>

    <groupId>demo</groupId>
    <artifactId>configclient</artifactId>
    <version>1.0-SNAPSHOT</version>
    <packaging>jar</packaging>

    <parent>
        <groupId>org.springframework.boot</groupId>
        <artifactId>spring-boot-starter-parent</artifactId>
        <version>1.1.5.RELEASE</version>
        <relativePath/>
    </parent>

    <dependencyManagement>
        <dependencies>
            <dependency>
                <groupId>org.springframework.cloud</groupId>
                <artifactId>spring-cloud-starters</artifactId>
                <version>1.0.0.M1</version>
                <type>pom</type>
                <scope>import</scope>
            </dependency>
        </dependencies>
    </dependencyManagement>

    <properties>
        <project.build.sourceEncoding>UTF-8</project.build.sourceEncoding>
        <start-class>demo.ClientApp</start-class>
        <java.version>1.8</java.version>
    </properties>

    <dependencies>
        <dependency>
            <groupId>org.springframework.boot</groupId>
            <artifactId>spring-boot-starter-web</artifactId>
        </dependency>
        <dependency>
            <groupId>org.springframework.cloud</groupId>
            <artifactId>spring-cloud-config-client</artifactId>
        </dependency>
        <dependency>
            <groupId>org.springframework.boot</groupId>
            <artifactId>spring-boot-starter-actuator</artifactId>
        </dependency>

        <dependency>
            <groupId>org.springframework.boot</groupId>
            <artifactId>spring-boot-starter-test</artifactId>
            <scope>test</scope>
        </dependency>
    </dependencies>
    <repositories>
        <repository>
            <id>spring-milestones</id>
            <name>Spring Milestones</name>
            <url>http://repo.spring.io/milestone</url>
            <snapshots>
                <enabled>false</enabled>
            </snapshots>
        </repository>
    </repositories>
    <pluginRepositories>
        <pluginRepository>
            <id>spring-milestones</id>
            <name>Spring Milestones</name>
            <url>http://repo.spring.io/milestone</url>
            <snapshots>
                <enabled>false</enabled>
            </snapshots>
        </pluginRepository>
    </pluginRepositories>
    <build>
        <plugins>
            <plugin>
                <groupId>org.springframework.boot</groupId>
                <artifactId>spring-boot-maven-plugin</artifactId>
                <dependencies>
                    <dependency>
                        <groupId>org.springframework</groupId>
                        <artifactId>springloaded</artifactId>
                        <version>${spring-loaded.version}</version>
                    </dependency>
                </dependencies>
            </plugin>
        </plugins>
    </build>

</project>
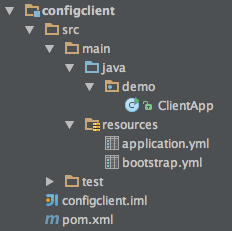
プロジェクト構成は以下のようになる。(application.ymlは後で説明する。)
Spring Boot Actuatorの機能でhttp://localhost:8080/envにアクセスして、PropertySource一覧を見ると、Config Serverからプロパティを取得できていることがわかる。

単プロパティの取得も可能。
$ curl http://localhost:8080/env/bar
123456
Controllerにアクセスすると、
$ curl http://localhost:8080
Hello 123456!
Config Server上のプロパティがインジェクションされていることがわかる。
動的コンフィギュレーション変更
次にConfig Serverの値を以下のように書き換えてみる。
bar: Spring Boot
単プロパティにアクセスすると、
$ curl http://localhost:8080/env/bar
123456
この段階ではConfig Serverの変更は反映されていない。反映させるためにはrefreshエンドポイントにPOSTでアクセスする必要がある。
$ curl -X POST http://localhost:8080/refresh
["bar"]
$ curl http://localhost:8080/env/bar
Spring Boot
これでクライアントのPropertySourceには反映させることができた。ではもう一度
$ curl http://localhost:8080
Hello 123456!
既にDIされたプロパティをrefreshで変更することはできない。(このControllerはSingletonスコープであるため)
再度DIするにはrestartエンドポイントにPOSTでアクセスしてDIコンテナを再起動する必要がある。
$ curl -X POST http://localhost:8080/restart
{"message":"Restarting"}
ログを見ればわかるが、DIコンテナが再起動する(数秒かかる)。
$ curl http://localhost:8080
Hello Spring Boot!
これでアプリケーションを再起動することなく、コンフィギュレーションを変更することが出来た。
ちなみに、restartエンドポイントはデフォルトでは無効になっている。これを有効にするには、application.ymlに以下のように設定する必要がある。
endpoints:
  restart:
    enabled: true
Adhocなコンフィギュレーション変更
Config Serverを書き換えなくても、Client側でAdohocにコンフィギュレーションを変更することができる。
以下のようにenvエンドポイントにプロパティをPOSTすれば良い。
$ curl -X POST http://localhost:8080/env -d bar="Spring Cloud"
{"bar":"Spring Cloud"}
この時点でアプリケーションのPropertySourceは書き変わるので、
プロパティをGETすると、更新された値を取得できる。
$ curl http://localhost:8080/env/bar
Spring Cloud
再DIは行われないのでControllerの結果は変わらない。
$ curl http://localhost:8080
Hello Spring Boot!
refeshしても同じである。
$ curl -X POST http://localhost:8080/refresh
[]
$ curl http://localhost:8080
Hello Spring Boot!
この場合もrestartでDIコンテナを再起動することで、Controllerの結果を書き換えることが出来る。
$ curl -X POST http://localhost:8080/restart
{"message":"Restarting"}
$ curl http://localhost:8080
Hello Spring Cloud!
Refreshスコープの導入
ここまで説明して、普通の人なら思うと思うが、DIコンテナの再起動は時間がかかるのであまりうれしくない。
そこで導入されたのがRefreshスコープである。@RefreshScopeアノテーションがついたBeanはDIコンテナを再起動しなくても、refreshエンドポイントにPOSTすれば、そのBeanが再生成される。
ClientAppを修正する。
package demo;

import org.springframework.beans.factory.annotation.Value;
import org.springframework.boot.SpringApplication;
import org.springframework.boot.autoconfigure.EnableAutoConfiguration;
import org.springframework.cloud.context.config.annotation.RefreshScope;
import org.springframework.context.annotation.ComponentScan;
import org.springframework.web.bind.annotation.RequestMapping;
import org.springframework.web.bind.annotation.RestController;

@EnableAutoConfiguration
@ComponentScan
@RestController
@RefreshScope // important!
public class ClientApp {
    @Value("${bar:World!}")
    String bar;

    @RequestMapping("/")
    String hello() {
        return "Hello " + bar + "!";
    }

    public static void main(String[] args) {
        SpringApplication.run(ClientApp.class, args);
    }
}
アプリケーションを再起動すると、Adhocな変更は失われていることがわかる。
$ curl http://localhost:8080
Hello Spring Boot!
再度、変更する。
$ curl -X POST http://localhost:8080/env -d bar="Spring Cloud Config"
{"bar":"Spring Cloud Config"}
次にrefreshエンドポイントにPOSTする。
$ curl -X POST http://localhost:8080/refresh
[]
さっきはこの状態ではControllerは何も変化しなかったが、今回は@RefreshScopeをつけたので、
$ curl http://localhost:8080
Hello Spring Cloud Config!
プロパティを反映させることができた!
ちなみに、
@ConfigurationPropertiesが設定されたBean- ログレベルに関するプロパティ
logging.level.*
は最初からRefreshスコープである。
サンプルコードはこちら。
SpringのDIコンテナは改めて優秀だとおもった。この機能はSpring本体に取り込まれるんじゃなかろうか。
そして、こういったことをほぼ設定無しで実現できてしまうSpring Bootというか@Conditinalの仕組みの導入はSpringにとって革命的だったんだな〜と思う。
この記事で説明した内容は2014/11/15のJJUG CCC 2014 Fallの僕のセッション(ハンズオン)で扱うので、この記事を読んで手を動かして試してみたいと思った場合は是非参加してほしい。