Kubo(Kubernetes on BOSH)をAWSにデプロイ
目次
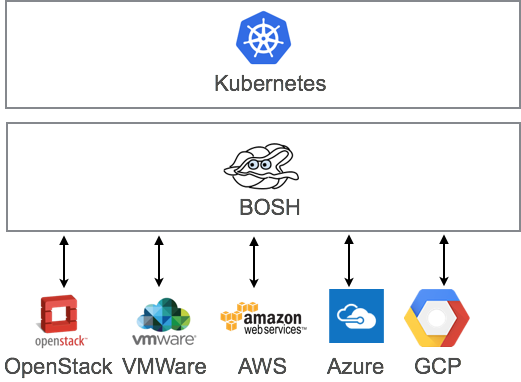
Kuboとは
KuboはKubernetesのBOSH Releaseです。BOSHを利用して、Kubernetesのデプロイ、運用を行うことができます。
- https://docs-kubo.cfapps.io/
- https://pivotal.io/jp/partners/kubo
- https://github.com/cloudfoundry-incubator/kubo-deployment
Cloud Foundry Foundationで共同開発されています。
BOSHはCloud Foundryの運用において長く使用されているツールです。
BOSHもKubernetesもGoogleのBorgを起源としており、Kubernetesがコンテナの管理をするのに対して、BOSHは同じように、その下のVMの管理を行います。
BOSHを使用することにより、
- マルチクラウド環境(GCP, AWS, Azure, vSphere, OpenStack)にデプロイできる (クラスタを分散できるわけではありません)
- Day 1 Operation(k8sクラスタのインストール、デプロイ)だけでなく、Day 2 Operation(k8sクラスタ自体の自動復旧、スケールアウト、Multi-AZ対応、ローリングアップデート)に対応できる
などのメリットがあり、他のKubernetesデプロイツールとの違いになっています。
GKEやACSのようなManaged Kubernetesが使えない場合や、パブリッククラウドとオンプレミスで同じ環境を使いたい場合の魅力的な選択肢になるかと思います。
本記事の執筆時点ではKubo(v0.7.0)は
- GCP
- vSphere
- OpenStack
- AWS
に対応しています。
以下はAWSにKuboをデプロイした時のメモです。
使用したcommitは
基本的にはドキュメントの通りですが、一部やりやすいように変更しています.
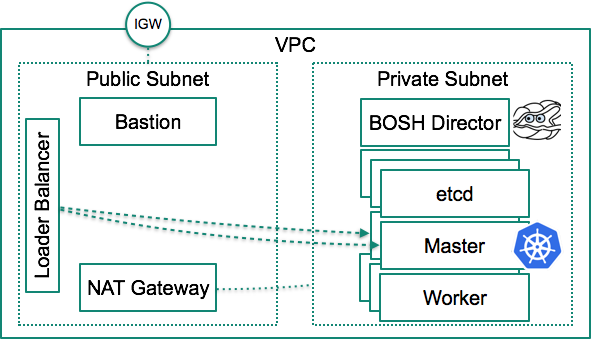
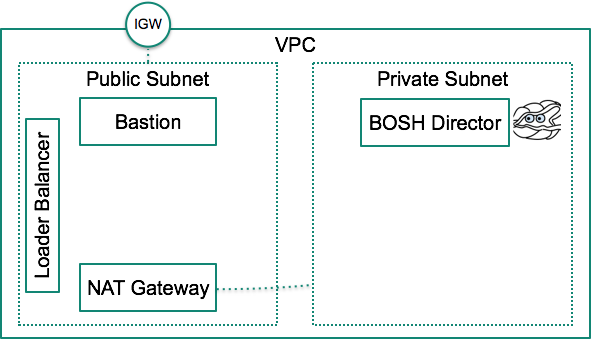
KuboをAWSにデプロイした場合のデフォルト構成は最終的に次の図のようになります。
VPCの作成
https://docs-kubo.cfapps.io/installing/aws/
AWSにBOSHをデプロイするための下準備をします。
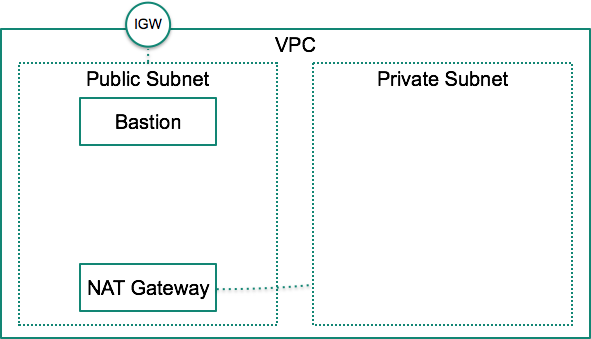
まずはVPC作成。

「DNS 解決」が有効になっていることを確認してください。


次にキーペア作成。ここではdeployerと言う名前にしておきます。

現状の図は次の通り。

AWS環境構築
deployer.pemを手元の環境の~/kubo-workspace/に配置し、
mkdir ~/kubo-workspace/
mv ~/deployer.pem ~/kubo-workspace/
chmod 600 ~/kubo-workspace/deployer.pem
terraformを使って、AWS環境をセットアップします。
AWSの情報を環境変数に設定します。
export prefix=makikubo-

export AWS_ACCESS_KEY_ID=xxxxxx
export AWS_SECRET_ACCESS_KEY=xxxxxx
export vpc_id=xxxxxx
export key_name=deployer # name of private key to use on Kubo VMs
export private_key_filename="~/kubo-workspace/${key_name}.pem" # private key to use on Kubo VMs
export region=ap-northeast-1 # region that you will deploy Kubo in
export zone=ap-northeast-1a # zone that you will deploy Kubo in
export public_subnet_ip_prefix="10.0.1" # subnet that will be used for bastion VM, NAT Gateway and load balancers
export private_subnet_ip_prefix="10.0.2" # subnet that will be used for Kubo VMs and BOSH director
export kubo_terraform_state=~/kubo-workspace/terraform.tfstate
terraformを実行します。
wget https://storage.googleapis.com/kubo-public/kubo-deployment-latest.tgz
tar -xvf kubo-deployment-latest.tgz
cd kubo-deployment/docs/user-guide/platforms/aws

terraform init

terraform apply \
  -var region="${region}" \
  -var zone="${zone}" \
  -var vpc_id="${vpc_id}" \
  -var prefix="${prefix}" \
  -var public_subnet_ip_prefix="${public_subnet_ip_prefix}" \
  -var private_subnet_ip_prefix="${private_subnet_ip_prefix}" \
  -var private_key_filename="${private_key_filename}" \
  -var key_name="${key_name}" \
  -state=${kubo_terraform_state}
publicとprivateの2つのサブネットが作成されます。

それぞれのルートテーブルが作成されます。

publicサブネットのルートテーブルはインターネットゲートウェイに繋がっています。
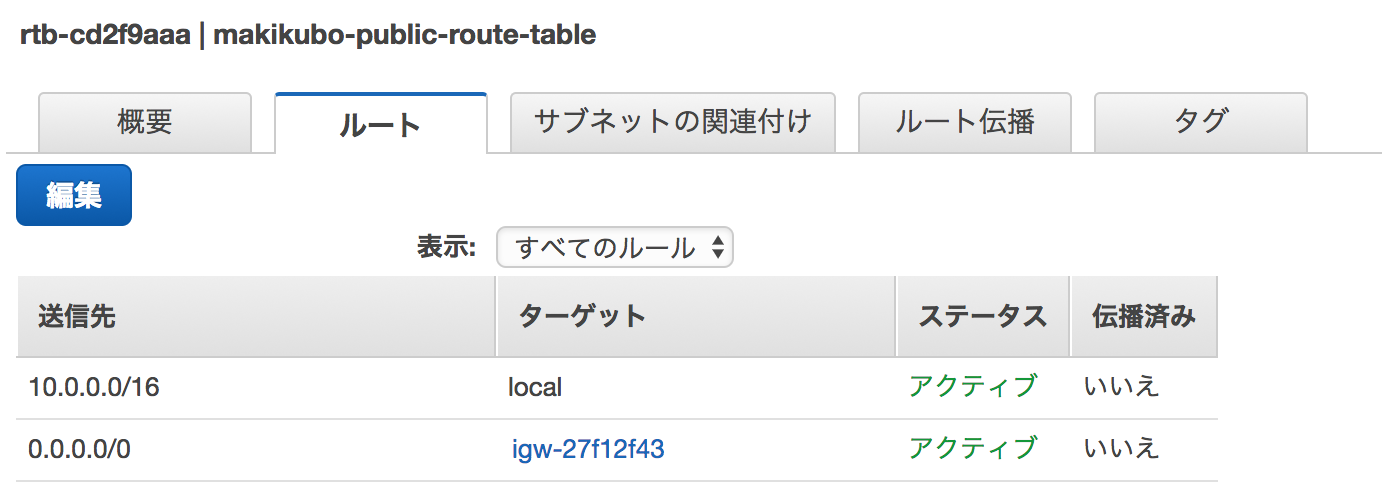
privateサブネットのルーテテーブルはNATゲートウェイに繋がっています。

Bastion(踏み台)サーバーのインスタンスが立ち上がります。

Worker VM向けのセキュリティグループが作成されます。

現状の図は次の通り。
BOSH Directorのデプロイ
次にBOSH(Director VM)をデプロイします。
https://docs-kubo.cfapps.io/installing/aws/deploying-bosh-aws/
これ以降はBastion(踏み台)サーバーで作業します。
次のコマンドでログインできます。
export kubo_terraform_state=~/kubo-workspace/terraform.tfstate
cd $(dirname $kubo_terraform_state)
ssh -i ~/kubo-workspace/deployer.pem ubuntu@$(terraform output bosh-bastion-ip)
手順自動化のため、awscliとjqをインストールしておきます。
sudo apt-get install awscli jq
AWSの設定を行います。
$ aws configure
AWS Access Key ID [None]: ****
AWS Secret Access Key [None]: ****
Default region name [None]: ap-northeast-1
Default output format [None]:
まずはKuboをデプロイするための設定ファイルテンプレートを生成します。
cd /share/kubo-deployment

export kubo_envs=~/kubo-env
export kubo_env_name=kubo
export kubo_env_path="${kubo_envs}/${kubo_env_name}"

mkdir -p "${kubo_envs}"
./bin/generate_env_config "${kubo_envs}" "${kubo_env_name}" aws
Kubo用のIAMユーザーを作成します。
aws iam create-user --user-name "kubo-user"

policy=`cat <<EOF
{
    "Version": "2012-10-17",
    "Statement": [
        {
            "Action": [
                "ec2:AssociateAddress",
                "ec2:AttachVolume",
                "ec2:CreateVolume",
                "ec2:DeleteSnapshot",
                "ec2:DeleteVolume",
                "ec2:DescribeAddresses",
                "ec2:DescribeImages",
                "ec2:DescribeInstances",
                "ec2:DescribeRegions",
                "ec2:DescribeSecurityGroups",
                "ec2:DescribeSnapshots",
                "ec2:DescribeSubnets",
                "ec2:DescribeVolumes",
                "ec2:DetachVolume",
                "ec2:CreateSnapshot",
                "ec2:CreateTags",
                "ec2:RunInstances",
                "ec2:TerminateInstances",
                "ec2:RegisterImage",
                "ec2:DeregisterImage",
                "elasticloadbalancing:*"
            ],
            "Effect": "Allow",
            "Resource": "*"
        },
        {
            "Effect": "Allow",
            "Action": "iam:PassRole",
            "Resource": "$(aws iam get-user --user-name "kubo-user" | jq -r ".User.Arn" | sed 's|user/kubo-user|role/*kubo*|')"
        }
    ]
}
EOF`

aws iam put-user-policy --user-name "kubo-user" \
    --policy-name "kubo-policy" \
    --policy-document "$policy"

aws iam create-access-key --user-name "kubo-user" > access-key.json
作成したIAMユーザー情報を設定ファイルに反映します。
sed -i "s/access_key_id:/access_key_id: $(jq -r .AccessKey.AccessKeyId access-key.json)/" ${kubo_env_path}/director-secrets.yml
sed -i "s/secret_access_key:/secret_access_key: $(jq -r .AccessKey.SecretAccessKey access-key.json)/" ${kubo_env_path}/director-secrets.yml
いよいよBOSH(Director VM)をデプロイします。
./bin/deploy_bosh "${kubo_env_path}" ~/deployer.pem
デプロイが完了するとbosh/0という名前のVMが立ち上がります。

プロダクション向けの設定でm4.xlargeが使われており、検証用途にはちょっと大きいため、
次のvm typeを変更するoperation file(yamlのpatchファイル)を作成します。
mkdir ${HOME}/custom-ops-files
cat <<EOF > ${HOME}/custom-ops-files/director-size-aws.yml
- type: replace
  path: /resource_pools/name=vms/cloud_properties/instance_type
  value: t2.small
EOF
deploy_boshスクリプトではbosh create-envの追加オプションを環境変数BOSH_EXTRA_OPSで設定できます。
これを設定して再度デプロイします。
export BOSH_EXTRA_OPS="--ops-file ${HOME}/custom-ops-files/director-size-aws.yml "

/share/kubo-deployment/bin/deploy_bosh "${kubo_env_path}" ~/deployer.pem

BOSH Directorの情報を環境変数に設定します。
BOSH_ENV=~/kubo-env/kubo . /share/kubo-deployment/bin/set_bosh_environment
BOSH Directorにログインします。
$ bosh-cli env
Using environment '10.0.2.252' as client 'bosh_admin'

Name      makikubo-bosh
UUID      56abcae9-2fca-4a97-a9c9-93fe02236e83
Version   263.0.0 (00000000)
CPI       aws_cpi
Features  compiled_package_cache: disabled
          config_server: enabled
          dns: enabled
          snapshots: disabled
User      bosh_admin

Succeeded

$ bosh-cli log-in
Successfully authenticated with UAA

Succeeded
現状の図は次の通り。

Kuboのルーティングの設定
https://docs-kubo.cfapps.io/installing/aws/routing-aws/
Kuboへルーティング(LB)をIaaSのものにするか、Cloud Foundryのものにするかを設定できます。 ここではIaaSのもの(ELB)を使用します。
export kubo_env_name=kubo
cd /share/kubo-deployment/docs/user-guide/routing/aws
export state_dir=~/kubo-env/${kubo_env_name}
export kubo_terraform_state=${state_dir}/terraform.tfstate
export AWS_ACCESS_KEY_ID=`jq -r .AccessKey.AccessKeyId /share/kubo-deployment/access-key.json `
export AWS_SECRET_ACCESS_KEY=`jq -r .AccessKey.SecretAccessKey /share/kubo-deployment/access-key.json`

terraform init

terraform apply \
   -var region=${region} \
   -var vpc_id=${vpc_id} \
   -var node_security_group_id=${default_security_groups} \
   -var public_subnet_id=${public_subnet_id} \
   -var prefix=${prefix} \
   -state=${kubo_terraform_state}
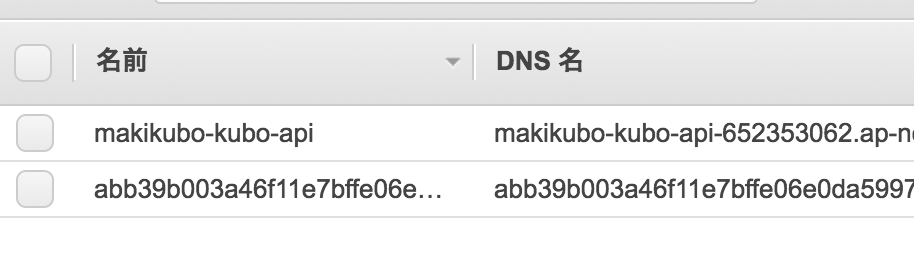
Master VM向けのセキュリティグループが作成されます。

Master API向けのELBが作成されます。

設定ファイルに反映します。
export master_target_pool=$(terraform output -state=${kubo_terraform_state} kubo_master_target_pool)
export kubernetes_master_host=$(terraform output -state=${kubo_terraform_state} master_lb_ip_address)

. /share/kubo-deployment/docs/user-guide/platforms/aws/setup_helpers
set_iaas_routing "${state_dir}/director.yml"
現状の図は次の通り。
Kuboのデプロイ
https://docs-kubo.cfapps.io/installing/deploying-kubo/
いよいよKuboのデプロイです。
/share/kubo-deployment/bin/deploy_k8s ~/kubo-env/kubo kubo
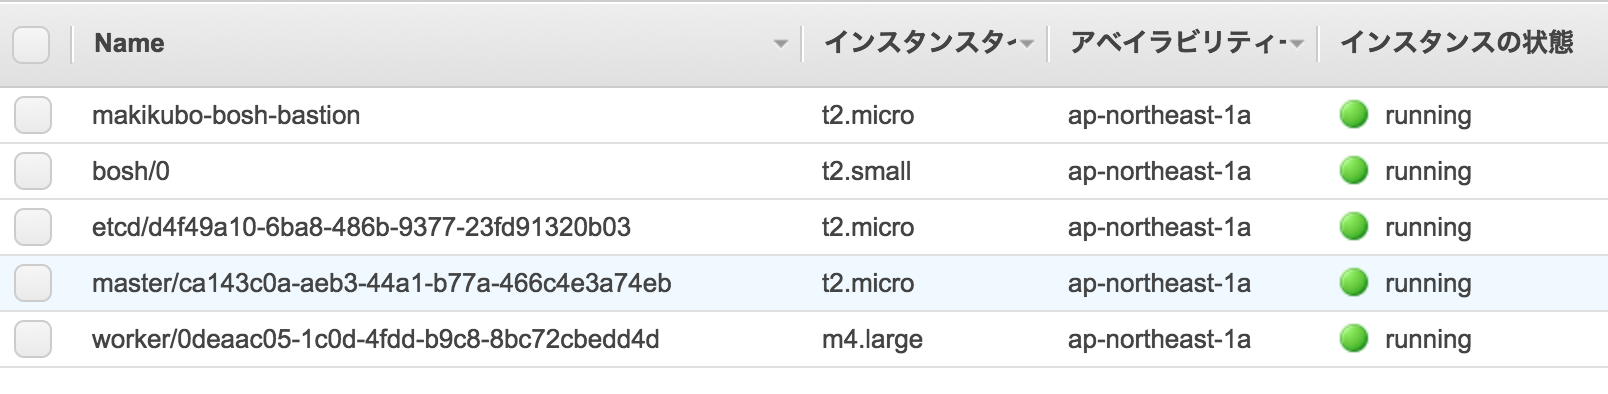
デプロイが完了したら、bosh-cliで確認します。
$ bosh-cli vms
Using environment '10.0.2.252' as client 'bosh_admin'

Task 6. Done

Deployment 'kubo'

Instance                                     Process State  AZ  IPs        VM CID               VM Type
etcd/5a1ee552-f94d-4665-81ac-2deb1ee3ab0b    running        z1  10.0.2.5   i-01d38a8c93b919da9  common
etcd/ba5d02c0-b80e-4092-976b-35a9f9718689    running        z1  10.0.2.6   i-09135355fb58155c5  common
etcd/d4f49a10-6ba8-486b-9377-23fd91320b03    running        z1  10.0.2.4   i-0a989f01671b9eadc  common
master/1b3e37b7-0641-43f2-81b9-5712085341ad  running        z1  10.0.2.8   i-0fa89c32ca7cfe3d4  master
master/ca143c0a-aeb3-44a1-b77a-466c4e3a74eb  running        z1  10.0.2.7   i-070d791c1067fef9a  master
worker/0663c9ee-80d2-44ce-b425-c4f4255d1340  running        z1  10.0.2.10  i-0f9c6b24a259c38d0  worker
worker/0deaac05-1c0d-4fdd-b9c8-8bc72cbedd4d  running        z1  10.0.2.9   i-0191c6eeb9bac4893  worker
worker/7efb6037-6e55-460d-8971-e569c2d903cd  running        z1  10.0.2.11  i-079f6d7f1d1407ee6  worker

8 vms

Succeeded
etcdが3台、masterが2台、workerが3台デプロイされます。

また使用されているBOSH Releaseは次の通りです。
$ bosh-cli releases
Using environment '10.0.2.252' as client 'bosh_admin'

Name       Version       Commit Hash
docker     28.0.1*       8096ad43+
kubo       0.8.0-dev.7*  529e961
kubo-etcd  2*            aa57fc9

(*) Currently deployed
(+) Uncommitted changes

3 releases

Succeeded
現状の図は次の通り。
Kubernetesへのアクセス
デプロイしたKubernetesへアクセスしましょう。
/share/kubo-deployment/bin/set_kubeconfig ~/kubo-env/kubo kubo
~/.kube/configが更新されました。これでkubectlを使ってアクセス可能です。
$ kubectl version
Client Version: version.Info{Major:"1", Minor:"7", GitVersion:"v1.7.6", GitCommit:"4bc5e7f9a6c25dc4c03d4d656f2cefd21540e28c", GitTreeState:"clean", BuildDate:"2017-09-14T06:55:55Z", GoVersion:"go1.8.3", Compiler:"gc", Platform:"linux/amd64"}
Server Version: version.Info{Major:"1", Minor:"7", GitVersion:"v1.7.5", GitCommit:"17d7182a7ccbb167074be7a87f0a68bd00d58d97", GitTreeState:"clean", BuildDate:"2017-08-31T08:56:23Z", GoVersion:"go1.8.3", Compiler:"gc", Platform:"linux/amd64"}

$ kubectl get pods --namespace=kube-system
NAME                                    READY     STATUS    RESTARTS   AGE
heapster-932399794-5jskb                1/1       Running   0          8m
kube-dns-3329716278-k301f               3/3       Running   0          8m
kubernetes-dashboard-1367211859-kdgxb   1/1       Running   0          8m
monitoring-influxdb-564852376-sqr9s     1/1       Running   0          8m

$ kubectl get node -o wide
NAME                                           STATUS    AGE       VERSION   EXTERNAL-IP   OS-IMAGE             KERNEL-VERSION
ip-10-0-2-10.ap-northeast-1.compute.internal   Ready     11m       v1.7.5    <none>        Ubuntu 14.04.5 LTS   4.4.0-83-generic
ip-10-0-2-11.ap-northeast-1.compute.internal   Ready     9m        v1.7.5    <none>        Ubuntu 14.04.5 LTS   4.4.0-83-generic
ip-10-0-2-9.ap-northeast-1.compute.internal    Ready     13m       v1.7.5    <none>        Ubuntu 14.04.5 LTS   4.4.0-83-generic
アプリケーションのデプロイ
簡単なアプリケーションをデプロイします。次のhello-tomcat.ymlを作成します。
kind: Service
apiVersion: v1
metadata:
  name: hello-tomcat-service
spec:
  selector:
    run: hello-tomcat
  ports:
  - protocol: TCP
    port: 8080
    targetPort: 8080
  type: LoadBalancer
---
apiVersion: apps/v1beta1
kind: Deployment
metadata:
  name: hello-tomcat-deployment
spec:
  replicas: 2
  template:
    metadata:
      labels:
        run: hello-tomcat
    spec:
      containers:
      - name: hello-tomcat
        image: making/hello-tomcat:v1
        ports:
        - containerPort: 8080
デプロイします。
kubectl apply -f hello-tomcat.yml
しばらくするとデプロイ完了します。
$ kubectl get pods
NAME READY STATUS RESTARTS AGE
hello-tomcat-deployment-1598259564-m9n0f 1/1 Running 0 5m
hello-tomcat-deployment-1598259564-wrqmd 1/1 Running 0 5m
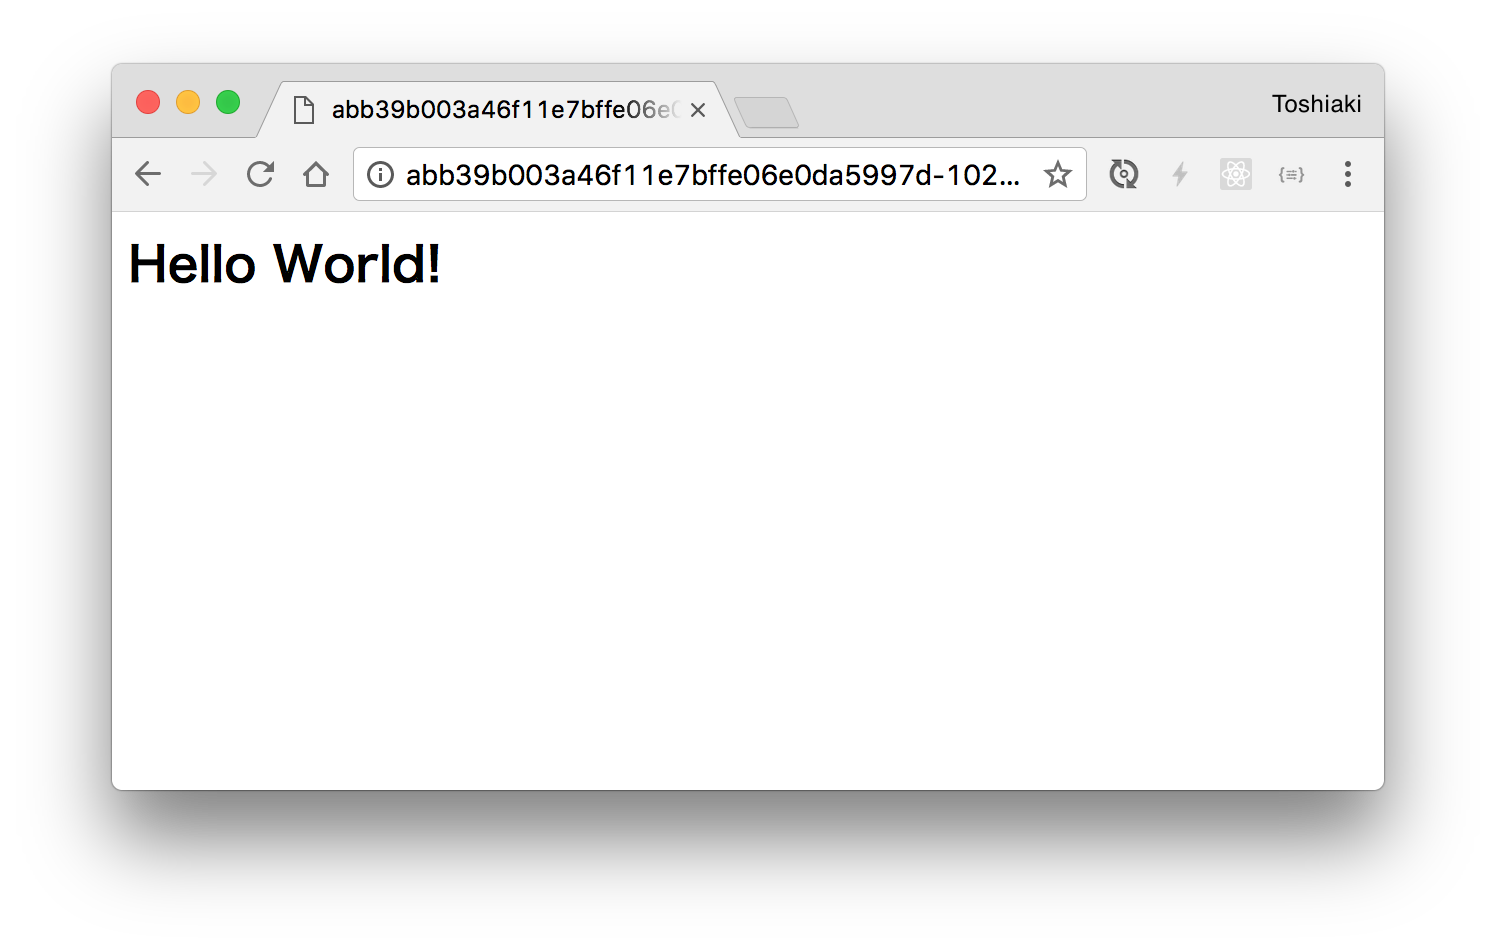
$ kubectl get service hello-tomcat-service -o wide
NAME CLUSTER-IP EXTERNAL-IP PORT(S) AGE SELECTOR
hello-tomcat-service 10.100.200.94 abb39b003a46f11e7bffe06e0da5997d-1028762931.ap-northeast-1.elb.amazonaws.com 8080:32742/TCP 5m run=hello-tomcat
ServiceがELBに紐付いていることがわかります。
アクセスしてみます。
$ curl http://abb39b003a46f11e7bffe06e0da5997d-1028762931.ap-northeast-1.elb.amazonaws.com:8080/
<html>
<body>
<h2>Hello World!</h2>
</body>
</html>


$ curl http://abb39b003a46f11e7bffe06e0da5997d-1028762931.ap-northeast-1.elb.amazonaws.com:8080/env
HELLO_TOMCAT_SERVICE_SERVICE_HOST: 10.100.200.94
PATH: /usr/local/tomcat/bin:/usr/local/sbin:/usr/local/bin:/usr/sbin:/usr/bin:/sbin:/bin
KUBERNETES_PORT: tcp://10.100.200.1:443
JAVA_HOME: /docker-java-home/jre
CA_CERTIFICATES_JAVA_VERSION: 20161107~bpo8+1
KUBERNETES_SERVICE_HOST: 10.100.200.1
LANG: C.UTF-8
TOMCAT_MAJOR: 8
TOMCAT_VERSION: 8.5.15
LD_LIBRARY_PATH: /usr/local/tomcat/native-jni-lib
OPENSSL_VERSION: 1.1.0e-2
HELLO_TOMCAT_SERVICE_PORT_8080_TCP_PROTO: tcp
TOMCAT_NATIVE_LIBDIR: /usr/local/tomcat/native-jni-lib
PWD: /usr/local/tomcat
JAVA_VERSION: 8u131
KUBERNETES_PORT_443_TCP: tcp://10.100.200.1:443
TOMCAT_TGZ_URL: https://www.apache.org/dyn/closer.cgi?action=download&filename=tomcat/tomcat-8/v8.5.15/bin/apache-tomcat-8.5.15.tar.gz
KUBERNETES_PORT_443_TCP_ADDR: 10.100.200.1
HELLO_TOMCAT_SERVICE_PORT_8080_TCP_ADDR: 10.100.200.94
CATALINA_HOME: /usr/local/tomcat
HELLO_TOMCAT_SERVICE_PORT: tcp://10.100.200.94:8080
KUBERNETES_PORT_443_TCP_PROTO: tcp
HELLO_TOMCAT_SERVICE_SERVICE_PORT: 8080
HELLO_TOMCAT_SERVICE_PORT_8080_TCP_PORT: 8080
KUBERNETES_SERVICE_PORT: 443
HOSTNAME: hello-tomcat-deployment-1598259564-wrqmd
JAVA_DEBIAN_VERSION: 8u131-b11-1~bpo8+1
TOMCAT_ASC_URL: https://www.apache.org/dist/tomcat/tomcat-8/v8.5.15/bin/apache-tomcat-8.5.15.tar.gz.asc
KUBERNETES_PORT_443_TCP_PORT: 443
KUBERNETES_SERVICE_PORT_HTTPS: 443
HELLO_TOMCAT_SERVICE_PORT_8080_TCP: tcp://10.100.200.94:8080
GPG_KEYS: 05AB33110949707C93A279E3D3EFE6B686867BA6 07E48665A34DCAFAE522E5E6266191C37C037D42 47309207D818FFD8DCD3F83F1931D684307A10A5 541FBE7D8F78B25E055DDEE13C370389288584E7 61B832AC2F1C5A90F0F9B00A1C506407564C17A3 713DA88BE50911535FE716F5208B0AB1D63011C7 79F7026C690BAA50B92CD8B66A3AD3F4F22C4FED 9BA44C2621385CB966EBA586F72C284D731FABEE A27677289986DB50844682F8ACB77FC2E86E29AC A9C5DF4D22E99998D9875A5110C01C5A2F6059E7 DCFD35E0BF8CA7344752DE8B6FB21E8933C60243 F3A04C595DB5B6A5F1ECA43E3B7BBB100D811BBE F7DA48BB64BCB84ECBA7EE6935CD23C10D498E23
HOME: /root
ロードバランスされることも確認できます。
$ for i in `seq 1 10`;do curl -s http://abb39b003a46f11e7bffe06e0da5997d-1028762931.ap-northeast-1.elb.amazonaws.com:8080/env | grep HOSTNAME;done
HOSTNAME: hello-tomcat-deployment-1598259564-wrqmd
HOSTNAME: hello-tomcat-deployment-1598259564-wrqmd
HOSTNAME: hello-tomcat-deployment-1598259564-m9n0f
HOSTNAME: hello-tomcat-deployment-1598259564-wrqmd
HOSTNAME: hello-tomcat-deployment-1598259564-m9n0f
HOSTNAME: hello-tomcat-deployment-1598259564-wrqmd
HOSTNAME: hello-tomcat-deployment-1598259564-wrqmd
HOSTNAME: hello-tomcat-deployment-1598259564-wrqmd
HOSTNAME: hello-tomcat-deployment-1598259564-m9n0f
HOSTNAME: hello-tomcat-deployment-1598259564-m9n0f
Kuboのカスタマイズ
https://docs-kubo.cfapps.io/installing/customizing-kubo/
deploy_k8sではデフォルトの設定が強制されます。
vm typeの変更など、細かい設定変更はBOSH CLIで直接行えます。
BOSH CLIによるデプロイに必要なCloud ConigとKuboのマニフェストファイルを次のコマンドで生成します。
cd /share/kubo-deployment
./bin/generate_cloud_config ~/kubo-env/kubo > ~/kubo-env/kubo/cloud-config.yml
./bin/generate_kubo_manifest ~/kubo-env/kubo kubo dummy > ~/kubo-env/kubo/kubo-manifest.yml
まずは利用可能な(小さい)VMタイプを追加するためのCloud Configのoperation fileを作成します。
cat <<EOF > ${HOME}/custom-ops-files/add-small-vm-types.yml
- type: replace
  path: /vm_types/-
  value:
    cloud_properties:
      ephemeral_disk:
        size: 25000
      instance_type: t2.micro
    name: common-small

- type: replace
  path: /vm_types/-
  value:
    cloud_properties:
      elbs:
      - makikubo-kubo-api
      ephemeral_disk:
        size: 25000
      iam_instance_profile: makikubo-kubo-master
      instance_type: t2.micro
    name: master-small

- type: replace
  path: /vm_types/-
  value:
    cloud_properties:
      ephemeral_disk:
        size: 50000
      iam_instance_profile: makikubo-kubo-worker
      instance_type: m4.large
    name: worker-small
EOF
-oでこのファイルを指定してCloud Configを更新します。
bosh-cli update-cloud-config ~/kubo-env/kubo/cloud-config.yml \
                             -o ~/custom-ops-files/add-small-vm-types.yml
実行結果。
$ bosh-cli update-cloud-config ~/kubo-env/kubo/cloud-config.yml \
>                              -o ~/custom-ops-files/add-small-vm-types.yml
Using environment '10.0.2.252' as client 'bosh_admin'

  vm_types:
+ - cloud_properties:
+     ephemeral_disk:
+       size: 25000
+     instance_type: t2.micro
+   name: common-small
+ - cloud_properties:
+     elbs:
+     - makikubo-kubo-api
+     ephemeral_disk:
+       size: 25000
+     iam_instance_profile: makikubo-kubo-master
+     instance_type: t2.micro
+   name: master-small
+ - cloud_properties:
+     ephemeral_disk:
+       size: 50000
+     iam_instance_profile: makikubo-kubo-worker
+     instance_type: m4.large
+   name: worker-small

Continue? [yN]: y

Succeeded
次にKuboで小さいVM Typeを使用するようなoperation file(use-small-vm-types.yml)を作成します。
cat <<EOF > ${HOME}/custom-ops-files/use-small-vm-types.yml
- type: replace
  path: /instance_groups/name=etcd/vm_type
  value: common-small

- type: replace
  path: /instance_groups/name=master/vm_type
  value: master-small

- type: replace
  path: /instance_groups/name=worker/vm_type
  value: worker-small
EOF
次にetcd, master, workerを全て1インスタンスに減らすためのoperation file(scale-to-one.yml)を作成します。
cat <<EOF > ${HOME}/custom-ops-files/scale-to-one.yml
- type: replace
  path: /instance_groups/name=etcd/instances
  value: 1

- type: replace
  path: /instance_groups/name=master/instances
  value: 1

- type: replace
  path: /instance_groups/name=worker/instances
  value: 1
EOF
use-small-vm-types.ymlとscale-to-one.ymlを追加してbosh-cli deployします。
bosh-cli deploy -d kubo ~/kubo-env/kubo/kubo-manifest.yml \
                -o ~/custom-ops-files/use-small-vm-types.yml \
                -o ~/custom-ops-files/scale-to-one.yml
実行結果。
$ bosh-cli deploy -d kubo ~/kubo-env/kubo/kubo-manifest.yml \
>                 -o ~/custom-ops-files/use-small-vm-types.yml \
>                 -o ~/custom-ops-files/scale-to-one.yml
Using environment '10.0.2.252' as client 'bosh_admin'

Using deployment 'kubo'

Release 'kubo-etcd/2' already exists.

Release 'docker/28.0.1' already exists.

  vm_types:
+ - cloud_properties:
+     ephemeral_disk:
+       size: 25000
+     instance_type: t2.micro
+   name: common-small
+ - cloud_properties:
+     elbs:
+     - makikubo-kubo-api
+     ephemeral_disk:
+       size: 25000
+     iam_instance_profile: makikubo-kubo-master
+     instance_type: t2.micro
+   name: master-small
+ - cloud_properties:
+     ephemeral_disk:
+       size: 50000
+     iam_instance_profile: makikubo-kubo-worker
+     instance_type: m4.large
+   name: worker-small

  instance_groups:
  - name: etcd
-   instances: 3
+   instances: 1
-   vm_type: common
+   vm_type: common-small
  - name: master
-   instances: 2
+   instances: 1
-   vm_type: master
+   vm_type: master-small
  - name: worker
-   instances: 3
+   instances: 1
-   vm_type: worker
+   vm_type: worker-small

Continue? [yN]: y
スケールダウンすると
hello-tomcatがいなくなり、ELBのゴミが残っていました。。この辺の挙動はよくわかっていません。
使われなくなったDisk(EBS)はしばらく残っています。これを削除したい場合は、
bosh-cli -n clean-up --all
Kuboのstart/stop
VMを削除して止めたい場合は、
bosh-cli -d kubo stop --hard
再開したい場合は、
bosh-cli -d kubo start
kube-systemsytem以外のpodはなくなる?
Kuboの削除
bosh-cli -d kubo delete-deployment