AzureにCloud Foundry (Diegoオンリー構成)をインストール
AzureにCloud Foundryをインストールする。情報が少ないのでメモっておく。
基本的にはhttps://github.com/cloudfoundry-incubator/bosh-azure-cpi-release/blob/master/docs/guidance.mdの内容の通り。
Azureの設定
Azure CLIをインストール
$ brew cask install azure-cli
Service Principalの作成
$ azure config mode arm
$ azure login
info:    Executing command login
/info:    To sign in, use a web browser to open the page http://aka.ms/devicelogin. Enter the code ****** to authenticate. If you're signing in as an Azure AD application, use the --username and --password parameters.
http://aka.ms/devicelogin でコンソールに表示されているコードを入力すればログイン成功。
$ azure account list --json
[
  {
    "id": "aaaaaaaa-aaaa-aaaa-aaaa-aaaaaaaaaaaa",
    "name": "....",
    "user": {
      "name": "...",
      "type": "..."
    },
    "tenantId": "bbbbbbbb-bbbb-bbbb-bbbb-bbbbbbbbbbbb",
    "state": "...",
    "isDefault": true,
    "registeredProviders": [],
    "environmentName": "..."
  }
]
idの値(Subscription ID)をazure account setに渡す。tenantIdは後で使用するのでメモすること。
$ azure account set aaaaaaaa-aaaa-aaaa-aaaa-aaaaaaaaaaaa
Azure Active Directory (AAD) アプリケーションを作成する。
$ azure ad app create --name "Service Principal for BOSH" --password "changeme" --home-page "http://BOSHAzureCPI" --identifier-uris "http://BOSHAzureCPI"
info:    Executing command ad app create
+ Creating application Service Principal for BOSH
data:    Application Id:          cccccccc-cccc-cccc-cccc-cccccccccccc
data:    Application Object Id:   dddddddd-dddd-dddd-dddd-dddddddddddd
data:    Application Permissions:
data:                             claimValue:  user_impersonation
data:                             description:  Allow the application to access Service Principal for BOSH on behalf of the signed-in user.
data:                             directAccessGrantTypes:
data:                             displayName:  Access Service Principal for BOSH
data:                             impersonationAccessGrantTypes:  impersonated=User, impersonator=Application
data:                             isDisabled:
data:                             origin:  Application
data:                             permissionId:  eeeeeeee-eeee-eeee-eeee-eeeeeeeeeeee
data:                             resourceScopeType:  Personal
data:                             userConsentDescription:  Allow the application to access Service Principal for BOSH on your behalf.
data:                             userConsentDisplayName:  Access Service Principal for BOSH
data:                             lang:
info:    ad app create command OK
Application Idをazure ad sp createに渡してService Principalを作成する。Application IdはclientIdとして、後で使用するのでメモすること。
$ azure ad sp create cccccccc-cccc-cccc-cccc-cccccccccccc
info:    Executing command ad sp create
+ Creating service principal for application cccccccc-cccc-cccc-cccc-cccccccccccc
data:    Object Id:               ffffffff-ffff-ffff-ffff-ffffffffffff
data:    Display Name:            Service Principal for BOSH
data:    Service Principal Names:
data:                             cccccccc-cccc-cccc-cccc-cccccccccccc
data:                             http://BOSHAzureCPI
info:    ad sp create command OK
Subscription IDを指定してRoleをアサインする。
$ azure role assignment create --spn "http://BOSHAzureCPI" -o "Contributor" --subscription aaaaaaaa-aaaa-aaaa-aaaa-aaaaaaaaaaaa
info:    Executing command role assignment create
+ Finding role with specified name
|data:    RoleAssignmentId     : /subscriptions/aaaaaaaa-aaaa-aaaa-aaaa-aaaaaaaaaaaa/providers/Microsoft.Authorization/roleAssignments/00000000-0000-0000-0000-000000000000
data:    RoleDefinitionName   : Contributor
data:    RoleDefinitionId     : 11111111-1111-1111-1111-111111111111
data:    Scope                : /subscriptions/aaaaaaaa-aaaa-aaaa-aaaa-aaaaaaaaaaaa
data:    Display Name         : Service Principal for BOSH
data:    SignInName           :
data:    ObjectId             : ffffffff-ffff-ffff-ffff-ffffffffffff
data:    ObjectType           : ServicePrincipal
data:
+
info:    role assignment create command OK
BOSHをデプロイ
テンプレートを使用して、まずはBOSH Directorをデプロイするための踏み台サーバーを作成し、そこからBOSH Directorのインストールまで自動でやってもらう。
⚠️テンプレートからインストールする方法はしばしば更新されていくので、この記事の内容通りに行くとは限りません⚠️

をクリックして、次のパラメーターには以下を設置する。下記の値は例。
VMNAME (string) bosh
ADMINUSERNAME (string) making
SSHKEYDATA (string) ~/.ssh/id_rsa.pubの内容
TENANTID (string) bbbbbbbb-bbbb-bbbb-bbbb-bbbbbbbbbbbb
CLIENTID (string) cccccccc-cccc-cccc-cccc-cccccccccccc
CLIENTSECRET (securestring) changeme
AUTODEPLOYBOSH (string) true
リソースグループazure-cf(東日本)を作成して設定。
しばらく待つ(1時間くらい)。

bosh (director)のデプロイまで完了である。1時間くらいかかる。

この時点で2つのVMができている。VMNAMEで入力した名前のVMが踏み台サーバーで、ランダムな文字列の方がBosh Directorである。
BOSH Componentsの図で言うと、次の図の2つの赤枠に相当するVMができている。

踏み台の方にログインしてBOSH DirectorをBOSH CLIで操作して、右側のVM群(ここではCloud FoundryのRuntime)をインストールすることになる。
では踏み台サーバーにsshでログインする。ユーザー名と~/.ssh/id_rsa.pubと対の秘密鍵(~/.ssh/id_rsa)でログインできる。IPアドレスはパブリックIPアドレスを参照。

ホームディレクトリは次のようになっている。deploy_bosh.shでBosh Directorはデプロイ済みなので、残るはCLIを使ってCloud Foundryをデプロイするのみ。deploy_cloudfoundry.shも用意されている。
making@bosh:~$ ll
total 6908
drwxr-xr-x 6 making making    4096 Sep 14 11:37 ./
drwxr-xr-x 3 root   root      4096 Sep 14 10:00 ../
-rw-r--r-- 1 making making     220 Apr  9  2014 .bash_logout
-rw-r--r-- 1 making making    3637 Apr  9  2014 .bashrc
-r-------- 1 making root      1675 Sep 14 10:04 bosh
-rw------- 1 making making     350 Sep 14 10:43 .bosh_config
-rw-r--r-- 1 making root        23 Sep 14 10:04 BOSH_DIRECTOR_ADMIN_PASSWORD
drwxrwxr-x 4 making making    4096 Sep 14 10:07 .bosh_init/
-rw-r--r-- 1 making root       382 Sep 14 10:04 bosh.pub
-rw-rw-r-- 1 making making    1386 Sep 14 10:43 bosh-state.json
-rw-r--r-- 1 making root      4385 Sep 14 10:04 bosh.yml
drwx------ 2 making making    4096 Sep 14 11:37 .cache/
-rw-r--r-- 1 making root   4009884 Sep 14 10:04 cf-cli-installer_6.14.1_x86-64.deb
-rwxr-xr-x 1 making root       427 Sep 14 10:04 deploy_bosh.sh*
-rwxr-xr-x 1 making root      1445 Sep 14 10:04 deploy_cloudfoundry.sh*
drwxr-xr-x 2 making root      4096 Sep 14 10:43 example_manifests/
-rw-r--r-- 1 making root     88794 Sep 14 10:43 install.log
-rw-r--r-- 1 making making     675 Apr  9  2014 .profile
-rw-rw-r-- 1 making making 2887560 Sep 14 10:43 run.log
-rw-r--r-- 1 making root      2452 Sep 14 10:04 settings
drwx------ 2 making making    4096 Sep 14 10:00 .ssh/
Cloud Foundryをデプロイ
Bosh CLIはインストール済みで、Bosh Directorにもログイン済みになっている。
making@bosh:~$ bosh target
Current target is https://10.0.0.4:25555 (bosh)
deploy_cloudfoundry.shの中でCloud Foundryのデプロイに必要なことをやってくれているので、実行するだけ。実行時にmanifestファイルを指定する必要があるが、これもexample_manifestsフォルダ内にシングルVM用とマルチVM用それぞれ用意してある。
ここでは練習用にできるだけ本番に近いマルチVM用のmanifestを利用する。
$ ./deploy_cloudfoundry.sh example_manifests/multiple-vm-cf.yml
可用性は不要で1 VMでとにかくCloud Foundry on Azureを試したい場合は、シングルVM用のスクリプトを使うと良い。その場合は次
$ ./deploy_cloudfoundry.sh example_manifests/single-vm-cf.yml
バックエンドサービス含めるとに20個ほどVMをつくることになるため、サポートに問い合わせて制限を30-50個くらいに上げてもらうのがよい。 ポータルから「ヘルプとサポート」→「新しいサポートリクエスト」でリクエストする。自分の場合は1日くらいかかったので、早めにやっておくと良い。

デプロイが終わったら(1時間くらい)、bosh vmsでデプロイされたVMを確認すると次のような結果になるはず。cellなどDiegoコンポーネントを含む17VMs。ログはこちら。
$ bosh vms
Acting as user 'admin' on 'bosh'
Deployment `multiple-cf-on-azure'

Director task 14

Task 14 done

+---------------------------------------------------------------------------+---------+-----+-------------+---------------+
| VM                                                                        | State   | AZ  | VM Type     | IPs           |
+---------------------------------------------------------------------------+---------+-----+-------------+---------------+
| access_z1/0 (74a1ab9d-32c9-46aa-9903-1430ed474249)                        | running | n/a | resource_z1 | 10.0.16.109   |
| api_z1/0 (47cffc4f-e68f-450f-ad55-e016b3ec7e01)                           | running | n/a | resource_z1 | 10.0.16.102   |
| brain_z1/0 (6a0ed991-b9ad-4743-b5c6-60eef37c1a51)                         | running | n/a | resource_z1 | 10.0.16.106   |
| cc_bridge_z1/0 (7001782d-97d4-48e0-a288-b49fe99e907e)                     | running | n/a | resource_z1 | 10.0.16.108   |
| cell_z1/0 (46f83357-a890-463d-9f34-ff6e37082a32)                          | running | n/a | resource_z1 | 10.0.16.107   |
| consul_z1/0 (eb86b16c-aee0-4711-8a4d-c1046e666d43)                        | running | n/a | resource_z1 | 10.0.16.16    |
| database_z1/0 (e42d51b8-2509-4aa6-a5de-c26ff161746c)                      | running | n/a | resource_z1 | 10.0.16.105   |
| doppler_z1/0 (facd13de-9e7e-4919-a21f-f8c25dcb76e0)                       | running | n/a | resource_z1 | 10.0.16.103   |
| etcd_z1/0 (0b0d0610-35e9-4a18-8861-3e5bd6c2bbb8)                          | running | n/a | resource_z1 | 10.0.16.14    |
| ha_proxy_z1/0 (b0e54bf1-20e8-4861-8ec6-3897a5e04177)                      | running | n/a | resource_z1 | 10.0.16.4     |
|                                                                           |         |     |             | 13.78.121.100 |
| loggregator_trafficcontroller_z1/0 (89e9789a-cf8d-481c-b4bd-e71de58947a3) | running | n/a | resource_z1 | 10.0.16.104   |
| nats_z1/0 (f7bfc395-4168-41ac-b40c-61810927baff)                          | running | n/a | resource_z1 | 10.0.16.13    |
| nfs_z1/0 (ab811af8-9e12-4f03-bede-cb6488ab13be)                           | running | n/a | resource_z1 | 10.0.16.15    |
| postgres_z1/0 (e0da4072-bff1-42a5-b6db-2d4e6876810a)                      | running | n/a | resource_z1 | 10.0.16.11    |
| route_emitter_z1/0 (dff8bc35-5020-4c62-a3b9-387d719e2546)                 | running | n/a | resource_z1 | 10.0.16.110   |
| router_z1/0 (50ec2d18-6971-49d2-bd14-d2b6946b18f0)                        | running | n/a | resource_z1 | 10.0.16.12    |
| uaa_z1/0 (f04a9a3d-3b70-4fbc-b52d-979f9064d905)                           | running | n/a | resource_z1 | 10.0.16.101   |
+---------------------------------------------------------------------------+---------+-----+-------------+---------------+

VMs total: 17

このままだとどれがどのVMかわからないので、列の選択で次の項目を選択すると良い。
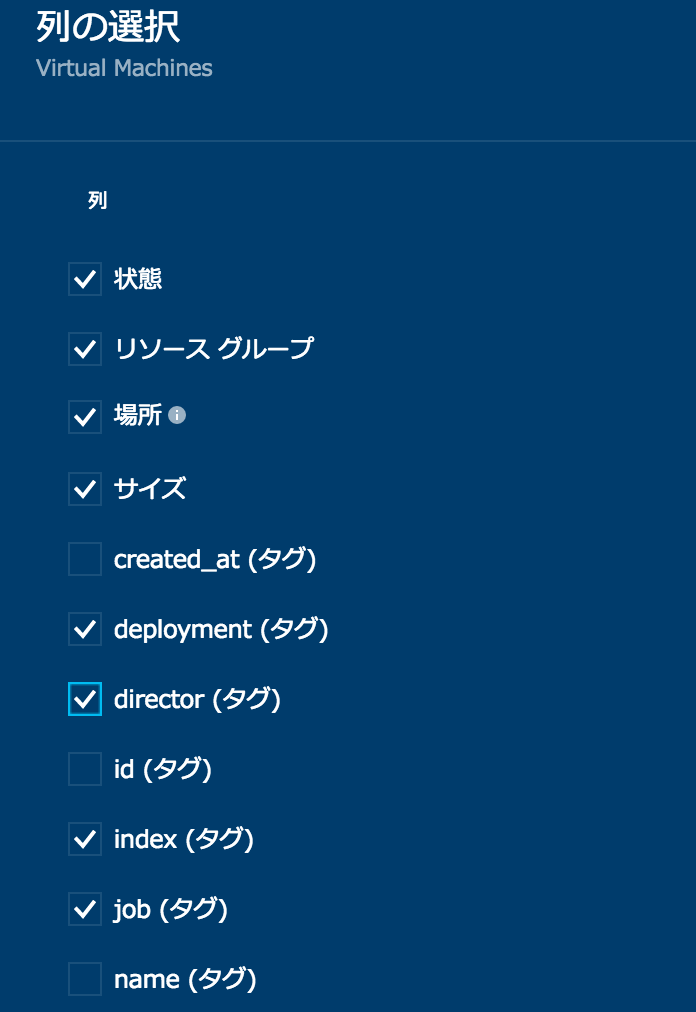
JOB列がコンポーネントの名前。

HA ProxyにパブリックIPが設定されている。manifestファイルをgrepすると以下のようにAPI URLとadminユーザーのパスワードがわかる。
$ grep api example_manifests/multiple-vm-cf.yml
- name: api_z1
      - name: api
        - "api.13.78.121.100.xip.io"
      api: api.13.78.121.100.xip.io
      api: api.13.78.121.100.xip.io
      api: api.13.78.121.100.xip.io
    bulk_api_password: c1oudc0w
    internal_api_password: c1oudc0w
    srv_api_uri: https://api.13.78.121.100.xip.io
    external_host: api
      02aN4KfOuGUiC3ivjaY3RrhcvybWGNhp8PK+hUYWnN8e6lyPDTo6kSgtapiSfCa3
  capi:
        base_url: https://api.13.78.121.100.xip.io
        base_url: https://api.13.78.121.100.xip.io
        base_url: https://api.13.78.121.100.xip.io
        base_url: https://api.13.78.121.100.xip.io
後はインターネット経由でcf loginできる 🙌
$ cf login -a https://api.13.78.121.100.xip.io --skip-ssl-validation -u admin -p c1oudc0w
$ cf create-space demo
$ cf target -s demo
$ cd /tmp
$ git clone https://github.com/making/hacker-tackle-demo.git
$ cd hacker-tackle-demo/hacker-tackle
$ cf push
$ curl -i hacker-tackle.13.78.121.100.xip.io
HTTP/1.1 200 OK
Content-Length: 1234
Content-Type: text/plain; charset=utf-8
Date: Wed, 14 Sep 2016 13:56:15 GMT
X-Vcap-Request-Id: 804a5469-de4d-4c2d-7e91-e850acf04926

0️⃣   0️⃣   0️⃣ 0️⃣     0️⃣ 0️⃣ 0️⃣  0️⃣    0️⃣  0️⃣ 0️⃣ 0️⃣   0️⃣ 0️⃣ 0️⃣
0️⃣   0️⃣  0️⃣   0️⃣   0️⃣       0️⃣   0️⃣   0️⃣       0️⃣    0️⃣
0️⃣ 0️⃣ 0️⃣  0️⃣ 0️⃣ 0️⃣   0️⃣       0️⃣ 0️⃣     0️⃣ 0️⃣     0️⃣ 0️⃣ 0️⃣
0️⃣   0️⃣  0️⃣    0️⃣  0️⃣       0️⃣   0️⃣   0️⃣       0️⃣    0️⃣
0️⃣   0️⃣  0️⃣    0️⃣   0️⃣ 0️⃣ 0️⃣  0️⃣    0️⃣  0️⃣ 0️⃣ 0️⃣   0️⃣    0️⃣

0️⃣ 0️⃣ 0️⃣ 0️⃣   0️⃣ 0️⃣     0️⃣ 0️⃣ 0️⃣  0️⃣    0️⃣  0️⃣       0️⃣ 0️⃣ 0️⃣
   0️⃣     0️⃣   0️⃣   0️⃣       0️⃣   0️⃣   0️⃣       0️⃣
   0️⃣     0️⃣ 0️⃣ 0️⃣   0️⃣       0️⃣ 0️⃣     0️⃣       0️⃣ 0️⃣
   0️⃣     0️⃣    0️⃣  0️⃣       0️⃣   0️⃣   0️⃣       0️⃣
   0️⃣     0️⃣    0️⃣   0️⃣ 0️⃣ 0️⃣  0️⃣    0️⃣  0️⃣ 0️⃣ 0️⃣   0️⃣ 0️⃣ 0️⃣
xip.ioはよくダウンするためcurl: (6) Could not resolve host: xxx.13.78.121.100.xip.ioというエラーが出たら、何度かリトライすると良い。
記事執筆時点でcf-release v238 (API version: 2.57.0)が使える。
アプリのデプロイはこの記事と同じ要領でOK。
ちなみにシングルVMのmanifestを使った場合はこんな感じ
$ bosh vms
Acting as user 'admin' on 'bosh'
Deployment `single-vm-cf-on-azure'

Director task 72

Task 72 done

+------------------------------------------------+---------+-----+-------------+---------------+
| VM                                             | State   | AZ  | VM Type     | IPs           |
+------------------------------------------------+---------+-----+-------------+---------------+
| cf_z1/0 (5662378e-b48c-4ee9-9ac0-f68dfea9d04a) | running | n/a | resource_z1 | 10.0.16.4     |
|                                                |         |     |             | 13.78.121.100 |
+------------------------------------------------+---------+-----+-------------+---------------+

VMs total: 1

独自ドメインを使う
xip.ioは流石にないので、独自ドメインを使う方法も紹介する。基本的には*.ドメイン名をロードバランサーに向ければ良い。
次の図はCloudFlareのDNSに*.azurecf.ik.amを設定する例。

~/example_manifests/multiple-vm-cf.yml 中の13.78.121.100.xip.ioをazurecf.ik.amに置換してbosh -n deploy。
アップデートが完了したらcf login -a https://api.azurecf.ik.am --skip-ssl-validation -u admin -p c1oudc0wでログインできるようになる。
最初にxip.ioを使ってインストールしているとdomainが登録済み担っている。
$ cf domains
Getting domains in org default_organization as admin...
name                   status
13.78.121.100.xip.io   shared
azurecf.ik.am          shared
不要なので削除。
$ cf delete-shared-domain -f 13.78.121.100.xip.io
Deleting domain 13.78.121.100.xip.io as admin...
OK
今後、cf pushすればazurecf.ik.amが使えるようになる。
$ cf push
Using manifest file /tmp/hacker-tackle-demo/hacker-tackle/manifest.yml

Updating app hacker-tackle in org default_organization / space demo as admin...
OK

Creating route hacker-tackle.azurecf.ik.am...
OK

Binding hacker-tackle.azurecf.ik.am to hacker-tackle...
OK

Uploading hacker-tackle...
Uploading app files from: /tmp/hacker-tackle-demo/hacker-tackle
Uploading 1.9K, 2 files
Done uploading
OK

Starting app hacker-tackle in org default_organization / space demo as admin...
Creating container
Successfully created container
Downloading app package...
Downloaded app package (979B)
Staging...
-------> Buildpack version 1.7.12
https://buildpacks.cloudfoundry.org/concourse-binaries/godep/godep-v74-linux-x64.tgz
https://buildpacks.cloudfoundry.org/concourse-binaries/glide/glide-v0.11.1-linux-x64.tgz
-----> Installing go1.7... done
Downloaded [https://buildpacks.cloudfoundry.org/concourse-binaries/go/go1.7.linux-amd64.tar.gz]
 !!    Installing package '.' (default)
-----> Fetching any unsaved dependencies (glide install)
[INFO]	Lock file (glide.lock) does not exist. Performing update.
[INFO]	Downloading dependencies. Please wait...
[INFO]	No references set.
[INFO]	Resolving imports
[INFO]	Downloading dependencies. Please wait...
[INFO]	Setting references for remaining imports
[INFO]	No references set.
[INFO]	Project relies on 0 dependencies.
-----> Running: go install -v -tags cloudfoundry .
github.com/making/hacker-tackle-demo/hacker-tackle
Exit status 0
Staging complete
Uploading droplet, build artifacts cache...
Uploading build artifacts cache...
Uploading droplet...
Uploaded build artifacts cache (66.5M)
Uploaded droplet (1.8M)
Uploading complete

1 of 1 instances running

App started


OK

App hacker-tackle was started using this command `hacker-tackle`

Showing health and status for app hacker-tackle in org default_organization / space demo as admin...
OK

requested state: started
instances: 1/1
usage: 8M x 1 instances
urls: hacker-tackle.azurecf.ik.am
last uploaded: Wed Sep 14 14:42:19 UTC 2016
stack: cflinuxfs2
buildpack: https://github.com/cloudfoundry/go-buildpack.git#v1.7.12

     state     since                    cpu    memory    disk      details
#0   running   2016-09-14 02:43:09 PM   0.0%   0 of 8M   0 of 1G

$ curl -i hacker-tackle.azurecf.ik.am
HTTP/1.1 200 OK
Content-Length: 1234
Content-Type: text/plain; charset=utf-8
Date: Wed, 14 Sep 2016 14:44:48 GMT
X-Vcap-Request-Id: 872c2957-df38-4b10-4c7d-194f24975b2b

0️⃣   0️⃣   0️⃣ 0️⃣     0️⃣ 0️⃣ 0️⃣  0️⃣    0️⃣  0️⃣ 0️⃣ 0️⃣   0️⃣ 0️⃣ 0️⃣
0️⃣   0️⃣  0️⃣   0️⃣   0️⃣       0️⃣   0️⃣   0️⃣       0️⃣    0️⃣
0️⃣ 0️⃣ 0️⃣  0️⃣ 0️⃣ 0️⃣   0️⃣       0️⃣ 0️⃣     0️⃣ 0️⃣     0️⃣ 0️⃣ 0️⃣
0️⃣   0️⃣  0️⃣    0️⃣  0️⃣       0️⃣   0️⃣   0️⃣       0️⃣    0️⃣
0️⃣   0️⃣  0️⃣    0️⃣   0️⃣ 0️⃣ 0️⃣  0️⃣    0️⃣  0️⃣ 0️⃣ 0️⃣   0️⃣    0️⃣

0️⃣ 0️⃣ 0️⃣ 0️⃣   0️⃣ 0️⃣     0️⃣ 0️⃣ 0️⃣  0️⃣    0️⃣  0️⃣       0️⃣ 0️⃣ 0️⃣
   0️⃣     0️⃣   0️⃣   0️⃣       0️⃣   0️⃣   0️⃣       0️⃣
   0️⃣     0️⃣ 0️⃣ 0️⃣   0️⃣       0️⃣ 0️⃣     0️⃣       0️⃣ 0️⃣
   0️⃣     0️⃣    0️⃣  0️⃣       0️⃣   0️⃣   0️⃣       0️⃣
   0️⃣     0️⃣    0️⃣   0️⃣ 0️⃣ 0️⃣  0️⃣    0️⃣  0️⃣ 0️⃣ 0️⃣   0️⃣ 0️⃣ 0️⃣
🙌
その他、.NETを使う方法やMySQL(▶️ 書きました)、DocumentDBなどAzureのサービスブローカーを使う方法(▶️ 書きました)、Azureのロードバランサーと連携する方法などはこちらを参照。
今回は各コンポーネントが1インスタンスずつと、冗長構成になっていないので注意。Hi-Availabilityを確保するためにはコンポーネント毎にこのくらいのインスタンス数が必要。cellは3インスタンス、routerは2インスタンスほしい。
またこの構成だとロードバランサー(HA Proxy)がネック。Azure Load BalancerはL7に対応していないので、ロードバランサーを冗長化するには Azure Load Balancer + multiple HA Proxyにしないといけない模様。